Plant Overview
Known as the Canary Rue or Ruda de Pinar, this sun-loving shrub is a rare gem native exclusively to the volcanic landscapes of the Canary Islands. It carries a powerful, pungent aroma that can fill a garden on a warm afternoon, a scent often described as a mix of citrus and bitter herbs. Shrouded in local folklore, it was once believed to ward off "mal de ojo" (the evil eye) and remains a symbol of the rugged, Macaronesian wilderness.
🔍 How to Identify
- 🌿 The Foliage: Unlike common Rue, its leaves are "pinnate"—finely divided into narrow, thread-like segments that give the plant a delicate, feathery appearance and a distinct blue-green hue.
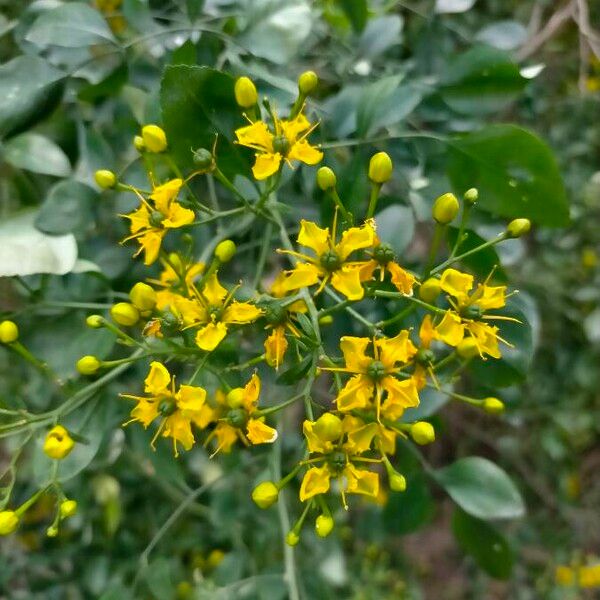
- 💛 The Blooms: It produces clusters of bright, sulfur-yellow flowers with four waxy petals, centered with a prominent green ovary that eventually turns into a textured seed capsule.
- 🪵 The Structure: This is a sub-shrub with a woody base that can reach up to 3 feet in height, maintaining a rounded, bushy habit that looks elegant even when not in bloom.
🏡 In Your Garden
- ☀️ Sun & Drainage: This plant is a specialist of rocky, volcanic slopes. In a garden setting, it demands "sharp drainage"—meaning it hates wet feet. Place it in the brightest spot possible to mimic its high-altitude island home.
- ✂️ Pruning Nuance: It is a slow-to-moderate grower. While it tolerates light pruning to maintain its shape, avoid cutting back into the old, hard wood, as it may struggle to push out new growth from the base.
⚠️ Safety & Toxicity
- 🚫 Photosensitivity Warning: Like many members of the Rutaceae family, the sap contains furanocoumarins. If the oil gets on your skin and is exposed to sunlight, it can cause severe blistering or "phytophotodermatitis." Always wear gloves when pruning.
- 🐾 Toxic to Pets: It is highly toxic if ingested by cats, dogs, or horses, causing gastrointestinal distress and potential neurological symptoms. Keep it out of reach of curious nibblers.
✨ Fun Fact
The specific epithet pinnata refers to its feather-like leaves, but in the Canary Islands, this plant is a vital part of the ecosystem; it is a primary food source for the caterpillars of the Canary Swallowtail butterfly (Papilio machaon gorganus), making it a must-have for local conservation gardens.

Detailed Care Instructions
To grow Ruta pinnata, also known as Fringed Rue or Herb of Grace, follow these steps:
- Obtain seeds or young plants: You can find seeds or young plants from local nurseries, online seed stores, or from other gardeners.
- Choose the right location: Ruta pinnata prefers a sunny location, but can also tolerate partial shade. It can tolerate a wide range of soil types but thrives in well-draining soil.
- Prepare the soil: Before planting, ensure the soil is rich in organic matter and well-draining. Remove any weeds or debris from the area where you plan to plant.
- Sow the seeds: If starting from seeds, sow them directly into the prepared soil in late winter or early spring. Lightly cover the seeds with soil, as they require light to germinate. Keep the soil lightly moist until the seedlings emerge.
- Plant the young plants: If using young plants, dig a hole slightly larger than the root ball. Place the plant in the hole, ensuring it sits at the same depth it was previously growing. Fill the hole with soil and gently firm it around the plant.
- Water regularly: Water the plant regularly to keep the soil evenly moist, but not waterlogged. Ruta pinnata prefers moist soil but can tolerate some drought once established.
- Mulch the soil: Apply a layer of organic mulch around the base of the plant to help conserve moisture and suppress weeds.
- Prune and maintain: Pruning is important to maintain the plant's shape and promote bushiness. Pinch back the growing tips regularly to encourage branching. Remove any dead or diseased stems as they appear.
- Protect from extreme cold: Ruta pinnata is hardy in USDA zones 6-10. In colder regions, provide winter protection by covering the plant with a layer of mulch or bringing it inside during freezing temperatures.
- Harvest and use: The leaves of Ruta pinnata can be harvested and used for culinary, medicinal, or aromatic purposes. Harvest the leaves as needed, taking care to trim only a portion of the plant at a time.
Remember to handle Ruta pinnata with caution, as it contains compounds that can cause skin irritation and photosensitivity.
To ensure the proper watering of Ruta pinnata, it is important to consider its specific requirements without mentioning its colloquial names. Here are some details on how to water this plant effectively:
- Study the Plant's Natural Habitat: Ruta pinnata usually thrives in regions with specific climatic conditions. Observe the natural growth patterns and water sources for the plant to understand its specific needs.
- Soil Moisture Check: Before watering the plant, check the moisture level of the soil using a moisture meter or by inserting your finger about an inch deep into the soil. Only water if the soil feels dry to the touch.
- Watering Frequency: The frequency of watering may vary depending on the climate and the season. During hot and dry periods, Ruta pinnata generally requires more frequent watering, while in cooler seasons, it may need less frequent watering.
- Watering Amount: When watering Ruta pinnata, ensure that the water penetrates the root zone, which is typically located below the surface. Water thoroughly and slowly to allow the water to soak in deeply, as shallow watering can lead to weak root development.
- Avoid Overwatering: Overwatering can be detrimental to the plant's health as it may cause root rot or other water-related diseases. Therefore, it is crucial to provide adequate water without saturating the soil excessively.
- Mulching: Apply a layer of organic mulch around the base of the plant, leaving a gap around the stem to prevent moisture loss through evaporation and aid in maintaining consistent soil moisture.
- Water Quality: Ruta pinnata prefers well-draining soil and does not thrive in waterlogged conditions. Ensure that the water used for irrigation is free from impurities, excess salts, or harmful chemicals that might be detrimental to the plant's health.
- Rainwater Collection: Whenever possible, consider collecting rainwater for irrigation purposes. Rainwater is usually free from chemicals such as chlorine, which can be harmful to the plant, and can help nourish Ruta pinnata effectively.
Remember, although these watering guidelines provide a general understanding of watering requirements for Ruta pinnata, it is always best to observe your individual plant's response and make adjustments accordingly.
- The best time to fertilize the Ruta Pinnata plant is in early spring, before new growth begins.
- Choose a balanced, slow-release fertilizer with equal parts nitrogen, phosphorus, and potassium. This will provide essential nutrients for its growth.
- Apply the fertilizer sparingly, following the recommended dosage on the package. Over-fertilizing can harm the plant.
- Gently work the fertilizer into the soil around the base of the plant, being careful not to damage the roots.
- Water the plant thoroughly after fertilizing to help the nutrients penetrate the soil and reach the roots.
- Avoid direct contact between the fertilizer and the plant's foliage to prevent burning or damage.
- Monitor the plant's response to the fertilizer. If you notice any signs of excessive growth, reduce the amount of fertilizer applied next time.
- It is recommended to fertilize the Ruta Pinnata plant every six to eight weeks during the growing season to support healthy growth.
When growing Ruta pinnata plants, it is important to choose the right type of soil that provides optimal growing conditions. The most suitable soil for Ruta pinnata is a loamy soil mix that is well-draining and rich in organic matter. This type of soil retains moisture while allowing excess water to drain away, preventing waterlogging that could lead to root rot.
The ideal pH range for Ruta pinnata is slightly acidic to neutral, around 5.5 to 7.5. Ensuring the soil falls within this pH range helps the plant to absorb nutrients effectively and support healthy growth.
Moreover, Ruta pinnata prefers soil that is moderately fertile. Adding organic matter, such as compost or well-rotted manure, to the soil before planting will enhance its fertility and nutrient content. This will provide a favorable environment for the Ruta pinnata plant to establish and thrive.
It is also important to ensure that the soil is well-aerated to promote root development and prevent waterlogging. This can be achieved by adding perlite or sand to the soil mix, improving its drainage capabilities.
In summary, the optimal soil for Ruta pinnata is a loamy soil mix that is well-draining, slightly acidic to neutral in pH, moderately fertile, and rich in organic matter. Providing these soil conditions will create an excellent foundation for the growth and development of Ruta pinnata plants.
To propagate Ruta Pinnata plant, you can follow these steps:
- Select a healthy mother plant: Choose a mature, healthy Ruta Pinnata plant from which you wish to take cuttings for propagation. Ensure that the plant is free from diseases, pests, and any physical damage.
- Gather the necessary materials: Get a clean, sharp pair of pruning shears or scissors, a clean and well-draining potting mixture, and small pots or propagation trays.
- Prepare the potting mixture: Ruta Pinnata prefers well-draining soil, so you can prepare a potting mixture by combining equal parts of perlite, peat moss, and sand. This mixture will provide good drainage and aeration while retaining moisture.
- Take cuttings: Identify healthy branches or shoots on the mother plant, preferably with no flower buds or flowers. Using the pruning shears or scissors, cut 4-6 inch long cuttings from the tips of the branches. Make sure to cut just below a leaf node as this is where new roots will form.
- Remove lower leaves: Gently remove the lower leaves from the cuttings, leaving only a few sets of leaves at the top. This will prevent excessive water loss and help direct energy towards root development.
- Create planting holes: Using a pencil or your finger, make planting holes in the potting mixture for the cuttings. Make sure the holes are deep enough to accommodate the lower half of the cuttings.
- Plant the cuttings: Dip the cut ends of the Ruta Pinnata cuttings into rooting hormone powder (optional) to encourage faster root development. Place each cutting into a planting hole, ensuring at least two nodes are covered with the potting mixture.
- Water the cuttings: Water the potted cuttings thoroughly, ensuring the potting mixture is evenly moist but not waterlogged. Place the pots or trays in a bright area with indirect sunlight, away from direct heat or cold drafts.
- Encourage root growth: Keep the potting mixture consistently moist by misting the cuttings or watering from the base. Maintain humidity by covering the pots or trays with a clear plastic bag or a propagator lid. This will create a greenhouse-like environment, promoting root growth.
- Monitor and care for the cuttings: Check the cuttings regularly for any signs of diseases or pests. Remove any decaying or infected parts promptly. After a few weeks, you should see new growth and roots developing, indicating successful propagation.
- Transplanting: Once the Ruta Pinnata cuttings have healthy root systems, usually after a few months, they can be transplanted into individual pots with standard potting soil or directly into the garden, depending on your preferences.
Remember to provide adequate care, including regular watering, sunlight, and protection from extreme weather conditions, to ensure the successful growth and establishment of your propagated Ruta Pinnata plants.


