Plant Overview
Often called the Birdeye Pearlwort, this tiny green architect is a master of disguise. Frequently mistaken for moss by casual observers, it creates dense, emerald carpets that thrive in the cracks of paving stones or damp lawn patches. While some gardeners battle it as a stubborn weed, others embrace its delicate texture as a soft, "living grout" that handles foot traffic with ease.
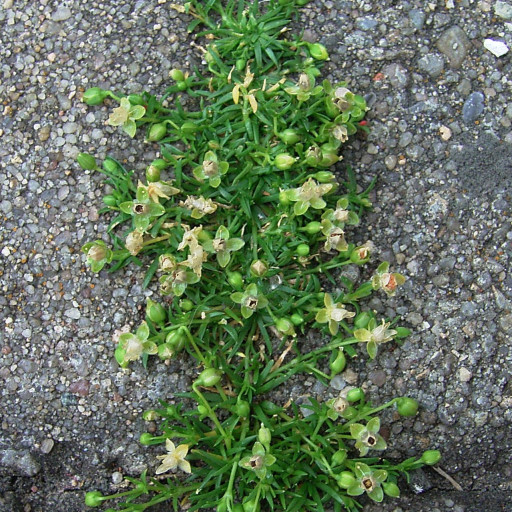
🔍 How to Identify
- 🌿 Leaf Texture: It features tiny, needle-like leaves that grow in opposite pairs along the stem, forming dense tufts that feel surprisingly soft to the touch.
- 🌼 The "Pearl" Bloom: The flowers are minuscule and greenish-white, often lacking petals or having very tiny ones; they resemble small pearls or "bird eyes" tucked into the foliage.
- 🏃 Growth Habit: This plant is prostrate, meaning it stays very low to the ground and spreads horizontally by rooting wherever its stems touch moist soil.
🏡 In Your Garden
- 💧 The Moisture Compass: If you see this plant popping up spontaneously, it’s telling you a story about your soil. It thrives in damp, compacted areas where other plants might struggle to breathe.
- 🧱 Pavement Specialist: Pearlwort is famous for its ability to grow in the narrowest gaps between bricks and flagstones. It acts as a natural weed suppressant in these tight spaces by forming a thick, competitive mat.
- 🌱 Seed Power: It is a prolific self-seeder. A single tiny plant can scatter hundreds of seeds, allowing it to "walk" across a patio or garden path over a single season.
⚠️ Safety & Toxicity
- ✅ Safe Status: Sagina procumbens is widely considered non-toxic and is safe to have around curious pets and children.
- 👟 Slippage Risk: While the plant itself isn't toxic, when grown on smooth garden steps or paths, its dense, moisture-retaining mats can become quite slippery when wet.
✨ Fun Fact
The genus name Sagina actually comes from the Latin word for "fattening." Historically, it was believed that certain species in this family were nutritious fodder for sheep, though you’d need a massive amount of this tiny plant to provide a decent snack!

Detailed Care Instructions
To grow Sagina Procumbens, also known as Irish Moss or Pearlwort, follow these steps:
- Select a suitable location: Sagina Procumbens prefers full sun to partial shade. Choose an area with well-drained soil that is slightly acidic to neutral pH.
- Prepare the soil: Loosen the soil and remove any rocks, weed, or debris. Mix in some organic matter, such as compost or peat moss, to improve drainage and fertility.
- Sow the seeds: You can start Sagina Procumbens from seeds or purchase young plants from a nursery. If using seeds, scatter them evenly over the prepared soil. Lightly press the seeds into the soil, but do not cover them as they need light to germinate. Water the seeds gently.
- Watering: Keep the soil consistently moist but not waterlogged. Water whenever the top inch of soil feels dry. Avoid overhead watering, as it can cause diseases. Water at the base of the plant or use a drip irrigation system.
- Fertilization: Sagina Procumbens is not a heavy feeder. If your soil is poor in nutrients, you can apply a balanced slow-release fertilizer in early spring. Follow the package instructions for the recommended dosage.
- Weeding: Regularly remove weeds that may compete with the Sagina Procumbens for nutrients and space. Be careful while weeding to avoid disturbing the shallow-rooted plants.
- Mulching: Apply a layer of organic mulch, such as shredded bark or straw, around the plants. Mulch helps retain moisture, suppress weed growth, and maintain a more even soil temperature.
- Pruning: Sagina Procumbens has a prostrate growth habit and spreads through creeping stems. You can trim or mow the plant to keep it tidy and prevent it from overcrowding or smothering other nearby plants.
- Winter care: Sagina Procumbens is hardy in USDA zones 4-10. In colder regions, it may benefit from a layer of winter mulch or a covering of frost cloth during extreme temperatures to provide some protection.
Following these guidelines, you will be able to successfully grow Sagina Procumbens and enjoy its lush, green moss-like appearance in your garden or landscape.

Place in a window with dappled sun or a spot in the middle of a room. Or directly in a window facing west or east.

To water this plant, it is important to maintain a consistent schedule. The soil should be kept moist, but not oversaturated. Water should be applied evenly across the soil surface, avoiding direct contact with the foliage. It is important to ensure that drainage is adequate to prevent waterlogging and the accumulation of excess moisture. Depending on the environmental conditions, the plant may require more or less water, so it is important to monitor the soil moisture and adjust the watering schedule accordingly. Additionally, choosing an appropriate pot or container with adequate drainage holes can help to ensure the health of the plant and prevent water-related complications.
To fertilize this plant, apply a slow-release, balanced fertilizer in the spring before new growth begins. You can also supplement with a liquid fertilizer once every two weeks during the growing season. Follow the manufacturer's recommended dosage and application instructions carefully. Avoid over-fertilizing, as this can lead to leaf burn or stunted growth. Water the plant before and after fertilizing to help distribute the nutrients evenly.
The best soil for Sagina Procumbens is a well-draining soil with a pH between 6.0 and 7.5. It prefers moist, slightly acidic soils that are rich in organic matter. Sandy loam or loamy soil is suitable for this plant. Soil that is too compact and heavy will hinder the growth of this plant. It is also important to avoid soils that are too alkaline or clay-like. A soil mix that contains perlite or vermiculite may be added to improve the drainage of the soil. Maintaining adequate soil moisture is important as this plant is vulnerable to drought stress.
To propagate this plant, first take a stem cutting that is around 3-4 inches in length. Remove any leaves from the bottom 1-2 inches of the stem. Dip the end of the stem in rooting hormone powder.
Prepare a pot with well-draining soil, then make a hole in the soil with a pencil or stick. Insert the stem cutting into the hole and lightly press the soil around it. Water the soil thoroughly but gently, ensuring that the water doesn't disturb the stem.
Place the pot in a well-lit area, but avoid direct sunlight. Keep the soil moist but not waterlogged. In a few weeks, check to see if there are any new roots growing from the stem cutting by gently tugging on it. If you feel resistance, it means that roots have formed.
Once the new plant has established roots, it can be transplanted into a larger pot or outside in a garden bed.


