Plant Overview
Known as the "Blue-leaved Willow" or "Bayberry Willow," this shrubby beauty is a champion of the Great Lakes and Northeastern shorelines. While it shares the lineage of the famous weeping willow, it stands firm with an upright, bushy habit that thrives where land meets water. It is often the unsung hero of wetlands, providing vital structure and a splash of cool color to damp landscapes.
🔍 How to Identify
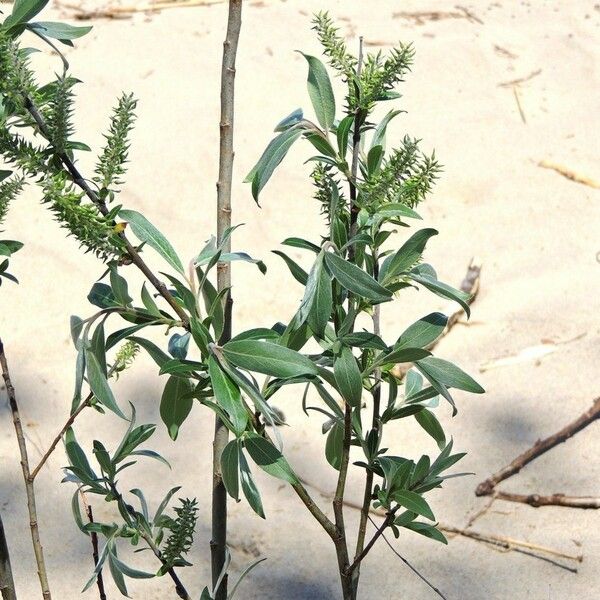
- 🍃 The Foliage: Leaves are lance-shaped with finely toothed edges. The most striking feature is the underside—a pale, waxy "glaucous" blue that contrasts beautifully with the dark green top.
- 🌾 The Catkins: In early spring, before the leaves fully emerge, it produces fuzzy, cylindrical flower clusters. These "pussy willows" are among the first signs of life in a waking landscape.
- 🪵 The Bark: The stems are typically smooth and vary from yellowish-brown to a deep, dusky purple-grey, providing visual interest even in the dead of winter.
🏡 In Your Garden
- 💧 The Water Bond: This willow is a true "water baby." It doesn’t just tolerate wet feet; it craves them. It is an elite choice for rain gardens, boggy patches, or stabilizing banks near ponds where the soil stays consistently moist.
- ☀️ Sun & Space: To maintain that vibrant blue-green foliage and a dense, bushy shape, give it plenty of sunlight. It is exceptionally hardy and wind-tolerant, making it a great natural screen for open, breezy properties.
- 🌱 Erosion Expert: Because of its aggressive and fibrous root system, it is frequently used in ecological restoration to hold sandy or rocky shorelines together against the force of waves and runoff.
⚠️ Safety & Toxicity
- ✅ Safe Status: Salix myricoides is generally considered non-toxic to humans, dogs, and cats. It does not possess thorns or caustic saps.
- 💊 Aspirin Connection: Like all members of the Salix family, the bark contains salicin, the chemical precursor to modern aspirin. While not dangerous to touch, the bark should not be chewed or ingested, especially by individuals with aspirin sensitivities or by pets.
✨ Fun Fact
Willow branches are incredibly flexible and resilient. The supple, straight stems of the Bayberry Willow have been used for centuries in traditional basket weaving and for creating the structural frames of dreamcatchers!

Detailed Care Instructions
To grow Salix myricoides, also known as western sandbar willow, follow these steps:
- Choose a suitable location: Salix myricoides thrives in full sun to partial shade. It prefers moist soil but can tolerate a wide range of growing conditions, including sandy or clay soil. Ensure the area has good drainage.
- Collect cuttings or seeds: You can propagate Salix myricoides through either cuttings or seeds. If using cuttings, select healthy stems from an existing plant. If using seeds, collect them from mature plants in late summer or early autumn.
- Prepare the soil: Clear any debris or weeds from the planting area and loosen the soil. Add organic matter, such as compost, to improve soil fertility and drainage.
- Propagate through cuttings: Dip the stem ends in a rooting hormone to encourage root development. Plant the stems in the prepared soil, burying them about halfway. Space the cuttings about 1-2 feet apart.
- Propagate through seeds: Plant the seeds directly into the soil in early spring when the ground has thawed. Scatter the seeds evenly and cover lightly with soil. Keep the soil moist until germination occurs.
- Watering and maintenance: Keep the soil consistently moist but not waterlogged. Water regularly, especially during dry spells, and add mulch around the base of the plants to retain moisture and control weeds. Prune back longer branches in early spring to promote bushier growth.
- Protect from pests and diseases: Salix myricoides is generally resistant to pests and diseases but may occasionally be susceptible to aphids or fungal infections. Monitor the plants regularly and take appropriate measures if any problems arise, such as using insecticidal soap for aphids or fungicides for fungal issues.
- Harvesting: Salix myricoides can be harvested for its stems, which can be used in crafts or as decorative accents. Cut the stems in late winter or early spring while the plant is dormant.
By following these steps, you should be able to successfully grow Salix myricoides in your garden or landscape.

Place in a bright room that is sun drenched almost all day. Or directly in a south-facing window.

Salix Myricoides is a plant that requires regular watering to thrive. It is important to water the plant deeply, ensuring that the water reaches the roots. This can be done by using a watering can or hose, and thoroughly saturating the soil around the plant.
The watering frequency depends on the climate and soil conditions. In general, Salix Myricoides should be watered once or twice a week during the growing season. However, in hot and dry conditions, it may require more frequent watering. It is important to avoid overwatering the plant, as it can lead to root rot and other issues.
To check if the soil is moist enough, insert a finger into the soil up to the first knuckle. If it feels dry, it is time to water the plant. It is also important to keep the soil consistently moist, as it can stress the plant if the soil dries out completely.
In addition to regular watering, it is important to ensure proper drainage to prevent waterlogging. This can be achieved by planting Salix Myricoides in well-draining soil or adding organic matter to improve drainage.
Overall, proper watering is essential for the health and growth of Salix Myricoides, ensuring that it thrives and remains healthy.
To properly fertilize this plant, it is important to use a slow-release fertilizer with a balanced N-P-K ratio. Apply the fertilizer evenly around the base of the plant, taking care not to let it touch the leaves or stems. Fertilize once in the early spring and again in the late summer to promote healthy growth. Water the plant deeply after fertilizing to ensure the nutrients are absorbed by the roots. Avoid over-fertilizing as this can damage the plant.
The ideal soil for this particular plant should be well-draining and nutrient-rich. It should preferably have a pH level between 5.5 and 7.5. A mix of sandy loam, peat moss, and compost would be suitable for this plant. The soil should also be kept moist but not waterlogged, as excessive watering can lead to root rot. Additionally, it is recommended to add some slow-release fertilizer to the soil to provide the plant with necessary nutrients over time.
To propagate this plant, you will need to obtain cuttings from a healthy plant. Use a sharp, clean pair of scissors or pruning shears to cut a stem from the plant at a 45-degree angle. The stem should be about 4-6 inches long, with several leaves attached. Remove any leaves on the lower half of the stem.
Next, prepare a pot with well-draining soil. You can use a mix of sand and peat moss or a commercial potting mix. Moisten the soil and make a hole in the center that is deep enough to accommodate the cutting.
Dip the cut end of the stem in rooting hormone powder, tapping off any excess. Insert the stem into the hole in the soil and gently press the soil around it to keep it stable. Water the cutting thoroughly.
Place the pot in a bright, warm location out of direct sunlight. Cover the pot with a clear plastic bag or a cloche to create a humid environment. This will help the cutting retain moisture and encourage root growth.
Check the cutting regularly for signs of growth and to ensure the soil stays moist but not wet. After several weeks, gently tug on the stem to see if it resists. If it does, roots have formed, and you can remove the cover and transplant the new plant into a larger container or outdoors.
With proper care and attention, your new Salix Myricoides plant will grow into a beautiful addition to your garden.


