Plant Overview
Known as the "Fragrant Sage" or "Cleveland Sage," this plant is the undisputed scent queen of the California chaparral. Just brushing against its silvery leaves releases an intense, earthy aroma that can perfume an entire garden on a warm afternoon. It is a rugged survivor, famous for its architectural "pom-pom" flowers and its ability to thrive where other plants wither.
🔍 How to Identify
- 🍃 Foliage: The leaves are small, narrow, and textured with a wrinkly (rugose) surface. They sport a sophisticated dusty grey-green color that reflects harsh sunlight.
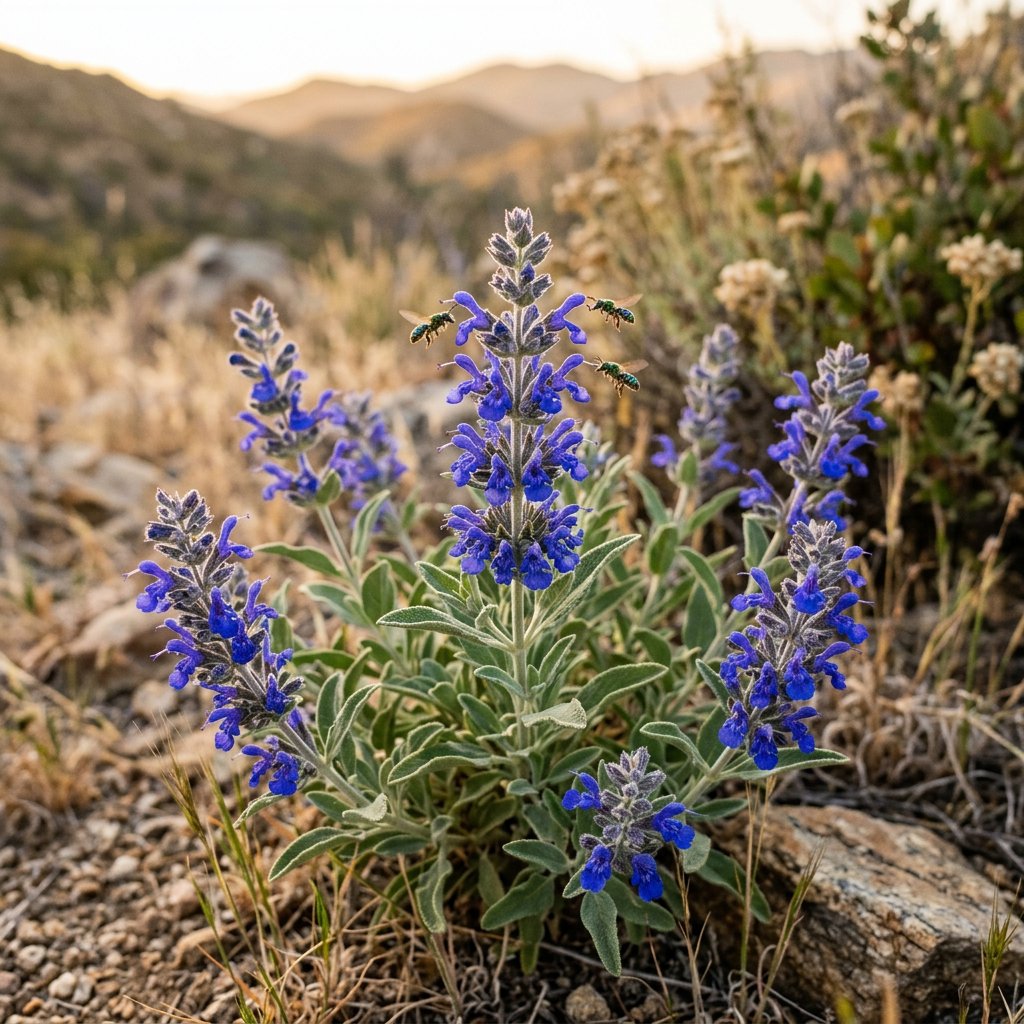
- 🔮 Flower Whorls: The flowers are truly unique, growing in 2 to 3 distinct, tiered "balls" or whorls along the stem rather than a continuous spike.
- 💜 Electric Blooms: The tubular flowers are a vibrant amethyst-purple or deep blue, often emerging from dark, smoky-purple husks (calyxes).
🏡 In Your Garden
- 🏜️ Drainage is Vital: Salvia clevelandii has a "death before wet feet" policy. It evolved in rocky, sloped soils, so it needs gritty earth and very little water once established. In fact, watering it too much in the summer can actually shorten its lifespan.
- 🦋 The Pollinator Hub: If you plant this, expect a crowd. It is one of the most effective plants for attracting hummingbirds, clearwing moths, and native bees, who are all drawn to its high-octane nectar.
⚠️ Safety & Toxicity
- ✅ Generally Safe: This sage is non-toxic to humans and is not listed as a poisonous plant for dogs or cats by the ASPCA.
- 👃 Sensory Note: While safe, the fragrance is incredibly potent. For sensitive individuals or those with allergies, the strong volatile oils in the leaves can occasionally cause a mild headache if the plant is kept in an enclosed, unventilated space.
✨ Fun Fact
Native to a very small region in Southern California and Baja, this plant was named after Daniel Cleveland, a 19th-century lawyer and amateur botanist who helped found the San Diego Society of Natural History. Its dried stems are often used in "smudge sticks" as a sweet-smelling alternative to Common White Sage.

Detailed Care Instructions
| Humidity | Dry |
| Lighting | Full Sun |
| Difficulty | Easy |
| Hibernation | Cold Period |
| Temperature | 22°C - 32°C |
| Hardiness Zones | 9 - 11 |
To grow Salvia clevelandii, also known as Cleveland sage, follow these steps:
- Choose the right location: Salvia clevelandii thrives in full sunlight, so select a spot in your garden or yard that receives at least 6-8 hours of direct sunlight per day.
- Prepare the soil: Salvia clevelandii prefers well-draining soil. Amend the soil with organic matter like compost to improve drainage and fertility. The pH should be slightly acidic to neutral (around 6.5-7.5).
- Planting: Dig a hole that is slightly larger than the pot size of the plant. Place the plant in the hole and backfill with soil. Ensure the top of the root ball is level with or slightly above the soil surface. Water the newly planted sage thoroughly.
- Watering: Salvia clevelandii is drought-tolerant once established, but it needs regular watering during the initial growth phase. Water deeply but infrequently, allowing the soil to dry out between watering sessions. Once established, water sparingly to mimic natural rainfall patterns.
- Mulching: Apply a layer of organic mulch, such as wood chips or straw, around the base of the plant to help retain soil moisture, suppress weed growth, and regulate soil temperature.
- Pruning: Salvia clevelandii benefits from occasional pruning to maintain its shape and encourage bushiness. After the flowering season has ended, trim back the stems by about one-third to promote new growth.
- Fertilizing: Salvia clevelandii generally doesn't require much fertilization. However, you can apply a balanced organic fertilizer in spring to provide nutrients for vigorous growth. Follow the package instructions for the recommended amount and frequency.
- Pests and diseases: Salvia clevelandii is generally resistant to pests and diseases. However, keep an eye out for signs of aphids, spider mites, or powdery mildew. If necessary, treat with insecticidal soap or neem oil, following the product instructions.
- Propagation: Salvia clevelandii can be propagated from seeds or stem cuttings. Collect seeds from mature plants in late summer or autumn and sow them in well-draining soil indoors. For stem cuttings, take a 3-4 inch cutting, remove the lower leaves, dip the cut end in rooting hormone, and plant it in a pot with a well-draining growing medium.
With proper care and attention, your Salvia clevelandii plant should grow and thrive, offering beautiful flowers and a delightful fragrance to your garden.

Place in a window with dappled sun or a spot in the middle of a room. Or directly in a window facing west or east.

Salvia Clevelandii plant is a type of flowering shrub that requires consistent watering to thrive. To water this plant, you should aim to keep the soil evenly moist but not waterlogged. One way to achieve this is to water deeply once a week, allowing the water to soak in deeply before watering again. Be careful not to splash water onto the leaves or flowers, which can lead to fungal diseases.
It's important to note that the water requirements of the Salvia Clevelandii plant will vary depending on the climate and soil conditions. In hot, dry climates, you may need to water more frequently to prevent the soil from drying out completely. On the other hand, in cooler or more humid conditions, you may need to reduce watering to avoid waterlogged soil.
To ensure that your Salvia Clevelandii plant is getting the right amount of water, monitor the soil moisture regularly by sticking your finger into the soil. If it feels dry about 1-2 inches below the surface, it's time to water again. Additionally, you can use a moisture meter to get a more accurate reading of the soil moisture level.
Overall, watering Salvia Clevelandii plant is fairly straightforward - aim for even, consistent moisture and adjust the frequency based on the climate and soil conditions. With proper watering and care, this beautiful flowering plant can thrive and add color and fragrance to your garden.
To fertilize this particular plant, use a balanced, all-purpose fertilizer with an N-P-K ratio of 10-10-10 or 20-20-20. Apply the fertilizer at the beginning of the growing season in the spring, and then again halfway through the growing season, around mid-summer. Mix the fertilizer with water according to the manufacturer's instructions, and apply it to the soil around the base of the plant. Be careful not to apply too much fertilizer, as this can damage the plant.
The ideal soil for the plant should be well-draining and moderately fertile with a neutral to slightly alkaline pH. The plant prefers soils that are sandy or rocky in texture, and it may struggle in heavy clay soils. It is best to avoid soils that are consistently wet or poorly drained, as this can lead to root rot. Adding organic matter to the soil can also help to improve fertility and drainage. Overall, the key is to provide a soil that promotes good root growth and allows for adequate drainage.
The propagation of this plant can be achieved through stem cuttings that measure around five inches in length. These cuttings should be taken from the parent plant, making sure to select healthy, mature stems that have not yet produced flowers.
Once the cuttings have been gathered, remove all the leaves from the bottom two inches of the stem, making sure to leave only a few leaves on top. Dip the cut end of each stem in rooting hormone to increase the chances of successful rooting.
Next, fill a small pot with well-draining soil and moisten it slightly. Make a hole roughly two inches deep and place the cut end of the stem into the hole. Firmly press the soil around the stem to establish good contact and eliminate air pockets.
The pot should then be placed in a warm, brightly lit area but out of direct sunlight. Water the cutting every few days, but make sure to avoid overwatering, which can cause rot.
In a few weeks, roots should appear from the bottom of the stem, and new growth should emerge from the top. Once the cutting has established a robust root system, it can be transplanted into a larger container or directly into the garden.
Common pests of the fragrant sage include Spider mites, aphids, whiteflies. Make a habit of checking your fragrant sage frequently for pests so that any infestations can be caught and managed early.


