Plant Overview
Often called Jupiter’s Distaff or Sticky Sage, Salvia glutinosa is a woodland wanderer that breaks the typical "sun-loving" rule of the Sage family. Native to the shady forests of Europe and West Asia, this perennial is beloved for its unusual pale-yellow blooms and its remarkably "tacky" personality. It’s the perfect choice for those tricky, damp corners of the garden where other plants might struggle.
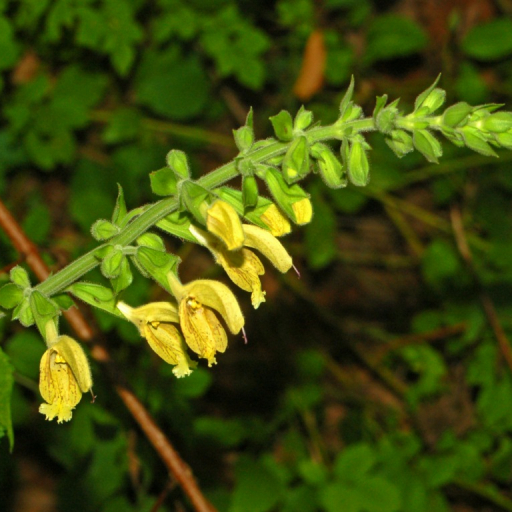
🔍 How to Identify
- 💛 The Flowers: Unlike the common purple sages, this variety produces hooded, pale-yellow flowers marked with delicate maroon or brown streaks on the "lip."
- 🍃 The Foliage: The leaves are large, bright green, and shaped like arrowheads (hastate) with serrated edges.
- 🕸️ The "Sticky" Factor: The entire plant is covered in glandular hairs that secrete a sticky, resinous substance. If you touch the stems, your fingers will feel like they’ve encountered mild adhesive!
🏡 In Your Garden
- 🌳 The Shade Seeker: While most Salvias crave baking sun, Salvia glutinosa thrives in partial to full shade. It mimics its natural forest floor habitat, making it an excellent companion for ferns and hostas.
- 💧 Moisture Matters: This plant hates drying out. It prefers rich, humusy soil that stays consistently moist. If it gets too dry, the large leaves will wilt quickly to let you know it’s thirsty.
- 🐝 Pollinator Magnet: Despite the sticky stems (which actually act as a defense against crawling "nectar thieves" like ants), bees and hoverflies absolutely adore the nectar-rich yellow blossoms.
⚠️ Safety & Toxicity
- ✅ Safe for All: Salvia glutinosa is generally considered non-toxic to humans, dogs, cats, and horses.
- 🧤 Tactile Note: While not poisonous, the "glutinous" resin on the stems can be a bit messy. It may pick up dust, pet hair, or small gnats, so you might want to wear gloves when pruning to keep your hands clean.
✨ Fun Fact
In ancient times, this plant was nicknamed "Jupiter's Distaff" because its tall, sturdy flower spikes resembled the tool used for spinning wool (a distaff). Its scientific name, glutinosa, literally translates to "glue-like."

Detailed Care Instructions
To grow Salvia Glutinosa, also known as sticky sage or sticky salvia, follow these guidelines:
- Climate: Check if your region has a suitable climate for growing Salvia Glutinosa. It prefers Mediterranean climates, with warm, dry summers and mild, wet winters.
- Choose the Right Location: Select a location in your garden that receives full sun to partial shade. Salvia Glutinosa benefits from at least six hours of direct sunlight per day.
- Soil Preparation: The plant prefers well-draining soil that is fertile and slightly acidic. Sandy, loamy, or clay soils can work, but make sure to improve drainage if necessary. Mix in organic compost to enrich the soil.
- Sowing Seeds: Salvia Glutinosa can be grown from seeds, which can be sown directly in the garden bed during spring or fall. Sow the seeds at a depth of one-eighth inch and keep the soil moist until germination occurs.
- Watering: During the initial growth stage, keep the soil consistently moist but avoid overwatering, as it could lead to root rot. Once the plant is established, it becomes more drought-tolerant, but regular watering during dry spells is still necessary.
- Mulching and Weeding: Apply a layer of organic mulch around the plant to retain moisture and suppress weed growth. Regularly remove any competing weeds to avoid competition for nutrients.
- Pruning: Prune the plant after flowering to encourage bushier growth. Trim back any dead or damaged stems or spent flowers throughout the growing season to maintain the plant's appearance.
- Fertilization: Once or twice during the growing season, apply a balanced, slow-release fertilizer according to the package instructions. Avoid using excessive amounts of nitrogen, as it promotes leaf growth over flower production.
- Pests and Diseases: Salvia Glutinosa is relatively resistant to pests and diseases. However, occasional aphids or powdery mildew may appear. Monitor the plant regularly and treat any issues with appropriate organic or chemical controls if necessary.
- Propagation: If you want to propagate the plant further, you can take semi-ripe cuttings from the Salvia Glutinosa in late summer or early fall. Dip the cut end in rooting hormone and plant it in a well-draining, soil-based compost mix.
Remember that Salvia Glutinosa is a perennial plant, which means it will come back year after year. By providing the right conditions, care, and maintenance, you can enjoy the beautiful blooms and aromatic foliage of Salvia Glutinosa in your garden.

Place in a window with dappled sun or a spot in the middle of a room. Or directly in a window facing west or east.

To water this plant, you should first check the soil moisture level by sticking your finger or a moisture meter into the soil. If it feels dry to the touch, it's time to water. When watering, aim for the soil at the base of the plant rather than the leaves, as wet foliage can lead to disease. Water slowly and deeply to allow the water to penetrate the root zone. Avoid overwatering, as this can lead to root rot. It is best to water in the morning or evening when temperatures are cooler, as this will allow the water to soak in properly and reduce evaporation.
To fertilize this plant, begin by selecting a balanced fertilizer with equal parts nitrogen, phosphorus, and potassium. Dilute the fertilizer according to the instructions on the package and apply it to the soil around the base of the plant, being careful not to get any on the leaves or stems. Water the plant deeply after fertilizing to ensure the nutrients are absorbed into the soil. Repeat the fertilization process every 4-6 weeks during the growing season, but reduce the frequency during the fall and winter months. Avoid over-fertilizing, as this can cause damage to the plant and reduce its overall health.
The ideal soil for this plant should be well-draining and rich in organic matter. It should have a slightly acidic pH ranging from 6.0 to 6.5. The soil should also be able to retain moisture, but not become waterlogged as this can lead to root rot. It is recommended to avoid soils with high levels of clay as they can cause the roots to suffocate. The plant grows best in full sun to partial shade, so the soil should be able to support these conditions. Adding compost or aged manure can improve the quality of the soil and provide essential nutrients to the plant.
To propagate this plant, you will need to start by taking stem cuttings. Use a sharp, clean pair of scissors to carefully cut a stem that is about 4-6 inches long. Remove any leaves or flowers from the lower half of the stem, leaving only a few leaves at the top.
Next, prepare a container with well-draining soil and moisten it lightly. Create a small hole in the soil and gently insert the stem cutting. Make sure that the soil is in contact with the stem and press it down gently to hold it in place.
Cover the container with a plastic bag or dome to create a humid environment. Place the container in a warm, bright location, but avoid direct sunlight.
Check the soil moisture regularly and mist the cutting if it starts to dry out. After a few weeks, the cutting should start to develop new growth and roots. Once the plant has established roots, you can transplant it into a larger container or into the garden.
Remember to provide the new plant with plenty of light and water regularly as it establishes itself in its new environment.


