Plant Overview
Known as Munz’s Sage or San Diego Sage, this hardy evergreen shrub is a local celebrity of the Southern California and Baja coastal scrub. It acts like a more compact, refined cousin of the common Black Sage, offering a tidier look for gardeners who want that wild, chaparral aesthetic without the unruly overgrowth. It is a resilient survivor, evolved to endure the salty breezes and sun-drenched slopes of the Pacific coast.
🔍 How to Identify
- 🌿 Compact Growth: Unlike many sprawling wild sages, Munz’s Sage maintains a neat, rounded mounding habit, typically staying under 3 feet tall.
- 🍃 Pebbled Foliage: The leaves are small, narrow, and dark green with a distinctively "crinkled" or rugose texture that helps the plant retain moisture.
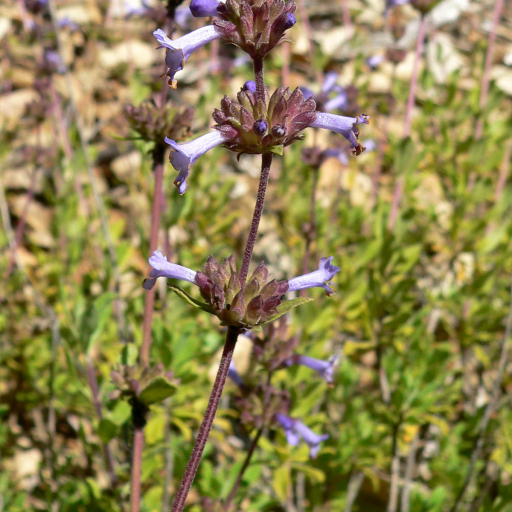
- 🪻 Electric Blooms: In late winter and spring, it produces tight clusters of small but intensely pigmented blue to violet-blue flowers that stand out sharply against the dark leaves.
🏡 In Your Garden
- ☀️ The Sun Worshipper: This plant thrives in the "hot spots" of your garden. It requires full sun and exceptionally well-draining soil; it "hates wet feet" and will suffer if planted in heavy clay that stays soggy.
- 💧 Summer Dormancy: To survive California’s dry spells, this sage often goes semi-dormant in the peak of summer. Resist the urge to overwater during this time, as too much summer moisture can lead to root rot.
- 🐝 Pollinator Magnet: If you want a garden buzzing with life, this is your plant. Its nectar is a primary food source for hummingbirds, native bees, and butterflies during the early spring lean months.
⚠️ Safety & Toxicity
- ✅ Non-Toxic: Munz’s Sage is generally considered safe and non-toxic for humans, dogs, and cats. It is a "friendly" addition to family backyards.
- 👃 Scent Sensitivity: While not toxic, the foliage is highly aromatic, releasing a strong, pungent herbal scent when brushed. Most find it refreshing, but it may be overwhelming for those with high fragrance sensitivities.
✨ Fun Fact
This plant is named after Philip A. Munz, a world-renowned botanist and former director of the Rancho Santa Ana Botanic Garden, who spent his life documenting the unique flora of California. It is a "narrow endemic" species, meaning its natural range is restricted to a very small strip of coastline near the US-Mexico border!

Detailed Care Instructions
To grow Salvia Munzii, which is a species of sage, follow these steps:
- Obtain seeds or seedlings: Salvia Munzii is a rare plant, so it may be difficult to find seeds or seedlings. Try searching online or contacting local native plant nurseries for availability.
- Choose a suitable location: Salvia Munzii prefers sunny spots with well-draining soil. Ensure the area receives at least six hours of direct sunlight per day.
- Prepare the soil: Before planting, loosen the soil and remove any weeds or debris. Add organic matter such as compost or peat moss to improve drainage and fertility.
- Plant the seeds or seedlings: If starting from seeds, sow them in the prepared soil following the packet instructions. If using seedlings, dig a hole slightly larger than the root ball and place the plant in it, ensuring the top of the root ball is level with the soil surface.
- Water regularly: Keep the soil evenly moist but not waterlogged. Salvia Munzii prefers moderate watering, so it's essential to avoid both drought and overwatering.
- Mulch around the plant: Apply a layer of organic mulch around the base of the plant to help retain moisture and regulate soil temperature.
- Prune if needed: You can prune Salvia Munzii to shape the plant or remove dead or damaged parts. Pruning also encourages bushier growth and increased flower production.
- Fertilize sparingly: Salvia Munzii doesn't require heavy fertilization. If necessary, apply a balanced slow-release fertilizer once in early spring and again in mid-summer according to the package instructions.
- Protect from extreme temperatures: Salvia Munzii is a native California plant and may not tolerate extreme cold or heat. If you live in an area with temperature extremes, consider protecting the plant during particularly harsh periods.
- Monitor for pests and diseases: Keep an eye out for common garden pests like aphids or spider mites. If necessary, use organic or chemical insecticides to control infestations.
Salvia Munzii can be a challenging plant to grow, but with proper care and attention, you can enjoy its beautiful flowers and unique foliage in your garden.

Place in a bright room that is sun drenched almost all day. Or directly in a south-facing window.

1. Determine the appropriate soil type: The soil for Salvia Munzii plant should be well-drained and slightly acidic. It is best to use a soil mixture of sand, perlite, and peat moss to ensure proper moisture retention and sufficient aeration.
2. Establish a watering schedule: Salvia Munzii should be watered deeply and infrequently to avoid waterlogging the soil. It is recommended to water the plant once a week during the growing season and reduce the frequency to every two weeks during the dormant period.
3. Check soil moisture: Before watering, check the soil moisture by inserting a finger or a moisture meter into the soil. Water only if the soil is dry to the touch, as over-watering can lead to root rot.
4. Use the right watering method: When watering Salvia Munzii, use a gentle stream of water to avoid disturbing the soil and damaging the plant. Water the plant at the base, avoiding the leaves and flowers.
5. Adjust watering based on environmental conditions: The amount of water needed for Salvia Munzii may vary depending on environmental conditions such as temperature and humidity. During hot and dry weather, increase the frequency of watering to prevent the soil from drying out.
6. Monitor for signs of over or under-watering: Keep an eye out for signs of over and under-watering, including wilting, yellowing of leaves, and stunted growth. Adjust watering accordingly to prevent any damage to the plant.
To fertilize this plant, use a balanced slow-release fertilizer in the spring when new growth appears. Apply according to the package instructions, taking care not to over-fertilize. During the growing season, you can also use a water-soluble fertilizer every 4-6 weeks, following the manufacturer's instructions. Avoid fertilizing in the fall and winter when the plant is dormant.
There are a few important factors to consider when choosing soil for Salvia Munzii plants. First, it's important to note that this plant is native to a specific region and soil type, so replicating those conditions is ideal. The soil should be well-draining, as the plant does not like wet feet. It should also be nutrient-rich, but not highly fertile. A sandy loam or rocky soil is ideal. Organic matter such as compost or decomposed leaves can be added to improve soil texture and fertility. pH levels should be slightly acidic to neutral, around 6.0-7.0. Overall, the soil should be loose, light, and well-aerated to allow for optimal root development.
To propagate this plant, you will need to take cuttings from the main plant. Use a clean, sharp pair of pruning shears to cut a piece of stem that is about 3-4 inches long, making sure to include at least two leaf nodes. Remove the lower leaves from the stem, leaving just a few at the top. Dip the cut end of the stem into rooting hormone and shake off any excess.
Next, prepare a pot or tray with a well-draining soil mix, such as a 50/50 blend of perlite and peat moss. Make a hole in the soil and insert the stem, firming the soil around it so that it stands upright. Water the cutting lightly and cover the pot or tray with a plastic bag or dome to create humidity. Place the pot or tray in a warm, bright location, but out of direct sunlight.
Monitor the cutting over the next few weeks, watering lightly as needed to keep the soil moist but not soaked. After a few weeks, gently tug on the stem to see if it has developed roots. Once you feel resistance, the cutting has rooted and can be gradually acclimated to lower humidity and brighter light conditions. After a few more weeks, the new plant should be ready to transplant into its own pot or into the garden.


