Plant Overview
Known affectionately as the "Woodland Sage" or "Balkan Clary," Salvia nemorosa is the backbone of the modern perennial garden. Its sturdy, upright spikes of deep violet-purple have a mystical quality, especially when planted in large drifts that sway in the summer breeze. Native to Europe and Western Asia, this plant is a favorite for those who want high-impact color without the high-maintenance drama.
🔍 How to Identify
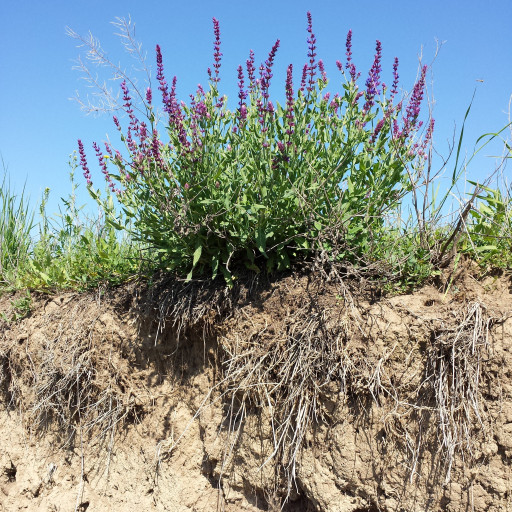
- 💜 The Flowers: Look for dense, slender spikes (racemes) crowded with tiny, two-lipped tubular flowers. They are typically deep violet or indigo, though pink and white cultivars exist.
- 🍃 The Foliage: The leaves are oblong, grayish-green, and have a distinctive wrinkled or "pebbly" texture. When crushed, they release a pungent, herbal scent reminiscent of kitchen sage.
- 📏 The Structure: It grows in tidy, mounding clumps with square stems—a classic hallmark of the mint family (Lamiaceae).
🏡 In Your Garden
- 🐝 Pollinator Party: This plant is essentially a neon sign for bees, butterflies, and hummingbirds. If you want a garden that hums with life, this is your primary candidate.
- ✂️ The "Chelsea Chop": To keep the plant from looking "leggy" or flopping over, many gardeners cut it back halfway in late spring. After the first heavy bloom in early summer, shearing off the spent flower spikes will often trigger a second, smaller wave of flowers in the fall.
- 💧 Drainage is Vital: While it is incredibly drought-tolerant once established, it cannot stand "wet feet." In heavy clay soils, it may struggle or suffer from root rot during winter; adding grit or planting in raised beds solves this beautifully.
⚠️ Safety & Toxicity
- ✅ Pet & Human Friendly: Salvia nemorosa is generally considered non-toxic to dogs, cats, and horses. It is a safe choice for families with curious pets or toddlers.
- 🌿 Deer & Rabbit Resistant: Because of its strong aromatic oils, most garden "critters" find the taste off-putting and will usually leave it alone in favor of tastier snacks.
✨ Fun Fact
The name Salvia comes from the Latin word "salvere," which means "to heal" or "to be healthy." While its cousin Salvia officinalis is the one used in your Thanksgiving stuffing, Salvia nemorosa carries that same hardy, life-giving lineage in its DNA!

Detailed Care Instructions
To grow Salvia Nemorosa plants, follow these steps:
- Choose a suitable location: Salvia Nemorosa thrives in full sun and well-draining soil. Choose a location with at least six hours of direct sunlight each day.
- Prepare the soil: Salvia Nemorosa prefers loamy or sandy soil with good drainage. Amend the soil with organic matter, such as compost, to improve its texture and fertility.
- Select healthy plants: Purchase Salvia Nemorosa plants from a reputable nursery or start them from seeds. Choose healthy plants with lush foliage and no signs of disease or pest damage.
- Planting: Dig a hole in the prepared soil that is slightly larger than the root ball of the plant. Place the plant in the hole, ensuring that the top of the root ball is level with the surrounding soil. Backfill the hole with soil, gently firming it around the plant.
- Watering: After planting, thoroughly water the Salvia Nemorosa plants to settle the soil and encourage root establishment. Water regularly, especially during dry periods, but avoid overwatering, as it can cause root rot.
- Mulching: Apply a layer of organic mulch, such as wood chips or straw, around the base of the plants. Mulching helps retain moisture, suppresses weed growth, and regulates soil temperature.
- Pruning: Salvia Nemorosa benefits from regular pruning to promote bushier growth and extend its blooming period. Cut back the plants by about one-third after the first flush of flowers. Deadhead spent flowers to encourage new blooms.
- Fertilizing: Salvia Nemorosa typically doesn't require heavy fertilization. However, you can apply a balanced slow-release fertilizer in spring to provide essential nutrients.
- Pests and diseases: Salvia Nemorosa is generally resistant to pests and diseases. However, keep an eye out for potential issues such as powdery mildew, aphids, or spider mites. Treat any problems promptly using organic insecticides or fungicides if necessary.
- Division and propagation: Salvia Nemorosa plants can be divided in early spring or early fall to propagate new plants. Carefully dig up the entire plant and divide it into clumps, ensuring that each clump has several healthy shoots and roots. Replant the divisions in prepared soil.
By following these guidelines, you can successfully grow and enjoy Salvia Nemorosa plants in your garden.

Place in a bright room that is sun drenched almost all day. Or directly in a south-facing window.

Watering for the plant commonly known as Salvia Nemorosa should involve providing it with an adequate amount of water while avoiding over-watering, and it should be done at the base of the plant to prevent moisture accumulation on the leaves. The watering frequency should also depend on the type of soil and the weather conditions, with the plant requiring more water during dry spells. Additionally, it is suggested to allow the top layer of soil to dry out before watering again, which helps to promote healthy root development while preventing water-logging and disease. Overall, proper watering practices are essential to maintain the health and vitality of the Salvia Nemorosa plant.
To fertilize this plant, use a balanced fertilizer (10-10-10) in early spring before new growth appears. Follow the instructions on the package for application rates. Do not over-fertilize as it can cause the plant to become leggy and produce fewer blooms. Water the fertilizer in thoroughly after application.
Salvia Nemorosa is a perennial plant that requires soil that is well-draining and has good aeration. It prefers soil that is fertile, rich in organic matter, and slightly acidic to neutral in pH. The soil should not be waterlogged or too moist as this can cause root rot and other issues. A sandy loam or loam soil that has been amended with compost or other organic matter is ideal for growing Salvia Nemorosa. It is important to ensure that the soil is prepared properly before planting as this will greatly impact the plant's health and growth. Adding a layer of mulch around the base of the plant can help to retain moisture and prevent weeds from growing.
To propagate this particular plant, first, choose healthy and robust stems. Cut the stems from the mother plant using a sharp, sterile pair of garden shears. Ensure that each cutting has at least two to three nodes, which are the points where the leaves meet the stems.
Strip the leaves from the lower two-thirds of the cutting, leaving only a few leaves at the top of the stem. Dip the cut end of the stem into rooting hormone powder to encourage the growth of roots.
Fill a pot with a well-draining potting mix, and make a small hole in the soil using your finger or a pencil. Plant each cutting in the soil and water well.
Place the pot in a warm and bright location away from direct sunlight. Keep the soil moist but not waterlogged, and mist the cuttings with water daily to maintain a humid environment.
After several weeks, roots should begin to form, and new growth will appear at the top of the cutting. Once the cutting establishes roots and a robust amount of foliage, it can be transplanted to its desired location in the garden or a larger container.
Common pests of the woodland sage include Spider mites, aphids, whiteflies. Make a habit of checking your woodland sage frequently for pests so that any infestations can be caught and managed early.


