Plant Overview
Often called Hummingbird Sage or Pitcher Sage, this California native is a sensory delight for any woodland garden. Unlike its sun-drenched cousins, this sage thrives in the dappled shade of oak trees, releasing a potent, fruity fragrance that smells like a mix of pineapple and citrus. It has earned a legendary reputation among birdwatchers for being an irresistible magnet for hummingbirds, who treat its deep magenta blossoms like a high-energy nectar bar.
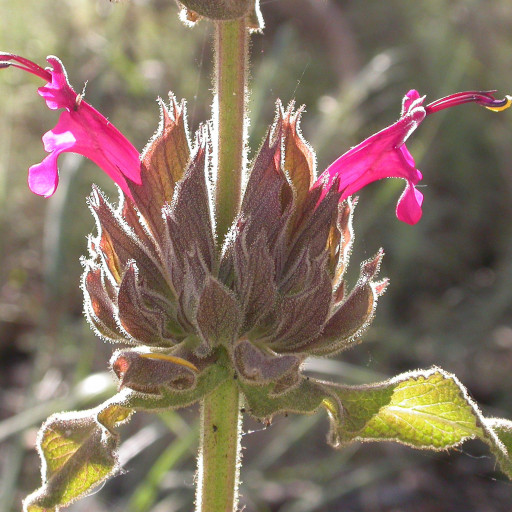
🔍 How to Identify
- 🍃 The Foliage: Large, arrow-shaped leaves that are a vibrant emerald green. They have a "rugose" texture, meaning they look pleasantly wrinkled or quilted, and are soft to the touch.
- 🌺 The Blooms: Striking, chunky flower spikes that rise above the leaves. The flowers are a rich beet-purple or magenta, emerging from dark, rounded bracts that look like stacked pom-poms.
- 🖐️ The Texture: If you touch the stems or flower heads, you’ll notice they are "glandular" or sticky. This resinous coating is what holds that incredible fruity scent.
🏡 In Your Garden
- 🌳 The Shade Specialist: While most Mediterranean sages crave blistering sun, Salvia spathacea is your go-to for dry shade. It is perfectly adapted to live under the canopy of large trees where other flowering plants might struggle.
- 🌱 Creeping Growth: This plant spreads via underground runners (rhizomes). Instead of staying in a tight clump, it will slowly colonize an area, creating a lush, fragrant carpet of green that suppresses weeds.
- ✂️ Summer Dormancy: In very hot, dry climates, it may look a bit tired in late summer. Don't panic and overwater; it is simply resting. A light pruning of the old flower stalks will keep it looking tidy until the winter rains spark new growth.
⚠️ Safety & Toxicity
- ✅ Status: Non-toxic and safe.
- 🐾 Wildlife & Pets: This plant is generally considered safe for households with cats and dogs. In fact, it is a "habitat hero"—completely safe for local pollinators, bees, and of course, the hummingbirds it is named after.
✨ Fun Fact
The scent of Hummingbird Sage is so powerful and pleasant that early California settlers and indigenous groups used the leaves to brew a medicinal tea or simply rubbed them on their clothes as a natural, fruity deodorant!

Detailed Care Instructions
| Lighting | Full Sun |
| Hardiness Zones | 7B - 10B |
To grow Salvia Spathacea plant, also known as Hummingbird Sage or Pitcher's Sage, you can follow these steps:
- Choose an appropriate location: Salvia Spathacea grows best in partial shade to full sun. Select an area with well-draining soil and good air circulation.
- Prepare the soil: Before planting, prepare the soil by removing any weeds, rocks, or debris. Improve the soil by adding organic matter, such as compost or aged manure, to provide nutrients and enhance drainage.
- Planting: Dig a hole slightly larger than the root ball of the Salvia Spathacea plant. Place the plant in the hole, ensuring that the top of the root ball is level with or slightly above the soil surface. Backfill the hole and gently firm the soil around the plant.
- Watering: Water the newly planted Salvia Spathacea thoroughly and regularly until it establishes a strong root system. Always keep the soil evenly moist but not waterlogged.
- Mulching: Apply a layer of organic mulch, such as wood chips or straw, around the plant to retain moisture, suppress weeds, and regulate soil temperature.
- Pruning: Prune Salvia Spathacea regularly to maintain its shape and encourage bushier growth. Deadhead faded flowers to promote continuous blooming.
- Fertilizing: Salvia Spathacea generally doesn't require heavy fertilization. However, if the plant seems weak or lacks growth, you can use a balanced, slow-release fertilizer once a year in spring.
- Pest and disease control: Salvia Spathacea is relatively resistant to pests and diseases. However, watch out for common garden pests like aphids or spider mites. Use organic pest control methods if needed.
- Overwintering: Salvia Spathacea is a perennial plant in warm climates. In colder regions, protect the plant during winter by covering it with a layer of mulch or moving it indoors.
- Propagation: Salvia Spathacea can be propagated through seeds or stem cuttings. To propagate through stem cuttings, take 3-5 inch cuttings from the plant's new growth. Dip the cut ends in a rooting hormone and place them in a well-draining potting mix. Keep the cuttings moist until they develop roots.
By following these steps, you should be able to successfully grow Salvia Spathacea.

Place in a window with dappled sun or a spot in the middle of a room. Or directly in a window facing west or east.

Salvia Spathacea is a herbaceous plant that requires proper watering to maintain healthy growth. It is important to water the plant regularly to prevent it from drying out.
When watering Salvia Spathacea, it is important to ensure that the soil is moist but not waterlogged. Water should be applied evenly throughout the growing season, especially during the hotter months. It is best to water the plants early in the morning or late in the afternoon to avoid the sun's harsh heat, and also to prevent the leaves from burning.
The water should be directed towards the base of the plant, ensuring that the soil is thoroughly soaked. Avoid watering the foliage directly as this can cause fungal diseases like powdery mildew. During periods of heavy rainfall, it may not be necessary to water the plant as often.
It is also important to ensure that the soil is well-draining, as Salvia Spathacea is susceptible to root rot if it is kept in overly moist soil. To improve drainage, you can add some sand or perlite into the soil mixture.
In summary, Salvia Spathacea should be watered regularly, ensuring the soil is moist but not waterlogged. Water should preferably be directed to the base, avoiding watering the foliage directly, and the soil mix should be well-draining.
To fertilize this plant, you should use a balanced fertilizer with equal parts nitrogen, phosphorus, and potassium. Apply the fertilizer in the spring and again in the fall, making sure to water the plant deeply after each application. Be careful not to over-fertilize, as this can lead to excessive growth and reduced blooming.
The ideal soil for the Salvia Spathacea plant should be well-draining and slightly acidic, with a pH level ranging from 5.5 to 6.5. It should also be rich in organic matter and have good aeration. A mixture of peat moss, perlite, and vermiculite can be used to create the perfect soil composition for this plant. Additionally, a layer of mulch can be added to the soil surface to help retain moisture and suppress weed growth. It is important to avoid using heavy, clay soils as they can lead to waterlogging and root rot in this plant.
To propagate this plant, take stem cuttings during the growing season. Select a healthy stem with several nodes and cut it just below a node using sharp, clean scissors or pruning shears. Remove all but the top 2-3 leaves from the cutting, leaving a few pairs of leaves at the top for photosynthesis. Dip the cut end of the stem into rooting hormone powder and tap off any excess.
Prepare a pot with well-draining soil and make a small hole in the center. Insert the cutting into this hole, gently pressing the soil around it. Make sure the soil is moist but not waterlogged, and keep the cutting out of direct sunlight to prevent wilting. Place a clear plastic bag over the pot to create a humid environment and retain moisture.
After 2-3 weeks, gently tug on the cutting to check for root development. Once roots begin to form, remove the plastic bag and gradually introduce the cutting to brighter light. When the cutting has established roots and new growth, it can be transplanted to a larger pot or outdoors in a suitable location.
Common pests of the hummingbird sage include Spider mites, aphids, whiteflies. Make a habit of checking your hummingbird sage frequently for pests so that any infestations can be caught and managed early.


