Plant Overview
Known widely as "Painted Sage" or "Annual Sage," Salvia viridis is a visual trickster of the Mediterranean. While most salvias are prized for their nectar-rich blossoms, this species is famous for its vibrant, paper-like "bracts" (modified leaves) that look like colorful flags waving in the breeze. It has been a cottage garden staple for centuries, providing neon splashes of purple and pink that outlast almost any other flower in the garden.
🔍 How to Identify
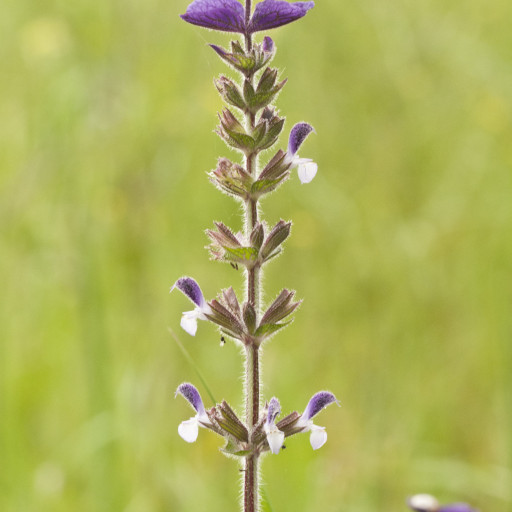
- 🌿 Colorful Bracts: The most striking feature—veined, leaf-like structures at the top of the stems in brilliant shades of violet, rose, or white.
- 🌸 Hidden Flowers: The actual flowers are tiny, two-lipped, and tucked discreetly in the leaf axils beneath the showy bracts.
- 🍃 Textured Foliage: Soft, oblong, and slightly hairy green leaves that release a mild, pleasant herbal scent when brushed or crushed.
🏡 In Your Garden
- ☀️ Sun-Loving Resilience: This plant thrives in the spotlight. It requires full sun to develop the most intense coloration in its bracts; without enough light, the "flags" will remain a dull, pale green.
- ✂️ Self-Seeding Spirit: As an annual, it completes its life cycle in one year but is a prolific self-seeder. If you leave the spent flower heads through the autumn, you can expect a fresh carpet of "volunteer" seedlings the following spring.
- 🦋 Pollinator Landing Pad: While the bracts catch the human eye, the nectar-rich (though small) flowers are a favorite for honeybees and butterflies, making it an excellent choice for a wildlife-friendly plot.
⚠️ Safety & Toxicity
- ✅ Non-Toxic: Salvia viridis is generally considered safe and non-toxic for humans, dogs, and cats.
- 🧤 Mild Irritant: While not poisonous, the fine, sticky hairs on the stems and leaves can trap dust and pollen, which might cause minor skin irritation or sneezing for those with high sensitivities during pruning.
✨ Fun Fact
In historical herbals, this plant was often called "Clear Eye." Its seeds were once soaked to produce a mucilaginous film used to help remove bits of dust or grit from the eye, and the leaves were occasionally added to vats of beer to make the brew more "heady."

Detailed Care Instructions
To grow Salvia viridis, also known as Clary sage, follow these steps:
- Obtain seeds: Purchase Salvia viridis seeds from a reputable source or collect seeds from existing plants, if available.
- Prepare the soil: Choose a well-draining soil mix with a pH level between 6.5 and 7.5. You can enhance the soil by adding organic matter like compost or well-rotted manure.
- Sow the seeds: Start the seeds indoors about 8-10 weeks before the last frost date. Sow the seeds at a depth of around 1/4 inch (0.6 cm) in small pots filled with the prepared soil. Moisten the soil lightly, cover the pots with plastic wrap, and keep them in a warm location (around 70°F or 21°C).
- Provide light and moisture: After germination, remove the plastic wrap and place the pots in a bright location where the plants will receive at least 6 hours of sunlight each day. Keep the soil consistently moist, but not waterlogged, throughout the growing process.
- Transplanting: When the seedlings have developed a sturdy root system and at least two sets of true leaves, they are ready for transplanting. Choose a sunny location in your garden with well-draining soil.
- Planting in the garden: Dig holes in the garden bed that are slightly larger than the root ball of the seedlings. Space the plants about 12-24 inches (30-60 cm) apart to allow sufficient room for growth. Carefully place the seedlings into the holes and backfill them with soil, gently firming around the base of the plant.
- Maintenance: Water the plants regularly, especially during dry spells. Clary sage is moderately drought-tolerant, but it will benefit from consistent moisture. Apply a balanced organic fertilizer once or twice during the growing season.
- Harvesting: The flowers and leaves of Salvia viridis are primarily harvested for their oil and herbal uses. Harvest the leaves just before the flowers open for the best flavor and potency.
By following these steps, you can successfully grow Salvia viridis plants and enjoy their beautiful flowers and aromatic leaves.

Place in a bright room that is sun drenched almost all day. Or directly in a south-facing window.

1. Determine the watering needs of the plant based on its natural environment and habitat. Salvia Viridis typically grows in dry, rocky areas with well-draining soil, so it is important to avoid over-watering.
2. Water the plant deeply and infrequently. This means soaking the soil around the plant so that the water penetrates the roots, but allowing the soil to dry out slightly before watering again. Typically, Salvia Viridis requires watering once every 7-10 days.
3. Consider the weather conditions and adjust watering accordingly. In hot, dry weather, the plant may need more frequent watering, while in cooler, more humid conditions, it may need less.
4. Check the soil moisture level regularly to ensure that the plant is not being under or over-watered. Insert your finger into the soil around the plant and water if the top 1-2 inches feel dry to the touch.
5. Use a watering can or hose with a gentle spray nozzle to avoid damaging the plant and to ensure that the water is being distributed evenly around the plant. Avoid getting water on the leaves and flowers, as this can increase the risk of fungal diseases.
6. Water in the early morning or late afternoon to avoid evaporation and to minimize the risk of sun scorching the leaves.
7. Fertilize the plant once a month during the growing season to provide additional nutrients to support healthy growth and flowering. Always follow the instructions on the fertilizer carefully to avoid over-fertilizing or burning the plant.
For best results with this particular plant, you should aim to fertilize it every two to three weeks during the growing season. You can use a balanced, all-purpose fertilizer that is specifically formulated for flowering plants. Be sure to follow the instructions on the label carefully and avoid over-fertilizing, as this can cause damage to the plant. In general, it's a good idea to water the plant thoroughly before applying fertilizer to help prevent burning. Additionally, you may want to consider supplementing with organic materials such as compost or worm castings to provide a more long-term nutrient source. Following these steps should help ensure healthy growth and vibrant blooms from this lovely plant.
The ideal soil for Salvia Viridis plant is a well-draining soil that is rich in organic matter. It should have a pH range between 6.0 and 7.5, which is slightly acidic to neutral. The soil should be loamy, with a good mixture of sand and clay. It should also be free of any pests or diseases that may harm the plant. A soil mixture that includes perlite or vermiculite to improve drainage is also beneficial. Additionally, the plant prefers a sunny location with well-draining soil and moderate water requirements. Fertilizer should be applied every 4-6 weeks during the growing season, but care should be taken not to overfeed the plant.
Salvia Viridis can be propagated through a process called stem-cutting. Take a healthy stem of the plant, about 4 to 6 inches in length, make sure to use a sharp and clean pair of scissors or pruners. Remove the leaves from the lower two-thirds of the stem, leaving only a few leaves at the top. Dip the cut end in rooting hormone powder, and plant it in a well-draining potting soil. The cutting should be kept in a warm and humid location and can be covered with a plastic bag to maintain moisture. It usually takes around 2-3 weeks for the roots to form, and once the cutting is established, it can be transplanted to a larger pot or outside into the garden.
Common pests of the wild clary include Spider mites, aphids, whiteflies. Make a habit of checking your wild clary frequently for pests so that any infestations can be caught and managed early.


