Plant Overview
Often called the Thorny Burnet, this resilient shrub is the quintessential "tough guy" of the Mediterranean landscape. Dominating the sun-scorched hillsides of the Phrygana, it forms dense, silver-grey cushions that look like natural barbed wire. In local folklore, it is frequently cited as the plant used to weave "crowns of thorns" due to its incredibly intricate and sharp branching structure.
🔍 How to Identify
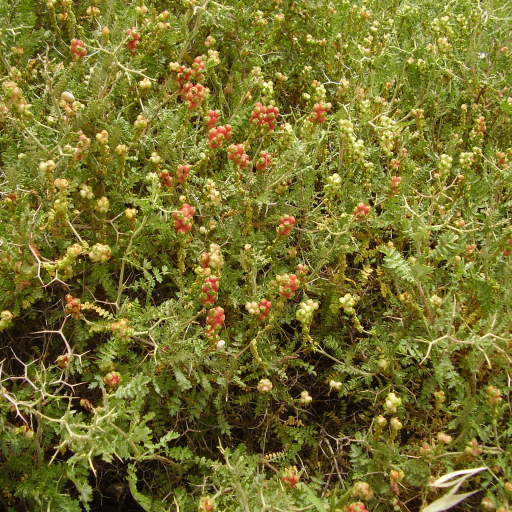
- 🌵 The Spiny Skeleton: The plant grows in a compact, rounded mound. Its branches are remarkably stiff and end in sharp, forked thorns that zig-zag in every direction.
- 🌿 Tiny Foliage: The leaves are very small, pinnate (feathery), and often drop during the hottest summer months to conserve water, leaving only the thorns visible.
- 🍓 Berry-like Fruits: After flowering, it produces small, fleshy, reddish-pink fruits that look like tiny berries, providing a splash of color against its dusty-green frame.
🏡 In Your Garden
- ☀️ The Sun Worshiper: This plant is the ultimate choice for xeriscaping or rock gardens. It thrives in positions where other plants would wither, demanding intense sunlight and very little (if any) supplemental water once established.
- 🪨 Poor Soil Specialist: It actually prefers "bad" soil. Whether it’s rocky, sandy, or heavy in limestone, the Thorny Burnet uses its deep root system to anchor itself. It’s an excellent choice for erosion control on slopes.
⚠️ Safety & Toxicity
- 🩹 Physical Hazard: While the plant is not known to be chemically toxic to humans or pets, its thorns are exceptionally sharp and rigid.
- 🐾 Paws and Ankles: It can easily puncture skin or soft paws. It is best planted away from walkways or areas where children and pets play frequently.
✨ Fun Fact
The Thorny Burnet is a "pioneer of fire." While its woody branches burn very quickly and were historically used as kindling for bread ovens, the plant is one of the first to resprout from its roots after a wildfire, helping the ecosystem recover.

Detailed Care Instructions
To grow Sarcopoterium Spinosum, also known as the thorny burnet, you can follow these steps:
- Obtain seeds or seedlings: You can either purchase seeds from a reputable seed supplier or try to find seedlings from a nursery.
- Choose a suitable location: Sarcopoterium Spinosum prefers full sun and well-draining soil. Make sure the chosen spot in your garden gets at least 6-8 hours of direct sunlight per day.
- Prepare the soil: Ensure the soil is loose and well-draining. You can amend it with organic matter like compost or well-rotted manure to improve fertility and drainage. Remove any weeds or debris from the planting area.
- Plant the seeds or seedlings: If using seeds, sow them at a depth of about 1/4 inch in the prepared soil, and space them a few inches apart. If using seedlings, make a hole large enough to accommodate the root ball, gently place the seedling in the hole, and backfill with soil, firming it gently around the plant.
- Watering: Water the newly planted Sarcopoterium Spinosum thoroughly after planting and keep the soil moist but not waterlogged until the plant is established. After that, the plant is quite drought-tolerant and will only require occasional watering during prolonged dry periods.
- Mulching: Mulching around the plant can help conserve moisture and suppress weeds. Consider using organic mulch like wood chips or straw, keeping it a few inches away from the plant's base to prevent stem rot.
- Pruning: Sarcopoterium Spinosum can benefit from occasional pruning to maintain its shape and promote new growth. Prune any dead or damaged branches, and trim back the plant lightly after flowering to promote bushier growth.
- Pests and diseases: Sarcopoterium Spinosum is generally resistant to pests and diseases, but occasional issues with aphids or spider mites can arise. Monitor the plant regularly and address any infestations promptly with appropriate organic insecticides or miticides if necessary.
- Fertilizing: Sarcopoterium Spinosum generally does not require heavy fertilization. However, if the plant appears to be lacking nutrients, you can apply a balanced, slow-release fertilizer according to the package instructions during the spring.
- Enjoy and observe: Once your Sarcopoterium Spinosum plant is established, it will provide attractive foliage, beautiful flowers, and habitat for wildlife. Enjoy its beauty and monitor its growth to spot any potential issues early on.
Remember to check the specific growing requirements for Sarcopoterium Spinosum in your region, as some variations may exist depending on your climate and soil conditions.

Place in a bright room that is sun drenched almost all day. Or directly in a south-facing window.

To properly water this plant, first you will need to take note of the soil around the plant. The soil should be checked for dryness, moisture content and overall texture. If the soil is moist, avoid over-watering the plant to prevent stagnant water. During the summer months, it is important to water the plant at least once a week. In areas with excess heat, the plant may require additional watering, but be careful not to let the soil become oversaturated. In the colder months, reduce the watering frequency to prevent freezing of the roots. When watering, ensure that the plant receives enough water to reach the roots by applying a slow, steady stream of water to the soil surface. Avoid using hard water or water with added minerals, as they can adversely affect plant growth. Finally, observe the foliage and soil for signs of thirst or over- watering, which may include yellowing, browning or wilting leaves and surface cracks in dry soil.
Here are fertilizing instructions for Sarcopoterium Spinosum plant:
- Use a balanced fertilizer with equal ratios of nitrogen (N), phosphorus (P), and potassium (K). Look for a fertilizer blend such as 10-10-10 or 20-20-20.
- Apply the fertilizer during the active growing season, which is typically spring and early summer.
- Dilute the fertilizer according to the package instructions. Typically, you will mix a certain amount of fertilizer with water to create a solution.
- Water the Sarcopoterium Spinosum plant thoroughly before applying fertilizer. This helps to prevent burning the roots.
- Pour the diluted fertilizer solution evenly around the base of the plant, avoiding direct contact with the stems or leaves.
- Be cautious not to over-fertilize, as this can lead to nutrient burn or cause harm to the plant. Follow the recommended dosage on the fertilizer packaging.
- After applying fertilizer, water the plant again to help distribute the nutrients into the soil.
- Regularly monitor the plant's response to the fertilizer. If you notice any signs of burning or other negative effects, reduce the amount or frequency of fertilization.
- Avoid fertilizing during periods of dormancy or when the plant is not actively growing.
- Remember to always read and follow the specific instructions on the fertilizer packaging, as different brands may have slightly different guidelines.
These instructions should help you effectively fertilize your Sarcopoterium Spinosum plant and promote healthy growth.
Sarcopoterium Spinosum is a plant that is native to arid regions and requires a well-draining soil that is low in organic matter. The soil should be alkaline with a pH between 7.0 and 8.5. It prefers soils that are sandy or gravelly, with good drainage and low water retention. The plant can tolerate drought and nutrient-poor soils, but it does require some fertilization with low-nitrogen fertilizers to promote healthy growth. It is recommended to use a soil mixture that is composed of 70% sand, 20% clay, and 10% organic matter. For optimal growth, the plant should be placed in a location that receives full sun and is sheltered from strong winds.
To propagate Sarcopoterium Spinosum, follow these steps:
- Select a healthy parent plant: Choose a mature, disease-free, and well-established Sarcopoterium Spinosum plant as the source for propagation.
- Prepare the potting medium: Use a well-draining potting mix consisting of equal parts peat moss, perlite, and sand. Sterilize the mix by baking it at 180°C (356°F) for 30 minutes or purchase pre-sterilized potting mix.
- Take stem cuttings: With clean, sharp pruning shears or a knife, take stem cuttings that are at least 4-6 inches long. Cut just below a leaf node or where the stem is firm and healthy. Aim for at least three cuttings to improve the chances of successful propagation.
- Remove lower leaves: Remove the lower leaves and any thorns or spines near the bottom of each cutting. This will prevent the leaves from rotting and allow better root development.
- Apply rooting hormone: Dip the lower end of each cutting into a rooting hormone powder or gel to promote root development. Shake off any excess hormone.
- Plant the cuttings: Make holes in the potting mix using a pencil or your finger, ensuring the holes are deep enough to plant the cuttings halfway into the soil. Place one cutting per hole and gently press the soil around it to hold it in place.
- Provide adequate conditions for rooting: Place the potted cuttings in a warm and bright location, but away from direct sunlight, which can scorch the young plants. Maintain a temperature of around 20-25°C (68-77°F) for optimal rooting.
- Watering and misting: Keep the potting mix slightly moist, but not waterlogged. Avoid overwatering, which can lead to rotting. Mist the cuttings regularly to maintain humidity around them, as this promotes successful rooting.
- Monitor and care for the cuttings: Keep an eye on the cuttings for any signs of disease or pest infestation. Remove any yellowing or wilted leaves to avoid the spread of infection. Also, ensure proper ventilation to prevent fungal diseases.
- Root development: After a few weeks, gently tug on the cuttings to check for resistance, indicating the development of roots. Once the cutting has developed sufficient roots, it can be transplanted into individual pots or a larger container.
- Transplanting: Carefully remove the rooted cuttings from the potting mix and transfer them into individual pots filled with well-draining soil. Provide appropriate care, including regular watering, sunlight exposure, and gradual acclimation to outdoor conditions.
With proper care and patience, your propagated Sarcopoterium Spinosum plants will grow into thriving individuals, ready to be enjoyed or even propagated further.


