Plant Overview
Imagine a prehistoric umbrella tree plucked straight from the misty highlands of Vietnam. Often called the "Large-leaf Schefflera," this architectural giant is the dramatic cousin of the common office plant. It is highly coveted by collectors for its massive, fan-like foliage that gives any space an instant "Jurassic Park" aesthetic.
🔍 How to Identify
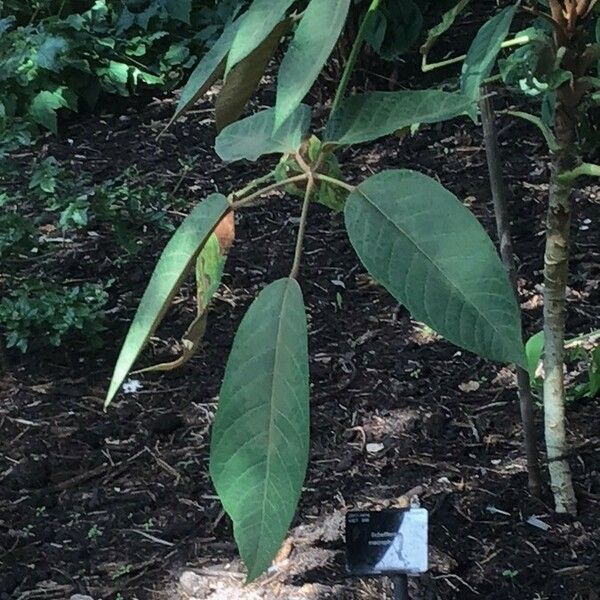
- 🌿 Colossal Foliage: The most striking feature is the size of the leaves; a single compound leaf can span nearly three feet across, radiating like a giant ribbed umbrella.
- 🍂 Cinnamon Fuzz: Young leaves and stems are often covered in a soft, rusty-brown "fuzz" known as indumentum, which protects the plant from pests and harsh light.
- 🏗️ Statuesque Growth: Unlike bushier Schefflera species, macrophylla tends to grow as a sturdy, upright tree with a thick central trunk that commands attention.
🏡 In Your Garden
- ☁️ Cloud Forest Vibes: Because it originates from high-altitude forests, this plant prefers "cool and bright" rather than "hot and sunny." It thrives in humid environments and can struggle if the air becomes too dry or stagnant.
- 🪴 Space Requirements: Give this giant some elbow room! It dislikes being moved once established, as its large leaves are sensitive to changes in light direction and physical bruising.
- 💧 Drainage is Key: While it loves moisture, its roots are prone to rot if left in standing water. Use a chunky, airy potting mix that mimics the forest floor.
⚠️ Safety & Toxicity
- 🚫 Moderate Toxicity: Like most members of the Aralia family, this plant contains insoluble calcium oxalate crystals.
- 🐾 Pet & Child Warning: If leaves are chewed or swallowed, they can cause intense oral irritation, drooling, and swelling of the throat. Keep it out of reach of curious cats, dogs, and toddlers.
✨ Fun Fact
In its native habitat in the mountains of Vietnam and Southern China, Schefflera macrophylla can grow over 40 feet tall, acting as a natural canopy for smaller forest-floor species!

Detailed Care Instructions
Growing a Schefflera macrophylla, commonly known as the giant umbrella tree, can be a rewarding experience. Here are some tips for successfully cultivating this attractive houseplant or garden tree:
1. Location and Light
- Light Requirements: Schefflera macrophylla prefers bright, indirect light. It can tolerate some direct sunlight, but too much can scorch its leaves. Insufficient light can slow its growth and cause the leaves to drop.
- Indoor Placement: If growing indoors, place it near a window with filtered light.
2. Soil
- Soil Type: Use a well-draining potting mix. A blend of peat, perlite, and orchid bark works well to provide aeration and drainage.
- pH Level: A slightly acidic to neutral pH (around 6.0 to 7.0) is ideal.
3. Watering
- Watering Schedule: Water the plant when the top inch of the soil feels dry. Be careful not to overwater, as this can lead to root rot.
- Watering Technique: Water thoroughly until it drains out of the bottom of the pot, but ensure the plant is not sitting in standing water.
4. Humidity and Temperature
- Humidity Levels: Schefflera prefers higher humidity levels. Consider using a humidifier or placing the pot on a tray filled with water and pebbles to increase humidity.
- Temperature Range: It thrives in temperatures between 60°F to 75°F (15°C to 24°C). Protect it from drafts and extreme temperature fluctuations.
5. Fertilizing
- Fertilizer Type: Feed with a balanced, water-soluble fertilizer during the growing season (spring and summer) every 4-6 weeks. Reduce feeding in the fall and winter.
6. Pruning
- Pruning Needs: Prune regularly to maintain its shape and encourage bushier growth. Remove dead or yellowing leaves to promote healthy growth.
7. Repotting
- Timing: Repot every 1-2 years or when the plant outgrows its pot. Choose a slightly larger pot to allow for more growth.
- Repotting Tips: Be gentle with the root system and use fresh potting mix.
8. Pest Management
- Common Pests: Watch out for common pests like spider mites, scale insects, and mealybugs. If you notice pests, treat them promptly with insecticidal soap or neem oil.
- Regular Checks: Inspect the leaves regularly to catch any infestations early.
9. Propagation
- Cuttings: You can propagate Schefflera macrophylla from stem cuttings. Use a clean, sharp knife to cut a healthy stem, allow it to callous over for a few hours, then plant it in moist potting mix.
- Water Propagation: Alternatively, place the cutting in water until roots develop, then transplant it into soil.
10. Enjoy the Process
- Be patient, as plants can take time to establish themselves and grow. Keep an eye on your plant's needs and adjust care as necessary.
By following these guidelines, you should be able to successfully grow and enjoy a healthy Schefflera macrophylla plant.
Watering the Schefflera macrophylla requires attention to a few key factors to ensure the plant remains healthy:
- Soil Moisture: Prioritize checking the moisture level of the soil. The top inch of the soil should be dry before you water again. This can be assessed with your finger or a moisture meter.
- Watering Frequency: The frequency of watering can vary based on environmental conditions such as temperature, humidity, and light levels. Generally, water the plant every 1-2 weeks during the growing season (spring and summer) and reduce this in the dormant period (fall and winter).
- Water Quality: Use room temperature water that is preferably distilled or rainwater. Tap water can be used, but let it sit for 24 hours to allow any chlorine to dissipate and ensure it’s at room temperature.
- Drainage: Ensure that the pot has proper drainage holes at the bottom. This prevents water from accumulating at the base, which could lead to root rot.
- Watering Technique: When watering, do so until you see water draining from the bottom of the pot. This ensures that the water reaches the root zone thoroughly.
- Humidity Considerations: If your environment is overly dry, particularly in winter months, consider misting the leaves or using a humidity tray to increase ambient moisture around the plant.
- Signs of Overwatering: Watch for yellowing leaves or a wilting appearance, which can indicate overwatering. Adjust your watering habits accordingly if you notice these symptoms.
By following these guidelines, you’ll be better equipped to maintain the health and vitality of your Schefflera macrophylla.
Fertilizing instructions for Schefflera Macrophylla:
- Fertilizer Type: Use a balanced, water-soluble fertilizer with equal N-P-K ratios (e.g., 20-20-20) or a fertilizer higher in nitrogen for lush foliage growth.
- Dilution: Dilute the fertilizer to half the recommended strength on the packaging to prevent root burn.
- Frequency: Fertilize during the growing season, typically from spring to early autumn. Apply every 4-6 weeks, allowing the plant to rest during the winter months when growth slows.
- Watering Before Fertilizing: Water the plant thoroughly a day before applying the fertilizer to minimize stress and help facilitate nutrient absorption.
- Application Method: Apply the diluted fertilizer solution directly to the soil, avoiding the foliage to prevent leaf burn.
- Observation: Monitor the plant for signs of nutrient deficiency or excess, such as yellowing leaves or stunted growth, and adjust feeding accordingly.
- Repotting: Consider repotting every couple of years into fresh potting mix, which provides additional nutrients and improves soil structure.
By following these guidelines, you can help promote healthy growth and vibrant foliage for your plant.
For optimal growth of Schefflera macrophylla, a well-draining potting mix is recommended. The following soil characteristics will support the plant's health and vitality:
- Texture: A mix that includes a combination of peat moss, perlite, and pine bark is ideal. This blend provides aeration while retaining an adequate amount of moisture.
- Drainage: Ensure the soil has good drainage properties. Adding components like coarse sand or pumice can improve drainage and prevent root rot.
- pH Level: Aim for a slightly acidic to neutral soil pH, ideally around 6.0 to 7.0. This range allows for optimal nutrient availability.
- Nutrient Content: A nutrient-rich soil mix will support growth. Consider incorporating organic matter, such as compost, to enhance fertility.
- Moisture Retention: While drainage is important, the soil should have the ability to retain some moisture. The presence of peat and certain organic materials can help maintain moisture levels without becoming soggy.
Overall, a well-balanced, loose, and aerated soil mix that combines organic matter for nutrients with components for drainage will create a suitable environment for Schefflera macrophylla.
The propagation of Schefflera macrophylla can be achieved through several methods, primarily stem cuttings or air layering. Here’s a detailed guide for each method:
1. Propagation through Stem Cuttings
Materials Needed:
- Sharp, sterile cutting tool (scissors or pruning shears)
- Potting mix (well-draining)
- Seed trays or small pots
- Rooting hormone (optional)
- Plastic bag or humidity dome (optional)
- Water
Steps:
- Selecting Cuttings: Choose a healthy stem with several leaves, ideally one that is semi-hardwood. This means it should not be too young and soft or too woody and mature.
- Taking Cuttings: Using the sterile cutting tool, cut a 4-6 inch segment just below a node (the point where a leaf emerges). Ensure your cutting has at least 2-3 leaves to support photosynthesis.
- Preparing Cuttings: Remove the lower leaves to prevent them from rotting in the soil. If desired, dip the cut end in rooting hormone to encourage root development.
- Planting Cuttings: Fill the seed trays or pots with potting mix, making sure it is moist but not soggy. Insert the cut end of the stem cutting into the soil about 2-3 inches deep. Space multiple cuttings if planting several.
- Creating Humidity: To maintain humidity, cover the cuttings with a plastic bag or a humidity dome, ensuring it does not touch the leaves directly. This helps to reduce moisture loss.
- Watering: Lightly water the soil to settle it around the cutting. Ensure that the mix remains consistently moist but not waterlogged.
- Light and Temperature: Place the cuttings in a warm area with bright, indirect light. Avoid direct sunlight, which can cause overheating.
- Roots Formation: In 4-8 weeks, check for root development by gently tugging on the cutting. If there is resistance, roots have formed.
- Transplanting: Once roots are established, you can transplant the new plants into larger pots, taking care to acclimate them gradually to normal growing conditions.
2. Propagation through Air Layering
Materials Needed:
- Sharp, sterile cutting tool
- Rooting hormone (optional)
- Moist sphagnum moss or potting mix
- Plastic wrap or foil
- String or twist ties
Steps:
- Selecting a Branch: Choose a healthy branch that is at least one year old and has a diameter of about 1/4 to 1/2 inch.
- Wounding the Branch: About halfway down the branch, make a circular cut around the stem, varying the depth, ensuring you cut through the bark but not into the wood. This promotes root formation.
- Applying Rooting Hormone: If desired, apply rooting hormone to the exposed area where you made the cut to encourage root growth.
- Wrapping with Moist Medium: Surround the wounded area with moist sphagnum moss or potting mix, ensuring it remains moist but not wet.
- Securing the Packaging: Wrap the moss or mix in plastic wrap or aluminum foil, covering it tightly to keep it in place but ensuring there is enough space for gas exchange. Secure the ends with string or twist ties.
- Waiting for Roots: Leave the wrapped branch for 4-8 weeks. During this time, keep an eye on the moisture level of the moss or medium; it should remain consistently moist.
- Severing the New Growth: Once roots emerge through the medium, cut the branch below the new root system and gently remove the plastic wrap.
- Transplanting: Plant the newly rooted section in a pot with appropriate potting mix and water it lightly. Place the pot in a warm area with indirect light.
- Acclimatization: Gradually acclimate the new plant to normal humidity and light conditions over a week or two.
Final Care:
Regardless of the propagation method used, ensure that the new plants are kept in environments suitable for their growth, including appropriate light, humidity, and water conditions, as they establish themselves.


