Plant Overview
Meet the Pyrenean Figwort, a statuesque wildflower native to the misty slopes of the Pyrenees and northern Spain. Known to botanists as Scrophularia alpestris, this plant is a master of the damp, shaded corners of the world where other flowers might struggle. While its blossoms are subtle and deep-hued, its history is deeply rooted in old-world herbalism, once believed to cure "scrofula" due to its bulbous, knot-like roots.
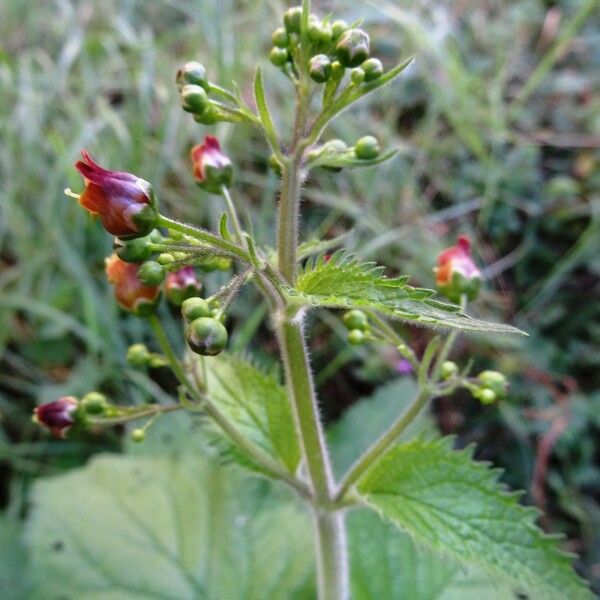
🔍 How to Identify
- 🌿 Square Stems: Like many in its family, it features a distinctive, sharply four-angled (square) stem that feels sturdy to the touch.
- 🍃 Jagged Foliage: The leaves are large, heart-shaped or ovate, and have deeply serrated (toothed) edges, appearing in opposite pairs along the stem.
- 🎭 Helmet Flowers: It produces small, brownish-purple or mahogany flowers that look like tiny helmets or pouches, arranged in long, airy clusters at the top of the plant.
🏡 In Your Garden
- 💧 Damp Feet: This species naturally thrives near mountain streams and damp forest edges. In a garden setting, it is perfect for "boggy" spots or near a pond where the soil stays consistently moist.
- 🐝 The Wasp's Favorite: Unlike many garden flowers that cater to butterflies, the Pyrenean Figwort is specialized for pollination by wasps. It provides a unique ecological service, supporting beneficial predatory wasps that help control garden pests.
⚠️ Safety & Toxicity
- 🚫 Non-Edible: Most members of the Scrophularia genus contain compounds like saponins and cardiac glycosides, making them unfit for human or pet consumption.
- 🐾 Pet Warning: If ingested in large quantities, it can cause digestive upset or more serious heart-related issues in cats, dogs, and livestock. It is best placed in areas where curious pets don't forage.
✨ Fun Fact
The genus name Scrophularia comes from the "Doctrine of Signatures"—an ancient belief that because the plant's roots looked like swollen lymph nodes (scrofula), it must be the cure for the disease! While its medical use has faded, its name remains a window into medieval medicine.

Detailed Care Instructions
Here are some tips on how to grow Scrophularia Alpestris plants:
- Choose the right location: These plants prefer full sun to partial shade. Find a spot in your garden that gets at least 6 hours of sunlight per day.
- Prepare the soil: Scrophularia Alpestris plants grow best in well-draining soil. Amend heavy or clay soil with compost or organic matter to improve drainage.
- Planting: Dig a hole slightly larger than the pot the plant came in. Place the plant in the hole and backfill with soil, gently patting it down. Space multiple plants about 12-18 inches apart.
- Watering: Water the newly planted Scrophularia Alpestris thoroughly after planting. Keep the soil consistently moist but not waterlogged. Water when the top inch of soil feels dry to the touch.
- Fertilizing: You can apply a balanced, slow-release fertilizer in spring to promote healthy growth. Follow the instructions on the packaging for the appropriate amount and frequency.
- Mulching: Apply a layer of organic mulch around the base of the plant to help retain moisture, suppress weed growth, and regulate soil temperature.
- Pruning: Trim back any dead or damaged branches in early spring to promote new growth. You can also prune for shape and size if needed.
- Pests and diseases: Scrophularia Alpestris plants are generally resistant to pests and diseases. However, keep an eye out for aphids or spider mites. If necessary, treat with insecticidal soap or a homemade organic pest control solution.
- Propagation: Scrophularia Alpestris can be propagated by division or by collecting and sowing seeds. Division can be done in spring or fall, dividing the plant into smaller clumps with roots attached. Seeds can be collected when the plant produces small capsules, which can be sown in flats or pots.
Remember to check your specific USDA hardiness zone and adjust care accordingly.

Place in a window with dappled sun or a spot in the middle of a room. Or directly in a window facing west or east.

To properly water this plant, it is important to ensure that the soil is consistently moist but not waterlogged. You can achieve this by watering the plant deeply once a week during the growing season and adjusting the frequency based on weather conditions. It is also important to avoid watering the leaves and instead direct the water at the base of the plant to prevent fungal growth and damage to the foliage. Additionally, it is recommended to use well-draining soil and a pot with good drainage holes to prevent water from accumulating in the roots.
To promote healthy growth and flowering, fertilize this plant with a balanced 10-10-10 fertilizer in the early spring before new growth appears. Apply a slow-release fertilizer every six to eight weeks during the growing season. Be sure to follow the package instructions for the specific fertilizer you are using. Avoid over-fertilizing, as this can lead to excessive foliage growth at the expense of flowering. Water the plant thoroughly after applying fertilizer.
Scrophularia Alpestris plant prefers well-draining soil that is rich in organic matter and has a slightly acidic to neutral pH. The ideal soil composition for this plant should consist of a mix of loamy soil, garden soil, and compost or peat moss. The soil should be slightly moist but never soggy, as the plant is sensitive to waterlogging. Add some sand or perlite to the soil to improve its drainage capacity. The plant prefers a soil temperature of 16-20°C, and it should be grown in a location that receives partial shade to full sun. Additionally, avoid using heavy or clay soils, as they can cause root rot.
The process of propagating this plant starts with preparing a suitable soil mix that drains well and is nutrient-rich. The soil should also be moist but not waterlogged. Once the soil is prepared, select a healthy stem from the parent plant and cut it just below a node. Remove any lower leaves and dip the cut end in rooting hormone powder.
Next, make a hole in the soil using a pencil or stick and carefully insert the stem into the hole. Ensure that the soil is firmly packed around the stem. Cover the pot with a plastic bag or dome to create a humid environment for the plant to root. Place the pot in indirect sunlight and water as needed to keep the soil moist.
Within a few weeks, the stem should start to develop roots. Once the plant has established a good root system, it can be transplanted into a larger pot or directly into the garden. It is best to wait until the plant has grown to a reasonable size before transplanting, as it will be better equipped to handle the stress of being moved.


