Plant Overview
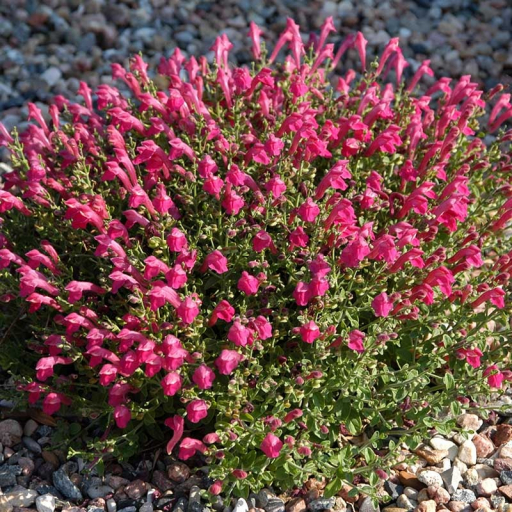
Commonly known as the Pink Skullcap or Cherry Skullcap, this tough-as-nails perennial is a favorite for rock gardens and sunny borders. Native to the rugged landscapes of Northern Mexico, it creates a "mound" of color that looks like a spilled bucket of vibrant pink paint. It is a champion of the "Xeriscape" movement, thriving in heat and drought where other plants might wilt under the sun's glare.
🔍 How to Identify
- 🌸 The Flowers: Tiny, tubular, snapping-bright pink blooms that appear in pairs along the stems. They are often compared to miniature snapdragons or little helmets.
- 🍃 The Foliage: Very small, oval, grey-green leaves that are slightly fuzzy to the touch. The plant grows in a tight, rounded cushion shape that remains dense.
- 🪵 The Base: As the plant matures, it develops a woody base (which is what the botanical name suffrutescens refers to), allowing it to survive harsh conditions and live for many years.
🏡 In Your Garden
- ☀️ Sun Worshipper: This plant demands full sun to maintain its signature tight-mound shape; in too much shade, it becomes "leggy" and the stems will sprawl apart.
- 🏜️ Drainage is Key: Because of its desert origins, it absolutely hates "wet feet." It is best planted in gritty, well-draining soil or tucked into rocky crevices where water cannot pool around the roots.
- ✂️ Low Maintenance: It is largely a "set it and forget it" plant. A light trim in late winter or early spring is all it needs to encourage a fresh flush of vibrant pink flowers for the new season.
⚠️ Safety & Toxicity
- ✅ Non-Toxic: Scutellaria suffrutescens is generally considered safe and non-toxic for humans, cats, and dogs.
- 🤚 Physical Feel: While not prickly, the foliage can be slightly resinous or sticky. If you have very sensitive skin, you might notice a mild residue after heavy pruning, but it is not harmful.
✨ Fun Fact
The common name "Skullcap" comes from the shape of the flower's calyx (the base that holds the petals). Once the flower falls off, the remaining seed pod looks exactly like a tiny medieval helmet or a miniature cap!

Detailed Care Instructions
Growing Scutellaria suffrutescens, or Texas skullcap, is relatively easy. Here are some steps to help you grow this plant:
- Choose the right location: Texas skullcap prefers full sun to partial shade. Make sure the location gets at least 6-8 hours of sunlight each day.
- Soil preparation: This plant prefers well-draining soil. Amend the soil with organic matter such as compost or peat moss to improve drainage and fertility. Avoid heavy clay soils.
- Planting: You can start your Texas skullcap plant from seeds or purchase young plants from a nursery. If starting from seeds, sow them directly into the prepared soil or start them indoors 6-8 weeks before the last frost. Plant the seeds or young plants at a distance of 8-12 inches apart.
- Watering: Keep the soil consistently moist but not waterlogged. Water deeply once or twice a week, depending on the weather conditions and soil moisture levels. Avoid overhead watering to prevent fungal diseases.
- Mulching: Apply a layer of mulch around the base of the plants to help retain soil moisture, prevent weed growth, and regulate soil temperature.
- Fertilization: Texas skullcap generally does well in average soil fertility. You can apply a balanced, slow-release fertilizer once or twice during the growing season, following the manufacturer's instructions. Avoid excessive fertilization, as it can lead to leggy growth and fewer flowers.
- Pruning: To encourage bushier growth and a longer blooming period, you can pinch back the tips of the stems or lightly trim the plant after each bloom cycle.
- Pest and disease control: Texas skullcap is relatively resistant to pests and diseases. However, keep an eye out for typical garden pests such as aphids, snails, or slugs. Treat any pest or disease issues promptly with organic or chemical controls if necessary.
- Winter care: In colder regions, Texas skullcap may not survive freezing temperatures. Apply a layer of mulch around the base of the plant to protect the roots during winter. Alternatively, consider growing it as an annual or bring it indoors during the winter months.
By following these simple steps, you should be able to successfully grow Scutellaria suffrutescens and enjoy its beautiful flowers and foliage.

Place in a bright room that is sun drenched almost all day. Or directly in a south-facing window.

1. Determine the water requirements: Before watering the Scutellaria Suffrutescens plant, it is important to determine its water requirements. This can be done by observing the soil moisture and checking for signs of stress or wilting.
2. Water deeply but infrequently: Scutellaria Suffrutescens plants prefer deep watering that allows the root system to absorb water and nutrients. However, they do not require frequent watering as they are drought-resistant plants.
3. Water in the morning: Watering in the morning is the best time for Scutellaria Suffrutescens plants as it allows the soil to absorb water before the sun becomes too hot. This also helps to prevent fungal growth and rotting.
4. Avoid over-watering: Over-watering can cause root rot and other issues. It is important to water the plants only when the soil is dry to the touch and avoid soggy soil.
5. Use a watering can or hose: Watering cans or hoses with a gentle spray attachment are the best tools for watering Scutellaria Suffrutescens plants. This helps to prevent damage to the delicate foliage and flowers.
6. Mulch the soil: Adding a layer of mulch around the base of the plant helps to retain soil moisture and prevent evaporation. This can also help to regulate soil temperature, which is important for Scutellaria Suffrutescens plants in hot climates.
To fertilize this plant, first ensure that the soil is moist but not overly wet. Use a balanced liquid fertilizer diluted to half strength and apply it to the soil around the base of the plant. Avoid getting fertilizer on the leaves or stem, as this can cause burning. Repeat fertilization every two to four weeks during the growing season, reducing to monthly or quarterly during the dormant period.
In order to successfully cultivate this type of plant, it is important to choose the right type of soil. A well-draining soil is preferred, one that is not too heavy or compact. The soil pH should be slightly acidic to neutral, around 6.0 to 7.5. It is also recommended to mix in some organic matter, such as compost or peat moss, to improve soil structure and overall health. Additionally, this type of plant prefers soil that is enriched with nutrients such as nitrogen, phosphorus, and potassium to promote healthy growth. When planting, ensure that the soil is adequately moistened but not waterlogged, as this can lead to root rot.
To propagate this plant, you will need to collect stem cuttings from a healthy mature plant. Select a stem that is several inches long and has several sets of leaves. Using a sharp and sterile pruning shears, cut the stem at a 45-degree angle just below a node, which is where the leaves meet the stem.
Remove the bottom set of leaves, leaving only two sets of leaves near the top of the stem. This will encourage the stem to focus its energy on root development instead of leaf growth.
Dip the cut end of the stem in rooting hormone to encourage root growth and then insert it into a pot filled with a well-draining soil mixture. Water the soil well and place the pot in a warm, bright location, but avoid direct sunlight. Keep the soil moist but not overly wet.
In a few weeks, the stem should begin to develop roots and new growth. Once the new growth is several inches tall, you can transplant the plant into a larger pot or directly into the garden.
Common pests of the cherry skullcap include Spider mites, whiteflies. Make a habit of checking your cherry skullcap frequently for pests so that any infestations can be caught and managed early.


