Plant Overview
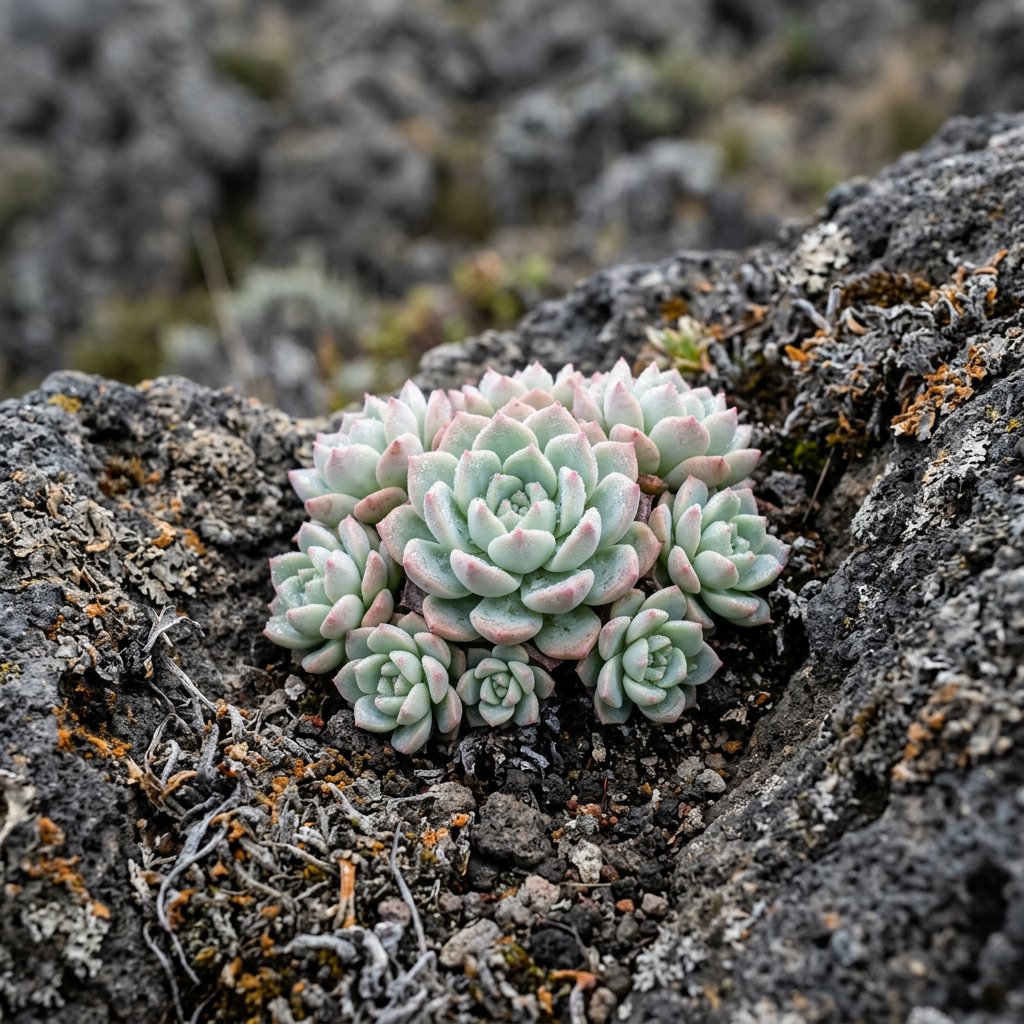
Often referred to as the Tiscalatengo Sedum, this Mexican treasure looks like a cluster of plump, frosted gems spilling out of a pot. Unlike many succulents that grow tall and leggy, this species stays relatively low to the ground, forming dense, fleshy mats of blue-green rosettes. It is a storyteller of its environment, changing colors based on the sun and the season.
🔍 How to Identify
- 🌿 The Rosettes: It forms tight, circular clusters of leaves that can grow up to 2 inches wide. As the plant matures, these rosettes sit atop thick, creeping stems.
- ❄️ The "Frosted" Coating: The leaves are covered in a thick layer of farina (epicuticular wax), which gives the plant a soft, silvery-blue or glaucous matte finish.
- 🏏 The Leaf Shape: True to its name (clavatum means club-shaped), the leaves are thick, blunt, and rounded at the tips, looking almost like tiny, smooth stones.
🏡 In Your Garden
- ☀️ The Blushing Effect: This plant is a master of transformation. While it is naturally blue-green, "stressing" the plant with bright sunlight or chilly (but not freezing) temperatures will cause the tips to blush a beautiful coral pink or soft red.
- 💧 The Drainage Rule: Because its "club" leaves store a massive amount of water, it is highly susceptible to root rot. It thrives best in "gritty" soil—think more pebbles and perlite than peat moss—to ensure water moves away from the roots quickly.
- 🧗 A Natural Trailer: In its native Mexico, it grows on rocky cliffs. In your home, it is perfect for hanging baskets or the edges of rock walls, where its heavy, succulent stems can gracefully drape downward over time.
⚠️ Safety & Toxicity
- 🐾 Pet Safe: You can breathe easy—Sedum clavatum is generally considered non-toxic to cats, dogs, and humans. It is a very safe choice for a household with curious nibblers.
- 🖐️ Handle with Care: While not poisonous, the plant is delicate. The white powdery farina is the plant’s natural sunscreen; touching the leaves will smudge this coating, and it won't grow back, leaving permanent "fingerprint" marks on the foliage.
✨ Fun Fact
The Sedum clavatum was only "officially" discovered by the botanical world in 1975! It was found growing on the steep walls of the Tiscalatengo River canyon in Mexico, which is why it is often named after that specific, hidden location.

Detailed Care Instructions
| Soil Ph | Acidic, Neutral |
| Humidity | Dry |
| Lighting | Part Sun |
| Soil Type | Sandy, Loamy, Well-Drained |
| Bloom Time | Summer, Fall |
| Difficulty | Easy |
| Plant Type | Succulent |
| Hibernation | Cold Period |
| Mature Size | Up To 4 Inches Tall |
| Temperature | 15°C - 30°C |
| Sun Exposure | Full Sun To Partial Shade |
| Hardiness Zones | 3-9 |
To grow Sedum Clavatum, also known as the Hooker's Burro's Tail, you can follow these steps:
- Choose a suitable planting pot: Select a pot with drainage holes at the bottom to ensure excess water can escape. Use a pot with a diameter of at least 6 inches to allow the plant to spread and grow.
- Prepare the soil: Sedum Clavatum prefers well-draining soil. You can mix cactus soil or succulent soil with perlite or coarse sand in a 1:1 ratio to improve drainage. Avoid using regular potting soil, as it retains too much moisture.
- Planting: Place a layer of small stones or gravel at the bottom of the pot to enhance drainage. Then, gently place the Sedum Clavatum into the pot, ensuring its roots are spread out. Fill the pot with the prepared soil mixture, leaving about 1 inch of space from the rim of the pot.
- Light and temperature: Sedum Clavatum thrives in bright, indirect sunlight. Place it near a window where it will receive several hours of sunlight each day. Ensure the temperature is between 60-75°F (15-24°C). Avoid exposing the plant to harsh direct sunlight, as it may scorch the leaves.
- Watering: Allow the soil to dry out completely between waterings. Overwatering can lead to root rot or other issues. Stick your finger into the soil to a depth of about an inch, and if it feels dry, water the plant thoroughly, ensuring the water drains out of the bottom of the pot. During winter, reduce watering as the plant goes into dormancy.
- Humidity: Sedum Clavatum prefers low humidity levels and does not require any additional humidity. Ordinary household humidity is generally sufficient.
- Fertilizing: During the growing season, from spring to fall, you can fertilize the Sedum Clavatum with a balanced succulent or cactus fertilizer, following the instructions provided. Be cautious not to over-fertilize, as it can lead to weak growth or burning of the leaves.
- Propagation: You can propagate Sedum Clavatum through stem cuttings. Simply take a cutting of a few inches from a healthy stem, leave it to dry for a day or two, then place it in well-draining soil. Keep the soil lightly moist until new roots form.
By following these steps, you should be able to successfully grow and care for Sedum Clavatum.

Place in a window with dappled sun or a spot in the middle of a room. Or directly in a window facing west or east.

To properly water Sedum Clavatum, you should allow the soil to dry out between waterings. When you do water, pour water slowly over the soil and allow it to be absorbed before watering again. Be sure not to overwater, as this can lead to root rot. It's also important to ensure good drainage, whether that be through proper soil composition or an adequate drainage hole in the pot.
To fertilize this plant, use a balanced fertilizer during the growing season, which should occur one to two times a month. Ensure that the soil is moist before fertilizing. Avoid fertilizing during the winter months, as this plant is dormant and does not need extra nutrients at this time.
Sedum Clavatum plant does well in well-draining soil that is not too rich or fertile. The soil should be slightly acidic to neutral with a pH range of 6.0 to 7.5. A sandy loam soil mixed with organic matter is ideal for Sedum Clavatum. The soil should be moist but not waterlogged as this can lead to root rot. It is also important to ensure that the pot has enough drainage holes to allow excess water to drain out. The plant can thrive in both full sun and partial shade, but it is important to avoid intense afternoon sun as it can damage the leaves.
To propagate this plant, you will need to take cuttings from the parent plant. Use a clean and sharp pair of scissors or pruning shears to snip off a stem that's at least 2-3 inches long. Make sure there are a few leaves on the stem.
Remove the lower leaves from the stem and let it dry for a few days in a warm and dry location to allow the cut end to heal and callus over.
Once the cut end has callused, plant the stem cutting in well-draining soil. Water the cutting lightly and place it in a warm spot with indirect light. Avoid overwatering, as too much moisture can cause the cutting to rot.
In a few weeks, the cutting should start to root and new growth will appear. Once the new growth has become established, you can transplant the new plant to a larger container or outdoor location.
Common pests of the tiscalatengo gorge sedum include Mealybugs, aphids. Make a habit of checking your tiscalatengo gorge sedum frequently for pests so that any infestations can be caught and managed early.


