Plant Overview
Commonly known as the Miniature Joshua Tree, this charming succulent from Algeria is a master of disguise. While it looks like a tiny, weathered desert tree straight out of a prehistoric landscape, it is actually a low-growing member of the stonecrop family. It’s a favorite for "mame" bonsai enthusiasts because it naturally takes on the shape of an ancient, gnarled tree without any wiring or pruning.
🔍 How to Identify
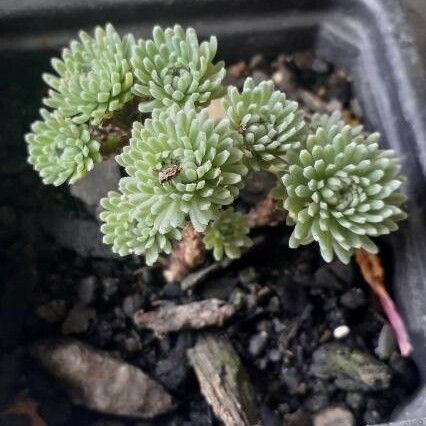
- 🌵 Branching Structure: It features thin, woody-looking stems that branch out extensively, creating a dense, miniature canopy.
- 🌿 Leaf Clusters: The foliage consists of tiny, lime-green, needle-like leaves gathered in tight pom-poms or rosettes at the very tips of the branches.
- 🌼 Starry Blooms: During the mid-summer to early autumn, it produces small, bright yellow, star-shaped flowers that contrast beautifully against the green "needles."
🏡 In Your Garden
- ☀️ The Summer Slumber: Unlike many plants, Sedum multiceps often goes dormant in the heat of summer. If the leaves turn brown and drop, don't panic—it’s just tucking itself in to survive the drought. It will "wake up" and flush with green when the weather cools.
- 🪨 The Perfect Squeeze: This plant thrives in "tight" spots. It loves gritty, rocky soil and is perfect for rock gardens, fairy gardens, or small containers where its architectural shape can be appreciated up close.
- ✂️ Easy Propagation: If a "branch" breaks off, don't throw it away! Simply let the end dry for a day and tuck it into the soil; it roots remarkably fast, allowing you to start a whole new miniature forest.
⚠️ Safety & Toxicity
- 🐾 Pet Friendly: Sedum multiceps is generally considered non-toxic to cats, dogs, and horses, making it a safe choice for households with curious nibblers.
- 👶 Human Safety: It is non-poisonous to humans. However, as with most succulents, the sap can occasionally cause mild skin irritation for those with very sensitive skin, so wash your hands after heavy pruning.
✨ Fun Fact
In its native Algerian habitat, this plant survives extreme heat by pulling its leaves into tight, closed balls to protect its moisture—a behavior called "estivation" that makes it look like a collection of tiny pinecones until the rain returns!

Detailed Care Instructions
To grow Sedum Multiceps plant, you can follow these steps:
- Choose a suitable location: Sedum Multiceps prefers well-draining soil, full sun to partial shade, and is generally hardy in USDA zones 5-10. Select a spot that receives at least 6 hours of sunlight per day and has good air circulation.
- Prepare the soil: Amend the soil with compost or well-rotted manure to improve drainage and fertility. Remove any weeds or grasses from the planting area.
- Planting: Dig a hole slightly larger than the root ball of the Sedum Multiceps plant. Place the plant in the hole and backfill with the amended soil, gently firming the soil around the roots. Ensure that the crown of the plant (where the stem meets the roots) is level with or slightly above the soil surface.
- Watering: Water the plant thoroughly after planting to help settle the soil. Afterward, water the Sedum Multiceps plant deeply but sparingly. Allow the soil to dry out between waterings to prevent root rot. Avoid overwatering, as Sedums are drought-tolerant plants.
- Mulching: Apply a layer of organic mulch around the base of the plant to help conserve moisture and suppress weeds. Maintain a gap between the mulch and the stem to prevent rotting.
- Fertilizing: Sedum Multiceps usually does not require regular fertilization. However, you can apply a balanced slow-release or organic fertilizer in spring if desired, following the package instructions.
- Pruning: Prune back any dead or damaged foliage in early spring to promote new growth. You can also pinch back the tips of the stems to encourage branching and create a more compact shape.
- Propagation: Sedum Multiceps can be propagated through stem or leaf cuttings. Take cuttings in spring or early summer and allow them to callus for a few days before planting them in well-draining potting mix. Keep the cuttings slightly moist until roots develop.
Remember, Sedum Multiceps is a low-maintenance plant that is generally resistant to pests and diseases. With proper care and suitable growing conditions, your Sedum Multiceps plant should thrive and grow well.

Place in a bright room that is sun drenched almost all day. Or directly in a south-facing window.

A plant with thick, fleshy leaves and stems should be watered deeply, allowing the soil to dry out between watering sessions. It is important to avoid overwatering, as this can cause root rot. The ideal time to water this plant is in the morning, allowing enough time for any excess water to evaporate throughout the day. It is recommended to use a well-draining soil mix when planting to prevent standing water and aid in proper drainage. Additionally, during the winter months, it is advised to reduce watering frequency to prevent the plant from becoming waterlogged.
To fertilize the Sedum Multiceps plant, apply a balanced, water-soluble fertilizer every two weeks during the growing season. Dilute the fertilizer to half strength and apply it to the soil around the plant. Avoid allowing the fertilizer to come into contact with the plant's foliage. Water the plant deeply before and after applying the fertilizer to prevent fertilizer burn. During the dormant season, reduce the frequency of fertilization to once a month.
The ideal soil for Sedum Multiceps should be fast-draining and well-aerated. It should be slightly acidic to neutral, with a pH of 6.0 to 7.0. The soil should be rich in organic matter, such as compost or peat moss, to provide nutrients and retain moisture. Avoid using heavy, clay soils that can trap water and cause root rot. A mixture of sand, perlite, and peat moss would be suitable for this plant, as it provides good drainage and aeration while retaining moisture.
To propagate this plant, first gather healthy stem cuttings from a mature plant during the growing season. The cuttings should be approximately 5-10 centimeters in length and have at least two sets of leaves.
Remove the leaves from the bottom 2 centimeters of the cutting and allow the wound to callus for a day or two.
Prepare a well-draining soil mix, such as a mixture of sand and peat moss, and moisten it.
Make a hole in the soil and insert the cutting, gently firming the soil around it.
Water the cutting lightly and place it in a bright but shaded area, avoiding direct sunlight.
Keep the soil lightly moist and mist the plant occasionally.
After a few weeks, the cutting should start to develop roots. Once the roots are well-established, the plant can be transplanted into a larger pot or into the ground.
Common pests of the dwarf joshua, algerian sedum include Mealybugs, aphids. Make a habit of checking your dwarf joshua, algerian sedum frequently for pests so that any infestations can be caught and managed early.


