Plant Overview
Often found hugging coastal cliffs in its native New Zealand, Senecio greyii (botanically known as Brachyglottis greyi) is a shimmering standout in any landscape. Known affectionately as the "Daisy Bush," this hardy evergreen shrub is beloved for its silver-felted leaves that look like they’ve been dusted with moonlight. It is a favorite for coastal gardeners because it treats salt spray and high winds like a gentle breeze.
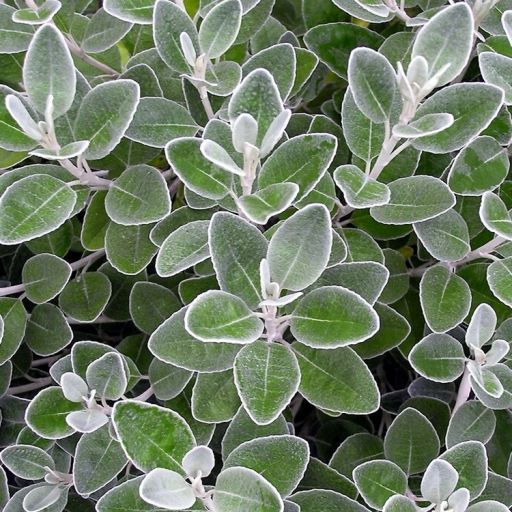
🔍 How to Identify
- 🌿 The Foliage: Look for oval, leathery leaves that are a soft grey-green on top with distinct, wavy white margins.
- ☁️ The Texture: The undersides of the leaves and the stems are covered in a dense, white "felt" (tomentum), giving the entire plant a silvery-white glow.
- 🌼 The Flowers: In summer, it produces flat-topped clusters of bright, golden-yellow daisy-like flowers that provide a sharp, sunny contrast to the cool-toned leaves.
🏡 In Your Garden
- 🌊 Coastal Warrior: This plant is incredibly salt-tolerant and wind-resistant, making it a "must-have" for seaside gardens where other plants might wither.
- ✂️ The "Haircut" Rule: While it is low-maintenance, it can become "leggy" or woody over time. To keep it compact and silver, it benefits from a firm pruning right after the yellow flowers fade.
- ☀️ Sunscreen Specialist: The white woolly hairs on the leaves aren't just for show—they reflect intense sunlight and trap moisture, helping the plant thrive in hot, dry spots where the soil might be poor.
⚠️ Safety & Toxicity
- 🐾 Mildly Toxic: While generally safe to have in the garden, many Senecio relatives contain pyrrolizidine alkaloids. It is best to prevent pets or curious children from chewing on the leaves, as ingestion can cause stomach upset.
- 🧤 Skin Sensitivity: The fine hairs on the leaves can occasionally cause mild skin irritation for people with sensitive skin; wearing gloves while pruning is a good precaution.
✨ Fun Fact
The "silver" look of the plant is actually a clever survival strategy! Those tiny white hairs act as a natural SPF, reflecting the sun's rays to prevent the leaves from scorching in exposed, cliffside environments.

Detailed Care Instructions
To grow a Senecio Greyii (dusty miller) plant, you can follow these steps:
- Purchase a Senecio Greyii plant or obtain cuttings:
- You can either buy a young plant from a local nursery or find cuttings from an existing plant.
- If you choose to grow from cuttings, make sure the cuttings are healthy and have a length of around 4-6 inches.
- You can either buy a young plant from a local nursery or find cuttings from an existing plant.
- Potting:
- Select a well-draining medium-sized pot with drainage holes.
- Fill the pot with a well-draining potting mix, such as a mixture of perlite, sand, and peat moss.
- Place the cuttings in the pot, leaving a few inches of stem above the soil surface.
- Select a well-draining medium-sized pot with drainage holes.
- Watering:
- Water the newly potted plant thoroughly, ensuring even moisture throughout the soil.
- Do not overwater, as this plant is susceptible to root rot. Allow the top inch of soil to dry out between waterings.
- Water the newly potted plant thoroughly, ensuring even moisture throughout the soil.
- Light:
- Senecio Greyii plants prefer bright, indirect sunlight.
- Place the pot in a location that receives several hours of bright light each day.
- Avoid placing the plant in direct sunlight, as it can scorch the leaves.
- Senecio Greyii plants prefer bright, indirect sunlight.
- Temperature and Humidity:
- Senecio Greyii plants thrive in average room temperature ranging from 65-75°F (18-24°C).
- They prefer average to high humidity levels, around 40-60%. You can increase humidity by using a humidifier or placing a tray of water near the plant.
- Senecio Greyii plants thrive in average room temperature ranging from 65-75°F (18-24°C).
- Fertilizer:
- Use a balanced liquid fertilizer diluted to half strength during the growing season (spring and summer) every 2-4 weeks.
- Do not fertilize during the dormant period in fall and winter.
- Use a balanced liquid fertilizer diluted to half strength during the growing season (spring and summer) every 2-4 weeks.
- Pruning:
- To maintain a compact shape, you can prune or pinch back the plant regularly.
- Remove any dead or yellowing leaves to keep the plant healthy and attractive.
- To maintain a compact shape, you can prune or pinch back the plant regularly.
- Propagation:
- Senecio Greyii plants can be propagated from stem cuttings.
- Take cuttings from healthy mature plants in the spring or summer.
- Dip the cut end of the stem in a rooting hormone and place it in well-draining soil. Keep the soil moist until roots develop.
Remember to monitor your Senecio Greyii plant regularly for pests such as aphids or spider mites. If you notice any signs of infestation, treat with a suitable insecticide or remove the affected parts of the plant.
- Senecio Greyii plants can be propagated from stem cuttings.

Place in a window with dappled sun or a spot in the middle of a room. Or directly in a window facing west or east.

To water this plant, it's best to wait until the top inch of soil is dry before watering. Use a watering can or spray bottle to slowly and evenly water around the base of the plant, taking care not to get water on the leaves. It's important not to overwater, as this plant is susceptible to root rot. The frequency of watering will depend on factors such as humidity, temperature, and light levels. It's also a good idea to use a well-draining mix and a container with drainage holes to help prevent waterlogged soil.
The Senecio Greyii plant should be fertilized once a month during its active growing season, which is from spring to summer. Use a balanced fertilizer with equal amounts of nitrogen, phosphorus, and potassium. Dilute the fertilizer to half the recommended strength and apply it to the soil around the base of the plant. Avoid fertilizing during the dormant season in the fall and winter.
The ideal soil for this plant is one that has excellent drainage, as it does not tolerate waterlogging or standing water. It prefers slightly acidic to neutral soil with a pH range of 6.0-7.0. A mix of well-draining soil and perlite or coarse sand is recommended to ensure the roots do not become waterlogged. The soil should be rich in nutrients, but not too heavy, as this plant prefers soil that is light, airy and loose. A mixture of coir, worm castings, and compost can be used to create a nutrient-rich soil that drains well but also retains moisture. It is important to avoid using soil that is too heavy or dense, as this can lead to root rot.
To propagate this plant, you will need to take a stem cutting. Choose a healthy stem that is at least 3-4 inches long. Using a sharp, clean pair of scissors or pruning shears, make a clean cut just below a node (where the leaves attach to the stem). Remove any leaves from the lower half of the stem.
Prepare a pot with well-draining soil and make a hole in the center. Dip the bottom of the stem cutting in rooting hormone (optional) and plant it in the soil, making sure it is buried up to the first set of leaves.
Water the cutting thoroughly and place it in a bright, indirect light. Keep the soil moist but not soaking wet. Cover the pot with a plastic bag or dome to increase humidity and hold in moisture.
After a few weeks, new growth should appear, indicating that the cutting has begun to root. Once the roots are well-established, you can transplant the new plant into a larger pot or into your garden.


