Plant Overview
Known as the Water Ragwort or Alkali Marsh Ragwort, this towering wetland native is a true "water lover" (as its Greek name hydrophilus suggests). Often found standing like a sentry in marshes and swamps across Western North America, it is admired for its waxy, succulent-like foliage and clusters of bright yellow blooms. While it adds a structural elegance to pond edges, it carries a hidden chemical defense that demands respect from gardeners and livestock owners alike.
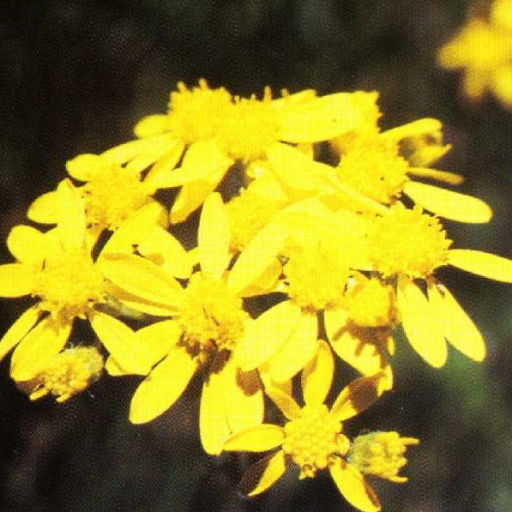
🔍 How to Identify
- 🌿 Waxy Foliage: The leaves are thick, smooth, and "glaucous"—meaning they have a dusty, blue-green waxy coating that helps the plant shed excess moisture.
- 🌼 Clustered Blooms: Unlike some daisies that stand alone, these small yellow flower heads gather in dense, flat-topped clusters at the very peak of the plant.
- 📏 Stout Stature: It is a tall, impressive perennial that can reach heights of 3 to 6 feet, supported by a thick, hollow, and remarkably sturdy central stem.
🏡 In Your Garden & Wild Spaces
- 💧 Wet Feet Only: This plant is an obligate wetland species; it doesn't just like water—it requires it. It is the perfect candidate for a "bog garden" or the soggy margins of a natural pond where other plants might drown.
- 🧂 Salt Tolerance: Unique among many garden favorites, the Water Ragwort thrives in alkaline or salty soils, making it a vital player in the ecology of salt marshes and interior basins.
⚠️ Safety & Toxicity
- 🚫 Toxic Status: Highly toxic if ingested. Like many members of the Senecio genus, it contains pyrrolizidine alkaloids.
- 🐾 Risk to Animals: These toxins can cause cumulative liver damage in horses, cattle, and household pets. It is generally avoided by wildlife, but gardeners should wear gloves when pruning to avoid any potential skin sensitivity from the sap.
✨ Fun Fact
The hollow stems of the Water Ragwort aren't just for show; they act like biological snorkels (aerenchyma tissue), allowing the plant to transport oxygen down to its roots even when they are submerged in thick, oxygen-poor mud!

Detailed Care Instructions
Here are some steps you can follow to grow Senecio Hydrophilus plant:
- Obtain seeds or cuttings: You can find seeds or cuttings of Senecio Hydrophilus plant at a local plant nursery or purchase them online. Seeds can be sown directly into the soil, while cuttings can be obtained from a mature plant.
- Choose an appropriate location: Senecio Hydrophilus plants prefer bright, indirect light, so select a spot that receives partial shade. It also grows well in a humid environment, so ensure that the location has adequate moisture.
- Prepare the soil: Senecio Hydrophilus plants require well-draining soil. You can create a suitable soil mix by combining equal parts of potting soil, perlite, and peat moss. Alternatively, you can use a pre-packaged cactus or succulent soil mix.
- Sow the seeds or plant the cuttings: If using seeds, sow them on the soil surface and lightly cover them with a thin layer of soil. If using cuttings, dip the cut end in rooting hormone and plant it in the soil, ensuring that at least one node is buried.
- Watering and humidity: Senecio Hydrophilus plants require regular watering to keep the soil consistently moist. Avoid overwatering, as this can lead to root rot. Additionally, mist the plant occasionally to maintain humidity.
- Fertilizer: Feed your Senecio Hydrophilus plant with a balanced liquid fertilizer diluted to half strength every two to four weeks during the growing season (spring and summer). Follow the instructions on the fertilizer package for proper application.
- Pruning: Prune any dead or damaged leaves to maintain the plant's health and appearance. Pinch back the tips occasionally to encourage a bushy growth.
- Repotting: As Senecio Hydrophilus plants grow, they may outgrow their containers. Repot them into a slightly larger pot with fresh soil when the roots become overcrowded.
- Common issues: Watch out for pests like aphids and mealybugs that may infest the plant. Treat them with appropriate insecticidal soaps or sprays. Also, be cautious of overwatering, as it can lead to root rot.
With proper care and maintenance, your Senecio Hydrophilus plant should grow and thrive in its new environment.

Place in a bright room that is sun drenched almost all day. Or directly in a south-facing window.

To water this plant, it is important to ensure that the soil is thoroughly moistened. This can be achieved by watering the plant until water begins to seep out of the drainage holes in the bottom of the container. It is important not to let the plant sit in standing water, as this can lead to root rot. Because this plant is tolerant of moist soil, it can be watered more frequently than other plants, but it is important to let the top layer of soil dry out slightly between watering to prevent overwatering. Additionally, it is important to avoid getting water on the leaves as this can promote fungal growth.
To fertilize this plant, use a balanced fertilizer with equal ratios of nitrogen, phosphorus, and potassium. Apply the fertilizer once a month during the growing season, which is typically spring and summer. Dilute the fertilizer to half strength and apply it to the soil around the plant, making sure not to get any on the foliage. Water the plant thoroughly after fertilizing. Avoid fertilizing during the dormant season, which is usually fall and winter.
Senecio Hydrophilus requires a soil that is well-draining and rich in nutrients. The soil pH should be slightly acidic to neutral. A soil mix that contains equal parts of peat moss, perlite, and vermiculite is ideal for this plant. It is important to ensure that the soil is moist but not waterlogged. Organic matter such as compost can be added to the soil to increase its nutrient content. Fertilizers should be used sparingly and only during the growing season. The soil should be kept moist, but not overly wet, as the roots of Senecio Hydrophilus are susceptible to rot. Adequate drainage is crucial to prevent this issue.
To propagate this plant, first take several stem cuttings from healthy and mature plants. It is important to use sharp and clean pruning shears when taking the cuttings. Cut the stem at a 45-degree angle, ensuring that the cutting is at least 3-4 inches long and has 3-4 leaves.
Next, remove the bottom leaves from the stem cutting, leaving only a few leaves at the top. Dip the cut end of the stem in rooting hormone and place the cutting in a pot filled with moist potting soil. Ensure that the soil is well-draining and the pot has drainage holes.
Cover the pot with a plastic bag or dome to create a humid environment that encourages rooting. Place the pot in bright, indirect sunlight and keep the soil moist but not waterlogged.
Check the cuttings for roots after 2-3 weeks by gently tugging on them. If there is resistance, roots have likely formed. Once they have rooted, remove the plastic bag or dome and gradually acclimate the plants to lower humidity and more light.
It is recommended to transplant the rooted cuttings into individual pots once they have grown roots, allowing more room for growth and development.


