Plant Overview
Henderson’s Checkermallow is the elegant wild cousin of the garden Hollyhock. Often found swaying in the coastal salt marshes of the Pacific Northwest, this native beauty is known for its towering wands of satiny, rose-pink blooms. It brings a touch of "wild cottage garden" charm to any landscape, looking far more delicate than its rugged, marsh-dwelling nature suggests.
🔍 How to Identify
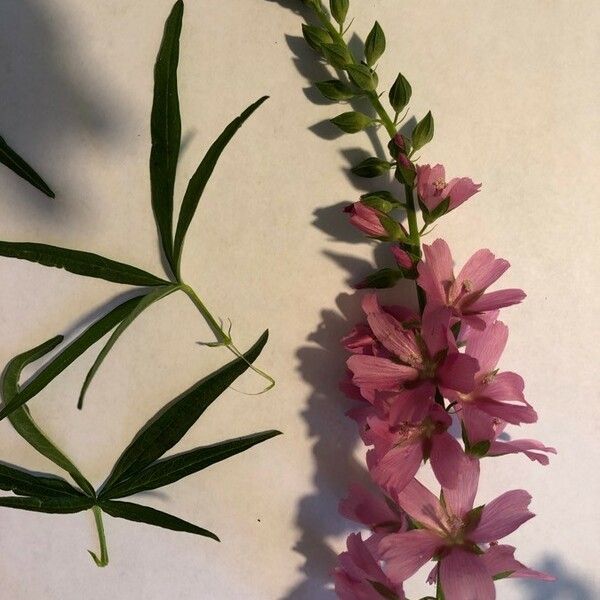
- 🌸 Bloom Structure: Dense, upright spikes (racemes) crowded with five-petaled, bell-shaped flowers in shades of deep rose to magenta.
- 🍃 Leaf Variety: It features "dimorphic" foliage; the base leaves are rounded and heart-shaped, while the leaves higher up the stem are deeply divided into narrow, finger-like lobes.
- 📏 Growth Habit: A clumping perennial that sends up tall, sturdy flower stalks reaching 3 to 4 feet in height, standing well above the low-growing basal foliage.
🏡 In Your Garden
- 💧 The "Wet Feet" Rule: Unlike many perennials that rot in soggy soil, this plant thrives in moist, heavy, or even clay-rich ground. It is the perfect candidate for rain gardens or areas with poor drainage.
- 🐝 Pollinator Hub: It is a high-value nectar plant. You will often find native bumblebees and butterflies crowded around the spikes, as the open flowers provide easy access for foraging.
- 🌱 Root Stability: It develops a woody crown over time. While it is hardy, it dislikes being moved once established, so choose its "forever home" in your garden carefully.
⚠️ Safety & Toxicity
- ✅ Safe for All: Henderson’s Checkermallow is generally considered non-toxic to humans, dogs, and cats. It belongs to the Mallow family, which is largely known for being edible or harmless.
- 👐 Mild Irritation: The stems and leaves may have very fine, fuzzy hairs. While not a chemical irritant, these can sometimes feel slightly "itchy" to gardeners with very sensitive skin during pruning.
✨ Fun Fact
Henderson's Checkermallow is a rare regional specialist! In the wild, it is almost exclusively found within a narrow strip of coastline ranging from British Columbia to Oregon. Because its natural marshland habitat is disappearing, it is considered a "species of concern" in several regions, making its cultivation in home gardens a great way to support local biodiversity.

Detailed Care Instructions
To grow Sidalcea Hendersonii, also known as Henderson's checkermallow, follow these steps:
- Choose the right location: Select a planting area that receives full sun to partial shade. Ensure the soil is well-draining, rich in organic matter, and slightly acidic (pH level of around 6.0-6.5).
- Prepare the soil: Remove any weeds and cultivate the soil to a depth of 6-8 inches. Incorporate well-rotted compost or aged manure to enrich the soil.
- Sow seeds or transplant: Sidalcea Hendersonii can be grown from seeds or transplants. If starting with seeds, sow them in pots or trays indoors six to eight weeks before the last frost date. Cover the seeds lightly with soil and keep them moist until germination. Transplants can be purchased from nurseries or garden centers.
- Transplant seedlings or mature plants: If using seeds, transplant the seedlings outdoors after the last frost date. Dig a hole slightly larger than the root ball of the plant, place it in the hole, and backfill with soil. Space multiple plants around 12-18 inches apart.
- Watering: Water the plants regularly, especially during dry spells, ensuring the soil stays consistently moist but not waterlogged. Consider using mulch around the base of the plant to help retain soil moisture.
- Fertilization: Apply a balanced, slow-release fertilizer in spring when new growth appears. Follow the manufacturer's instructions for proper application rates.
- Pruning: Deadhead spent flowers regularly to encourage more blooms and prevent self-seeding. Prune back faded stems in fall or early spring to promote new growth.
- Protection: Protect the plants from strong winds, as they can become top-heavy. Staking may be necessary to support the stems.
- Pests and diseases: Monitor the plants regularly for pests such as aphids, spider mites, or leafhoppers. Treat infestations with appropriate insecticides or organic pest control methods. Sidalcea Hendersonii is generally disease-resistant but may be susceptible to rust or powdery mildew. If necessary, apply fungicides according to the instructions.
- Propagation: Sidalcea Hendersonii can be propagated by dividing mature clumps in early spring or fall. Dig up the clump, divide it into smaller sections, and replant.
By following these steps, you should be able to successfully grow Sidalcea Hendersonii and enjoy its beautiful blooms.

Place in a bright room that is sun drenched almost all day. Or directly in a south-facing window.

To properly water the Sidalcea Hendersonii plant without referring to its common names, follow these guidelines:
1. Observe the soil moisture: Before watering, check the moisture level of the soil. Insert your finger about an inch deep into the soil at the base of the plant. If it feels dry, this indicates the need for watering.
2. Choose the right watering technique: To avoid damaging the plant or creating stagnant water, use a gentle watering technique. One effective method involves using a watering can with a narrow spout, which allows for precise targeting and reduces splashing.
3. Water at the base: Pour water directly onto the soil at the base of the plant, rather than overhead watering. This helps prevent fungal diseases and ensures the water reaches the roots efficiently.
4. Water deeply: It is important to provide a thorough watering session to encourage deep root growth. Apply water until the soil feels moist throughout the root zone. Avoid over-watering and creating waterlogged conditions as it may cause root rot.
5. Watering frequency: Instead of adhering to a strict schedule, monitor the soil moisture levels regularly. Sidalcea Hendersonii plants generally prefer moist but not saturated soil. The frequency of watering will depend on factors such as temperature, humidity, and soil type. It is better to water deeply but less frequently than to provide shallow and frequent watering.
6. Morning watering: Preferably, water the plant in the morning, allowing sufficient time for the leaves and soil to dry before evening. This helps prevent diseases that thrive in damp conditions.
7. Mulching: Applying a layer of organic mulch around the base of the plant helps retain moisture, regulates soil temperature, and suppresses weed growth. This can aid in reducing water loss through evaporation and lessen the frequency of watering.
Remember, each plant's water requirements may slightly vary, so it is crucial to pay attention to the individual needs of your Sidalcea Hendersonii plant when determining the watering routine.
To fertilize the Sidalcea Hendersonii plant, use a balanced, water-soluble fertilizer with equal amounts of nitrogen, phosphorus, and potassium. Dilute the fertilizer according to the package instructions, typically 1 tablespoon per gallon of water.
Apply the fertilizer during the plant's active growing period, typically in late spring or early summer. Begin fertilizing when new growth starts to appear and continue monthly until early fall. Avoid fertilizing during the winter dormant period.
Before applying the fertilizer, thoroughly water the soil to ensure proper absorption. Then, carefully pour the diluted fertilizer around the base of the plant, avoiding contact with the leaves. Alternatively, you can use a watering can to apply the fertilizer directly to the soil.
After fertilizing, water the plant again to wash away any fertilizer residue from the foliage. This will prevent fertilizer burn and damage to the plant. Do not over-fertilize, as it can lead to excessive vegetative growth and may harm the plant.
Monitor the plant's growth and adjust the fertilization frequency or concentration accordingly. Additionally, always follow the specific instructions provided by the fertilizer manufacturer for best results.
When selecting soil for the Sidalcea Hendersonii plant, it is important to consider its specific requirements for optimal growth and development. This perennial plant prefers a well-draining soil that is rich in organic matter. The soil should have a slightly acidic to neutral pH, ranging from 6.0 to 7.0, to provide an ideal growing environment.
A loose and loamy soil texture is ideal for the Sidalcea Hendersonii plant, as it allows for sufficient drainage while retaining enough moisture for the roots. Sandy or sandy loam soils are well-suited for this plant, as they provide good drainage and aeration. Adding organic matter such as compost or well-rotted manure to the soil can improve its structure, water-holding capacity, and nutrient content.
Furthermore, it is crucial to avoid heavy clay soils that tend to become waterlogged, as they can lead to root rot and various other problems for the Sidalcea Hendersonii plant. If your soil is heavy clay, you can amend it by incorporating coarse sand, peat moss, or perlite to improve drainage.
Before planting the Sidalcea Hendersonii, it is advisable to prepare the soil by loosening it and removing any weeds or debris. Incorporating a slow-release fertilizer that is balanced in nutrients can provide an added boost to the plant's growth and flowering potential.
Regular monitoring of soil moisture is essential to ensure the plant's health. It is important not to let the soil become overly dry or waterlogged, as either extreme can be detrimental to the Sidalcea Hendersonii plant. Watering when the top inch of soil feels slightly dry is generally recommended.
In summary, the most suitable soil for the Sidalcea Hendersonii plant should be well-draining, slightly acidic to neutral, and rich in organic matter. Ensuring proper soil preparation and maintaining appropriate moisture levels will contribute to the plant's overall health and vitality.
To propagate the Sidalcea Hendersonii plant, you can follow these steps:
- Start by selecting a healthy mother plant from which you can obtain cuttings. Look for a mature plant with strong stems and vibrant foliage.
- Prepare a clean and sharp pair of pruning shears or scissors. It is important to ensure that the tools are sterilized to prevent the spread of diseases.
- Choose a suitable time for propagation, which is typically during spring or early summer. This allows the new plant to establish roots before the onset of winter.
- Identify a stem on the mother plant that is robust and free from any damage or disease. Make a clean cut about 4-6 inches below the tip of the stem, ensuring that you snip just above a leaf node.
- Remove any lower leaves from the cutting, leaving only a few sets of leaves at the top intact.
- If desired, you can dip the cut end of the stem in a rooting hormone powder to promote faster root growth. However, this step is optional and not necessary for all plants.
- Choose a suitable growing medium for the cuttings. A mixture of perlite and peat moss or a well-draining potting mix can be used. Ensure the medium is moist but not excessively wet.
- Create a hole in the growing medium using a pencil or your finger, and gently place the cutting into it. Press the medium around the stem to provide support.
- Place the container in a warm and well-lit area, but avoid direct sunlight to prevent scorching the delicate cuttings. Maintain a consistent temperature between 70-75°F (21-24°C).
- Mist the cuttings regularly to maintain humidity and prevent dehydration. Covering the container with a plastic bag or clear plastic wrap can create a greenhouse-like environment that helps with moisture retention.
- Over the next few weeks, monitor the cuttings closely for signs of new growth, indicating that roots are forming. It may take 4-8 weeks for the roots to establish, so patience is required.
- Once the cuttings have rooted and show several inches of new growth, they can be transplanted into individual pots or directly into the garden, depending on your preference.
Remember to provide the newly propagated plants with adequate water, light, and care as they acclimate to their new environment. With proper attention, these new additions to your garden can thrive and bring beauty to your landscape.


