Plant Overview
Known affectionately as the Bristly-stem Checker-mallow, this Pacific Northwest native is like a delicate, wild cousin to the garden Hollyhock. Standing tall in coastal meadows and grassy prairies, it paints the landscape with soft strokes of rose-pink. While it may look fragile, it is a sturdy perennial that has survived for centuries in the damp, breezy corridors of the Oregon and Washington coastlines.
🔍 How to Identify
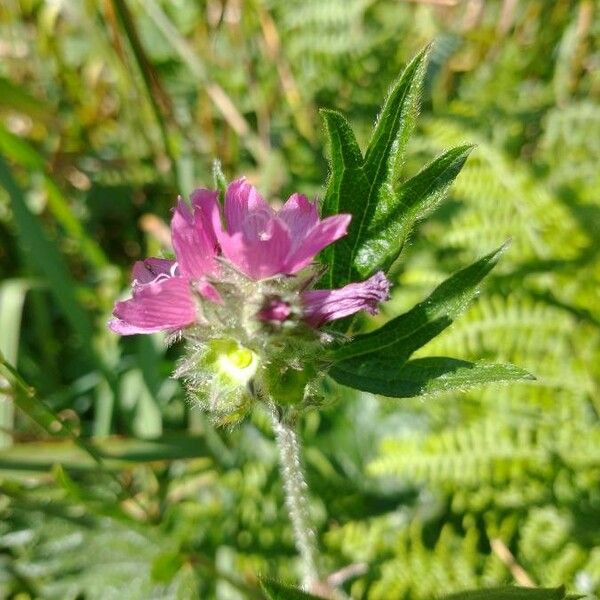
- 🌸 The Blooms: Features five-petaled, cup-shaped flowers that range from pale pink to a vibrant rose-purple. They cluster along the top of the stem in a loose, elegant spike.
- 🍃 Variable Foliage: The leaves at the base are rounded and heart-shaped, while the leaves higher up the stem are deeply "cut" into thin, finger-like lobes.
- 🪶 The "Bristles": True to its name, the stems are covered in fine, stiff hairs. If you look closely or run a finger gently along the stalk, you’ll feel a rough, sandpaper-like texture that distinguishes it from other Checker-mallows.
🏡 In Your Garden
- 💧 Moisture Lover: Unlike many drought-tolerant meadow plants, Sidalcea hirtipes craves "heavy" soils that retain moisture. It is a perfect candidate for rain gardens or those low-lying spots in your yard that stay damp after a spring shower.
- 🦋 Pollinator Magnet: This plant acts as a vital "filling station" for native bees and butterflies. It is specifically known to be a host plant for several species of caterpillars, providing them with both a home and a buffet.
⚠️ Safety & Toxicity
- ✅ Safe Status: This plant is generally considered non-toxic to humans, cats, dogs, and horses. It does not carry the chemical defenses found in more "dangerous" meadow flowers like Foxglove.
- 🧤 Skin Sensitivity: While not poisonous, the stiff bristles on the stems can be a minor irritant to those with very sensitive skin. If you are doing a lot of pruning, wearing gardening gloves is a good idea to avoid "prickly" discomfort.
✨ Fun Fact
The Sidalcea genus is often referred to as "Checker-bloom" because the veins on the petals can create a faint, intricate pattern that looks like a delicate lace or a checkered map when viewed under a magnifying glass!

Detailed Care Instructions
To successfully grow Sidalcea hirtipes, also known as the hairy-stemmed checkermallow, follow these steps:
- Select a suitable location: Sidalcea hirtipes prefers full sun to partial shade. Choose a well-draining area with fertile soil.
- Prepare the soil: Ensure the soil is well-draining by adding organic matter such as compost or well-rotted manure. This will improve moisture retention and provide essential nutrients.
- Planting: Depending on the climate, plant Sidalcea hirtipes in spring or fall. Dig a hole that is slightly larger than the root ball. Place the plant in the hole, making sure it is planted at the same depth it was previously growing. Backfill the hole with soil and gently firm it around the plant.
- Watering: Water the plant thoroughly after planting. Sidalcea hirtipes prefers consistent moisture but can tolerate some drought once established. Water deeply when the top inch of soil feels dry.
- Mulching: Apply a layer of organic mulch around the plant. This will help retain moisture, suppress weeds, and moderate soil temperature.
- Fertilization: Sidalcea hirtipes generally doesn't require extensive fertilization. However, you can provide a balanced slow-release fertilizer in early spring if the plant appears to be lacking vigor.
- Pruning: Deadhead spent flowers to encourage continuous blooming and prevent self-seeding. Cut back the foliage in late fall or early spring to promote new growth.
- Pests and diseases: Sidalcea hirtipes is relatively resistant to most pests and diseases. However, keep an eye out for common garden pests like aphids or spider mites. If necessary, use organic methods like insecticidal soap or neem oil to control pests.
- Division: Every few years, consider dividing and replanting Sidalcea hirtipes to maintain its vigor and prevent overcrowding. Dig up the clump, divide it into smaller sections, and replant them at the appropriate depth.
By following these steps, you can successfully grow Sidalcea hirtipes and enjoy its beautiful flowers throughout the growing season.

Place in a bright room that is sun drenched almost all day. Or directly in a south-facing window.

Watering the plant with a generous amount of water once a week is recommended. It is important to ensure that the soil is moist, but not waterlogged, as this can cause root rot. The plant should be watered slowly and deeply, allowing the water to penetrate the soil and reach the roots. It is best to avoid watering the plant during the hottest part of the day to prevent the water from evaporating before it can be absorbed by the soil. Mulching around the base of the plant can help to retain moisture in the soil and reduce the need for frequent watering.
To fertilize this plant, use a balanced, water-soluble fertilizer with equal amounts of nitrogen, phosphorus, and potassium. Apply the fertilizer every 4-6 weeks during the growing season, starting in early spring and ending in late summer. Use half the recommended dose for young or newly planted specimens. Water the plant thoroughly before and after applying the fertilizer to prevent burning the roots. Avoid over-fertilizing, as this can lead to excessive leaf growth and reduced flowering.
When planting Sidalcea hirtipes, it is important to choose a soil that is well-draining, yet moisture-retentive. A loamy soil with a pH of 6.0 to 7.0 is ideal. The soil should be fertile, with plenty of organic matter to provide nutrients for the plant. A good way to achieve this is to mix in compost or well-rotted manure before planting. It is also important to ensure that the soil is free of weeds and debris that can compete with the plant for nutrients and water. Sidalcea hirtipes prefers a sunny location, but can tolerate some shade. Watering should be consistent, but not excessive, to avoid waterlogging the soil and causing root rot. Adding a layer of mulch around the base of the plant can help to prevent moisture loss and regulate soil temperature.
To propagate this particular plant, you need to take stem cuttings. Start by selecting a healthy stem with several leaves and make a clean cut using sharp and sterilized pruning shears. Remove the lower leaves of the stem, leaving only a few at the top. Dip the cut end of the stem in rooting hormone to promote faster root development. Next, fill a small pot with well-draining soil and make a hole in the center. Insert the cutting into the hole and lightly pack soil around the stem. Water the cutting thoroughly and cover the pot with a clear plastic dome to create a mini greenhouse. Place the pot in a bright, indirect location and keep the soil consistently moist until roots have formed. After a few weeks, the cutting should have developed roots and can be transferred to a larger pot or planted in the ground.


