Plant Overview
Often called the Porcupine Tomato or Devil’s Thorn, this Madagascar native is one of the most visually striking (and intimidating) members of the nightshade family. It is a botanical paradox, featuring delicate lavender flowers and velvety foliage guarded by a fierce armor of neon-orange thorns. While it looks like something out of a science fiction movie, it is a popular choice for "Goth gardens" or for enthusiasts who love architectural, high-contrast plants.
🔍 How to Identify
- 🦔 The Spines: The most defining feature is the long, needle-sharp, fluorescent orange thorns that run vertically along the leaf veins and cover the stems.
- 🍃 The Foliage: Deeply lobed, fuzzy leaves with a dusty grey-green or silvery-blue hue that creates a sharp color contrast with the bright orange spikes.
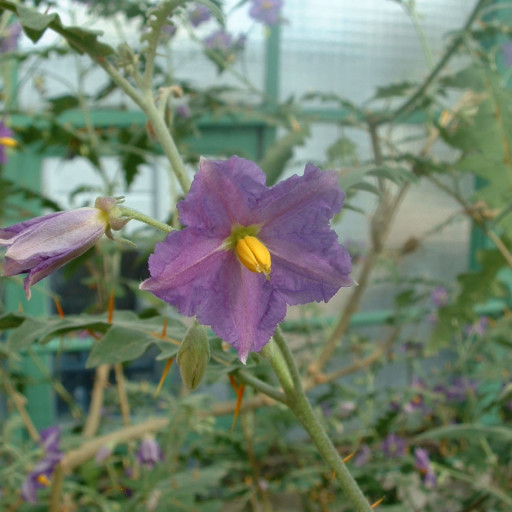
- 🌸 The Blooms: Star-shaped violet or lavender flowers with a prominent yellow cone of anthers in the center, appearing in small clusters throughout the warm months.
🏡 In Your Garden
- ☀️ Sun-Seeker: This plant is built for the intense heat of Madagascar. It thrives in full sun and actually develops more vibrant colors and longer thorns when it receives high light levels.
- 🪴 Growth Nuance: Because it has a vigorous growth habit and can be sensitive to frost, many gardeners treat it as an annual or keep it in a large container. This allows you to bring it indoors during winter and prevents it from spreading too aggressively in tropical climates.
- 💧 Dry Roots: It is remarkably drought-tolerant once established. Its "fuzzy" leaves help it retain moisture, so it prefers well-drained soil and will quickly suffer from root rot if overwatered.
⚠️ Safety & Toxicity
- 🚫 High Risk: Every part of the Porcupine Tomato is toxic if ingested by humans, cats, or dogs. It contains solanine, which can cause severe digestive distress and other symptoms.
- ⚔️ Physical Hazard: The thorns are not just for show—they are incredibly sharp and can easily puncture skin. Always wear heavy-duty leather gardening gloves when handling or pruning this plant, and keep it away from walkways where people might accidentally brush against it.
✨ Fun Fact
Despite its menacing appearance, the Porcupine Tomato is a close relative of the common garden tomato and the potato! Its fierce thorns are an evolutionary defense mechanism designed to discourage lemurs and other hungry herbivores in its native Madagascar from eating its leaves.

Detailed Care Instructions
| Lighting | Full Sun |
| Hardiness Zones | Min 9B |
To grow Solanum pyracanthos, which is commonly known as the porcupine tomato or devil's thorn, follow these steps:
- Obtain Seeds: Obtain seeds from a reputable supplier or collect them from a mature Solanum pyracanthos plant.
- Stratification: Scarify the seeds by nicking or sanding their outer coats lightly. Soaking the seeds in water for 24 hours can also help with germination. Then put the scarified seeds in a plastic bag with some moistened peat moss or vermiculite, and place them in the refrigerator for about 2 to 4 weeks. This cold stratification process helps break the seed dormancy.
- Soil Preparation: Choose a well-draining soil with a pH level around 6.0 to 7.5. Solanum pyracanthos prefers sandy or loamy soil.
- Planting: Start planting the seeds indoors in seed trays or pots, about 8-10 weeks before the last frost date in your area, or directly sow them outdoors after the frost has passed. Plant the seeds about ¼ inch deep and keep them moist.
- Lighting and Temperature: Provide bright, indirect light or partial shade to the young seedlings. Maintain a temperature of around 70-85°F (21-29°C) for optimal growth.
- Watering: Keep the soil consistently moist but not waterlogged. Avoid letting the soil dry out completely or become waterlogged, as it can adversely affect the plants.
- Transplanting: When the seedlings have at least 2 sets of true leaves and the risk of frost has passed, transplant them into larger pots or to their permanent outdoor location. Maintain a spacing of about 2-3 feet between plants.
- Fertilization: Apply a balanced, slow-release fertilizer according to the manufacturer's instructions, or use a diluted liquid fertilizer every two weeks during the growing season.
- Support: As Solanum pyracanthos plants grow, they may need support due to their sprawling nature. Use trellises, stakes, or fences to provide support and prevent the branches from breaking under the weight of the fruits.
- Pruning and Maintenance: Regularly prune the plant to control its size and promote bushier growth. Remove any dead or damaged branches.
- Pests and Diseases: Monitor the plant for pests like aphids, caterpillars, or whiteflies, and treat them accordingly. Additionally, be vigilant for any signs of diseases like powdery mildew or leaf spot, and take appropriate measures to control them.
- Harvesting: Solanum pyracanthos produces small, spiky fruits. Harvest them when they turn red and reach a desired size. They are edible but can be quite bitter and are typically used in ornamental arrangements.
By following these steps, you should be able to successfully grow your Solanum pyracanthos plant.

Place in a window with dappled sun or a spot in the middle of a room. Or directly in a window facing west or east.

To water this plant, first, determine its watering needs based on the season and the temperature and humidity levels in the surrounding environment. Ensure that the soil around the roots is dry before watering. Use a watering can with a narrow spout to direct water at the base of the plant, avoiding getting water on the foliage or flowers. Water to saturate the soil up to the depth of the plant roots, which may be several inches deep. Avoid over-watering, as this can lead to root rot and other plant diseases. Water consistently on a regular schedule, while still allowing the soil to dry out between waterings to prevent suffocation of the roots. Consider adding a layer of organic mulch on top of the soil to help retain moisture and regulate temperature.
- Start by selecting a balanced, slow-release fertilizer suitable for Solanum Pyracanthos.
- Dilute the fertilizer according to the product instructions or use it at full strength for a more immediate effect.
- Ensure that the soil is slightly moist before applying the fertilizer.
- Gently spread the fertilizer evenly around the base of the plant, making sure to avoid direct contact with the stem or leaves.
- Use a rake or garden fork to lightly work the fertilizer into the top layer of soil, being careful not to damage the plant's root system.
- Water the plant thoroughly after fertilizing to help activate and distribute the nutrients.
- Monitor the plant's response to the fertilizer and adjust the feeding schedule based on its growth and health. Be cautious not to over-fertilize, as this can cause harm to the plant.
- It is generally recommended to fertilize Solanum Pyracanthos every 4-6 weeks during the active growing season (spring and summer).
- During the dormant period (fall and winter), reduce or suspend fertilization to allow the plant to rest.
- Regularly check the soil's moisture level and adjust watering and fertilizing accordingly to ensure the plant receives adequate nutrients without becoming waterlogged or deprived of oxygen.
To propagate Solanum pyracanthos, follow these steps:
- Select a healthy and mature plant to extract cuttings from. This ensures the best chances of successful propagation.
- Prepare a clean, sharp pair of pruning shears or scissors. Disinfect the tools by wiping them with rubbing alcohol or a solution of one part bleach to nine parts water. This helps prevent the spread of diseases or pests.
- Choose a branch for cutting that is semi-hardwood, meaning it is not too young or too old. Semi-hardwood is usually found on the middle section of the plant, which is neither too flexible nor too rigid.
- Cut a 4-6 inch (10-15 cm) section of the chosen branch just below a leaf node. A leaf node is where leaves emerge from the stem. Make a clean, slanted cut to increase surface area for water absorption.
- Remove the lower leaves, leaving only a few at the top. This reduces moisture loss and allows the cutting to focus more on root development.
- Dip the cut end of the stem into rooting hormone powder or gel. This helps stimulate root growth and increases the success rate of propagation. Shake off any excess hormone to avoid overapplication.
- Prepare a pot with well-draining soil mix, such as a combination of equal parts peat moss, perlite, and vermiculite. Moisten the soil slightly to make it damp but not saturated.
- Create a planting hole in the soil using a pencil or any other thin object. Insert the hormone-treated cutting into the hole, ensuring that at least two leaf nodes are buried underground.
- Firmly press the soil around the cutting to eliminate any air pockets. Gently water the cutting to further settle the soil around it.
- Cover the pot with a transparent plastic bag or a plastic dome to create a greenhouse-like environment. This helps retain moisture and create humidity, promoting successful rooting.
- Place the pot in a warm, bright location with indirect sunlight. Avoid direct sunlight as it can scorch the cutting. Maintain a temperature of around 70-75°F (21-24°C) for optimal growth.
- Mist the cutting and the inside of the plastic cover regularly to maintain humidity. Check the moisture level of the soil and water whenever it feels dry to the touch.
- After a few weeks, gently tug the cutting to check for resistance, indicating root development. If there is no resistance, give it more time to root. Once resistance is felt, it indicates successful rooting.
- Gradually acclimate the newly rooted cutting to normal indoor or outdoor conditions over a week or two, by reducing the humidity and exposure to direct sunlight.
- Transplant the rooted cutting into a larger pot or a garden bed with well-draining soil once it has developed a strong root system and established enough foliage.
Remember, Solanum pyracanthos may have different common names in various regions, so it's important to verify the specific plant you are propagating using its scientific name.
Common pests of the porcupine-tomato include Spider mites, aphids, whiteflies, larvae. Make a habit of checking your porcupine-tomato frequently for pests so that any infestations can be caught and managed early.


