Plant Overview
The Solanum genus is a botanical family of extremes, famously known as the "Nightshades." This massive group encompasses everything from your favorite kitchen staples like potatoes and eggplants to beautiful but treacherous wild weeds. It is a diverse clan that has shaped human history, fueling entire civilizations while simultaneously lurking in the shadows of folklore as a source of ancient potions.
🔍 How to Identify
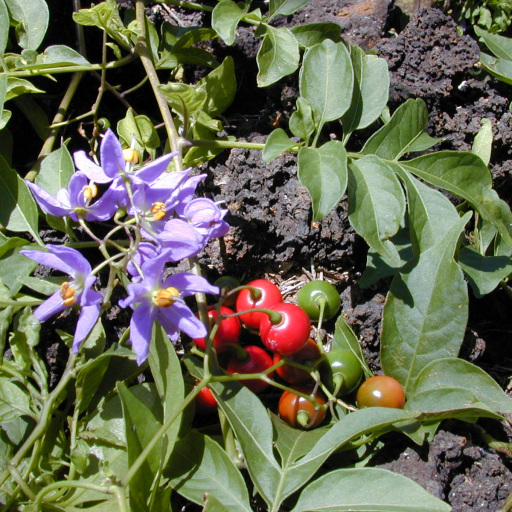
- 🌟 The Star Bloom: Almost all members produce five-petaled, wheel-shaped flowers that look like little stars, typically in shades of white, violet, or soft blue.
- 🍌 The Golden Beak: Look closely at the center of the flower; you’ll see bright yellow anthers clustered tightly together, resembling a tiny banana or a bird's beak.
- 🍃 Textured Foliage: Many species feature leaves covered in fine, silver hairs (trichomes) or even small prickles, which the plant uses as a defense mechanism against hungry insects.
🏡 In Your Garden
- ☀️ Sun-Seekers: Whether you are growing an ornamental "Potato Vine" or a backyard tomato, Solanum species are energy-hungry. They require full sun to produce the sugars necessary for their heavy fruit production.
- 🍽️ Nutrient Demand: These plants are "heavy feeders." They tend to exhaust the soil quickly, so they thrive best when provided with rich organic compost and consistent moisture.
- 🌱 Deep Rooting: Many wild varieties possess deep taproots or spreading rhizomes, making them incredibly resilient but also difficult to move once they’ve settled into a garden bed.
⚠️ Safety & Toxicity
- 🚫 Toxic Potential: Most wild members of this genus contain Solanine, a bitter and dangerous glycoalkaloid. Unless it is a known food crop, never consume the berries or leaves.
- 🐾 Pet & Child Safety: The foliage and unripe fruits of almost all Solanum plants—including the green parts of potatoes and tomatoes—are toxic to dogs, cats, and humans. Ingestion can lead to severe stomach upset, drooling, or lethargy.
✨ Fun Fact
Potatoes were originally feared in 16th-century Europe because they belonged to this "deadly" family. It is said that King Frederick the Great of Prussia had to plant a "royal" field of potatoes and have soldiers guard it so that peasants would think they were valuable enough to steal and eat!

Detailed Care Instructions
To grow a Solanum plant, also known as nightshade or potato, you can follow these steps:
- Choose the right variety: Solanum plants come in various species and varieties. Choose the one that suits your climate and growing conditions. Some popular varieties include Solanum tuberosum (potato), Solanum lycopersicum (tomato), and Solanum melongena (eggplant).
- Prepare the soil: Solanum plants prefer well-drained, fertile soil with a slightly acidic pH between 5.5 and 7.0. Add organic matter like compost or well-rotted manure to improve soil fertility, structure, and water retention.
- Start from seeds or seedlings: You can either start from seeds or buy seedlings from a reliable nursery or garden center. If starting from seeds, sow them indoors a few weeks before the last frost date in your area. Transplant the seedlings into the garden once the soil has warmed up and all chances of frost have passed.
- Choose a sunny location: Solanum plants need full sun exposure to produce healthy foliage and abundant fruits. Choose a spot in your garden that receives at least 6-8 hours of direct sunlight per day.
- Planting: Dig a hole slightly bigger than the pot size or the root ball of the seedling. Gently remove the seedling from the container and place it in the hole so that the top of the soil is level with the ground. Space the plants according to their mature size, usually between 12 to 24 inches apart.
- Watering and fertilizing: Water the plants regularly to keep the soil consistently moist, especially during hot and dry periods. Avoid overwatering, as it can lead to root rot. Fertilize the plants regularly with a balanced fertilizer, following the package instructions for dosage.
- Pruning and staking (if necessary): Some Solanum plants like tomatoes and certain types of eggplants may require staking or trellising to support their vigorous growth. Prune the plants by removing any damaged or diseased leaves, suckers, or branches to promote better air circulation and higher fruit production.
- Pests and diseases: Monitor the plants regularly for common pests like aphids, beetles, or caterpillars. Treat infestations with organic or chemical insecticides. Keep the surrounding area clean and remove any fallen leaves or debris to prevent the spread of diseases.
- Harvesting: Harvest the fruits when they are ripe and fully colored. Each Solanum species has different signs of ripeness, so refer to specific guidelines for your chosen plant. Enjoy the fresh produce or store potatoes and tomatoes in a cool, dark place.
Remember to research the specific needs and requirements of the Solanum species you wish to grow, as they may vary slightly. Happy growing!

Place in a bright room that is sun drenched almost all day. Or directly in a south-facing window.

Solanum plants require regular watering to maintain healthy growth and prevent soil drought. To water these plants properly, it is important to first assess the moisture needs of the soil. This can be done by checking the soil for dryness or moisture content using a moisture meter or testing the soil texture by hand.
When watering the Solanum plant, use a slow and gentle stream of water that won't disturb the soil. It is important to avoid over-watering the plant, as it can lead to root rot and other fungal diseases. Allow the soil to dry out slightly between watering sessions, but do not let it become completely dry.
When watering the Solanum plant, it is also important to avoid getting water on the leaves, as this can lead to the growth of fungal pathogens. Directing the water towards the base of the plant is the best and safest way to ensure that the roots receive adequate moisture.
Overall, consistent and careful watering is essential for ensuring the healthy growth and development of the Solanum plant.
Apply a balanced N-P-K fertilizer with a ratio of 10-10-10, in early spring before new growth appears.
Apply a second round of fertilizer in the early summer.
Fertilize every four to six weeks during the growing season, using a water-soluble fertilizer.
Avoid excessive fertilization, which may lead to lush foliage growth at the expense of flowers and fruit.
When planting Solanum plants, it is important to choose the right type of soil. These plants prefer well-draining soil that is rich in organic matter. A pH range of 6.0-7.5 is ideal. Sandy loam or loamy soils are recommended. The soil should be amended with compost or manure to improve its organic content. Avoid using heavy, clay soils that retain moisture and can cause root rot. It is also important to ensure that the soil is not too acidic or alkaline as this can affect the growth and development of the plant. A balanced fertilizer should be applied after planting to provide essential nutrients for Solanum's healthy growth.
There are several ways to propagate this plant, but one common method is through stem cuttings. Start by selecting a healthy stem that is at least 4 inches long and has several leaves. Make a clean cut just below a node using sharp, sterile scissors or pruners.
Remove the lower leaves from the stem, leaving only a few at the top. Dip the cut end in rooting hormone powder to aid in root development. Insert the cutting into a prepared pot of soil or into a container of water. If using soil, create a hole with a pencil or stick before inserting the cutting to prevent damage.
Place the pot or container in a warm, bright location but out of direct sunlight. If using soil, keep it consistently moist but not too wet, and cover the pot with a plastic bag to maintain humidity. If using water, change it every few days or as needed.
After a few weeks, check for root growth by gently tugging on the cutting. If you feel resistance, roots have developed and the cutting can be transplanted into its permanent location. If not, give it more time and continue to care for it until roots form.


