Plant Overview
Often called the "Philippine Ground Orchid" or the "Large Purple Orchid," Spathoglottis plicata is the perfect "entryway orchid" for those who find traditional tree-dwelling orchids intimidating. Unlike its cousins that cling to bark, this resilient beauty lives comfortably in the soil, mimicking the look of a miniature palm tree until it erupts in a fountain of vibrant purple blooms. In many tropical cultures, it is a staple of "grandmother's garden" because of its reliability and constant flowering.
🔍 How to Identify
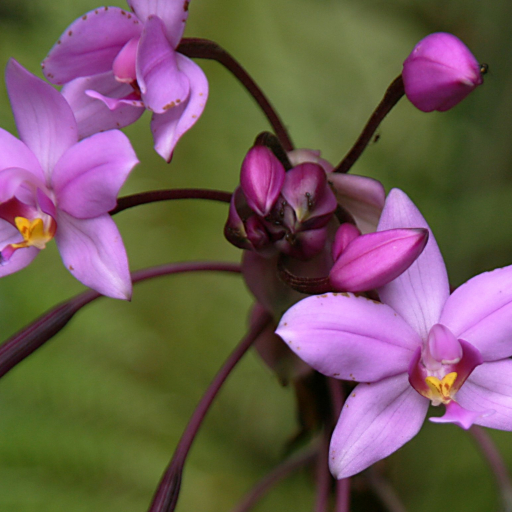
- 🍃 The Foliage: Look for long, lance-shaped leaves that feature distinct "pleats" or ribs running lengthwise, closely resembling the fronds of a palm seedling.
- 🌸 The Blooms: It produces tall, upright flower spikes topped with clusters of 1-inch wide flowers, typically in shades of rich magenta, purple, or occasionally white with a yellow "lip" in the center.
- 🌱 The Base: At the soil level, you will find "pseudobulbs"—swollen, onion-like structures that store water and nutrients, allowing the plant to survive brief periods of neglect.
🏡 In Your Garden
- 🪴 Terrestrial Living: Because this is a ground orchid, do not use chunky bark chips meant for Phalaenopsis. It prefers a rich, well-draining potting mix (think peat or coco-coir blended with perlite) that stays consistently moist but never soggy.
- ☀️ Sunlight Nuance: While it loves bright light to fuel its heavy blooming cycle, harsh midday sun can scorch those beautiful pleated leaves. In the garden, it thrives best under the dappled shade of a canopy tree.
- 🌡️ Warmth Lover: This is a true tropical; it has no "off" switch for winter and will stop growing or die back if temperatures drop below 50°F (10°C).
⚠️ Safety & Toxicity
- ✅ Status: Generally considered non-toxic.
- 🐾 Details: This orchid is a safe choice for households with curious cats or dogs. While not intended for consumption, it lacks the harsh alkaloids found in many other tropical ornamentals, making it a "worry-free" addition to your collection.
✨ Fun Fact
The species name plicata literally means "pleated" in Latin, referring to the fan-like folds of its leaves. Interestingly, this orchid is a pioneer species—it is often one of the first plants to recolonize volcanic blast sites or cleared lands in its native Southeast Asian habitat!

Detailed Care Instructions
| Lighting | Part Sun |
| Hardiness Zones | Min 10A |
Here are some tips to help you grow Spathoglottis Plicata plants:
- Location: Spathoglottis Plicata plants thrive in warm, tropical climates. Choose a spot in your garden that receives full sun or partial shade.
- Soil: Use well-draining soil that is rich in organic matter. This will help provide the necessary nutrients for healthy growth.
- Watering: Keep the soil evenly moist but avoid overwatering, as this can lead to root rot. Water the plant regularly, especially during the hot summer months.
- Fertilizer: Apply a balanced, slow-release fertilizer every two to three months during the growing season. This will help promote healthy growth and blooming.
- Pruning: Regularly remove spent flowers and trim back any dead or yellowing leaves. This will keep the plant looking neat and encourage new growth.
- Propagation: Spathoglottis Plicata plants can be propagated from rhizome divisions or from seeds. Division is usually the most common method. Simply dig up a clump of the plant and divide it into smaller sections, each with a healthy rhizome and several growth points.
- Pests and Diseases: Keep an eye out for common garden pests such as aphids, snails, and slugs. Treat infestations promptly to prevent damage to the plant. Additionally, ensure good air circulation around the plant to minimize the risk of fungal diseases.
- Winter Care: If you live in a colder climate, you may need to bring your Spathoglottis Plicata indoors during the winter months. Place the plant in a cool, bright location and reduce watering. Resume regular care and watering in the spring.
By following these tips, you should be able to successfully grow and enjoy your Spathoglottis Plicata plant.

Place in a window with dappled sun or a spot in the middle of a room. Or directly in a window facing west or east.

To properly water this plant, it is important to understand its watering needs. This plant prefers to be kept consistently moist but not waterlogged. It is important to allow the top layer of soil to dry out slightly before watering again. When watering, aim to evenly moisten the soil throughout the entire root system. Be sure to avoid getting water on the leaves and flowers, as this can cause damage or disease. The frequency of watering will depend on factors such as the size of the plant, the pot size, and the surrounding environment. It is recommended to use room temperature, non-chlorinated water for best results.
- Use a balanced fertilizer that includes nitrogen, phosphorus, and potassium.
- Water the plant thoroughly before applying the fertilizer.
- Dilute the fertilizer according to the instructions on the package.
- Apply the fertilizer to the soil around the base of the plant.
- Avoid getting the fertilizer on the leaves or flowers of the plant.
- Fertilize the plant once a month during the growing season.
- Reduce or stop fertilizing during the plant's dormant period.
- Monitor the plant for any signs of fertilizer burn, such as yellowing or browning leaves, and adjust the fertilization schedule if necessary.
- Always follow the manufacturer's instructions when using fertilizer.
Spathoglottis Plicata is a terrestrial orchid that requires a well-draining, nutrient-rich soil that is slightly acidic. One recommended soil mix is a combination of sphagnum peat moss, perlite, and pine bark in equal parts. The sphagnum peat moss provides moisture retention, while the perlite and pine bark offer good drainage and aeration to the roots. It is important to avoid compacted soil or heavy clay, as this can lead to root rot and suffocation of the plant. In addition, fertilizer should be applied regularly during the growing season to provide adequate nutrients for the orchid to thrive.
To propagate this plant, the first step is to identify a healthy stem with at least two or three leaves. Cut the stem about an inch below a node, making sure to use sterilized pruning shears. Then, remove the bottom leaves to expose the node and dip the cut end in a rooting hormone powder.
Next, prepare a pot with a well-draining mix of peat and perlite and make a hole using a pencil or a stick. Insert the stem into the hole and firm the soil gently around it. Water the cutting thoroughly and cover it with a clear plastic bag or a lid to create a mini greenhouse. Keep the soil moist but not waterlogged and place the pot in a warm and bright location, but away from direct sunlight.
After about four to six weeks, the cutting should start to produce new shoots and roots. You can check for root growth by gently tugging on the stem. Once the roots have established and the plant has several new leaves, you can gradually acclimate it to normal room conditions by removing the cover for a couple of hours each day and increasing the exposure gradually.
Finally, when the plant has outgrown the pot, you can transplant it to a larger container or into the ground, if the climate is appropriate. Make sure to mix in some organic matter, such as compost or aged manure, into the soil to promote healthy growth.
Common pests of the philippine ground orchid include Spider mites, thrips. Make a habit of checking your philippine ground orchid frequently for pests so that any infestations can be caught and managed early.


