Plant Overview
Known as the Stemless Mock Goldenweed, this rugged beauty is a "cushion plant" that clings to life in some of the harshest, rockiest terrains of Western North America. It forms dense, low-growing mats that explode into brilliant yellow dots during the early summer, looking like sunshine trapped in the crevices of a cliffside. It is a favorite for high-altitude hikers and rock garden enthusiasts alike.
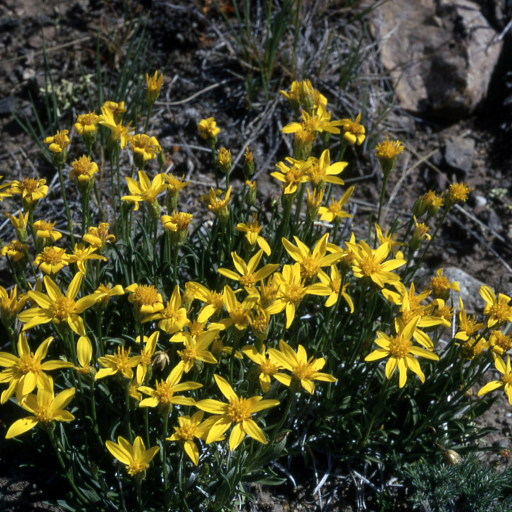
🔍 How to Identify
- 🌼 Golden Blooms: Daisy-like flowers with bright yellow ray petals that sit directly atop the foliage or on very short, nearly invisible stalks.
- 🍃 Leathery Foliage: Narrow, spoon-shaped leaves that are stiff, grayish-green, and often covered in a slight resin to help the plant retain moisture.
- 🧶 Mat-Forming Growth: The plant rarely exceeds 4 inches in height, spreading outward to create a dense, protective "cushion" that hugs the ground.
🏡 In Your Garden
- 🪨 The Rock Star: This plant is a specialist for rock gardens and xeric (dry) landscapes. It evolved to thrive in gravelly, alkaline, and well-draining soil where more delicate species would wither.
- 🚱 Taproot Toughness: It possesses a deep, sturdy taproot that makes it incredibly drought-tolerant once established. However, this means it hates being moved; transplanting a mature Stenotus is often unsuccessful.
⚠️ Safety & Toxicity
- ✅ Safe Profile: Stenotus acaulis is generally considered non-toxic to humans and common household pets.
- 🐕 Low Risk: It does not contain the high levels of volatile oils or harsh alkaloids found in some other members of the Aster family, making it a safe, "pet-friendly" addition to a rocky garden path.
✨ Fun Fact
The "cushion" growth habit is a clever engineering feat! By staying low and dense, the plant creates its own microclimate, trapping heat within its leaves and breaking the force of freezing mountain winds that would otherwise dry it out.

Detailed Care Instructions
To grow Stenotus Acaulis (also known as prairie fire or firecracker penstemon), follow these steps:
- Choose the right location: Stenotus Acaulis prefers full sun to partial shade. Select a spot in your garden that receives at least 6 hours of direct sunlight per day. Ensure the soil is well-draining to prevent waterlogged conditions.
- Prepare the soil: Before planting, prepare the soil by removing any weeds or grass. Loosen the soil and amend it with organic matter such as compost to improve drainage and nutrient content.
- Planting: Dig a hole slightly larger than the root ball of the Stenotus Acaulis plant. Place the plant in the hole, making sure it sits at the same depth as it was in its nursery pot. Backfill the hole with soil and gently tamp it down to remove any air pockets.
- Watering: Water the newly planted Stenotus Acaulis thoroughly after planting. Keep the soil consistently moist but not waterlogged. Once established, this plant is relatively drought-tolerant and should only require occasional watering during dry periods.
- Mulching: Apply a layer of organic mulch around the base of the plant to help conserve moisture, suppress weeds, and regulate the soil temperature.
- Pruning: Stenotus Acaulis benefits from regular pruning to maintain its shape and encourage bushier growth. After the plant finishes blooming, trim back any dead or damaged stems. Additionally, pinching back the stems in early spring can help promote branching.
- Fertilization: Stenotus Acaulis typically does not require frequent fertilization. However, you can apply a balanced, slow-release fertilizer in early spring to provide nutrients for healthy growth. Follow the instructions on the fertilizer packaging for proper application rates.
- Pest and disease control: Stenotus Acaulis is relatively resistant to pests and diseases. However, occasional monitoring is necessary. Keep an eye out for common garden pests like aphids, spider mites, or slugs, and treat them promptly if detected. Additionally, ensure good airflow around the plant to prevent diseases like powdery mildew.
- Division and propagation: Stenotus Acaulis can be propagated by division. Every few years, dig up the plant and carefully divide the clumps into smaller sections, ensuring each division has enough roots to support growth. Replant the divided sections in prepared soil and water thoroughly.
By following these guidelines, you can successfully grow Stenotus Acaulis and enjoy its vibrant blooms in your garden.

Place in a bright room that is sun drenched almost all day. Or directly in a south-facing window.

Stenotus Acaulis plant should be watered moderately, as it prefers well-draining soil that is not constantly moist. Water should be given when the top layer of soil feels dry to the touch, usually every 7-10 days. When watering, it is important to water the soil directly and avoid getting water on the leaves, as this can cause damage or disease. It is also important to provide good air circulation around the plant to prevent moisture buildup and the development of fungal problems. During the winter months, watering should be reduced to allow the plant to enter a dormant period.
To effectively fertilize the Stenotus Acaulis plant, follow these instructions:
- Select a balanced, water-soluble fertilizer with equal or slightly higher amounts of nitrogen (N), phosphorus (P), and potassium (K). A ratio of 10-10-10 or 15-15-15 is suitable.
- Dilute the fertilizer according to the label instructions. Generally, a dilution ratio of 1 teaspoon per gallon of water is appropriate, but always refer to the fertilizer packaging for specific recommendations.
- Water the Stenotus Acaulis plant thoroughly before applying the fertilizer. This helps prevent root burn and ensures proper absorption of nutrients.
- Pour the diluted fertilizer slowly and evenly around the base of the plant. Avoid getting the fertilizer on the foliage or flowers, as this could cause burning or damage.
- After fertilization, water the plant again to ensure the nutrients are evenly distributed and to avoid concentration around the roots.
- Repeat the fertilization process every 4-6 weeks during the plant's active growing season, which typically occurs in spring and summer. Adjust the frequency based on the specific fertilizer's recommendations and the plant's response.
Remember, it's crucial not to exceed the recommended fertilizer dosage, as over-fertilization can harm the plant. Regularly monitoring the plant's growth and health will help determine if adjustments need to be made to the fertilization routine.
Stenotus Acaulis is a plant that prefers well-draining soil and does not tolerate overly wet conditions. It is recommended to use a sandy loam soil mix that has been amended with organic matter such as compost. This will provide the plant with the necessary nutrients and enable good drainage. It is also recommended to avoid using heavy clay soils or soils that contain high levels of alkalinity. Soil pH should be between 5.0 to 7.0 for optimal growth. Additionally, it is important to ensure the soil is not too compacted as this can restrict the plant's root growth and affect its overall health.
To propagate the Stenotus Acaulis plant, follow these steps:
- Start by sterilizing all the tools and equipment you will be using, including a sharp, clean pair of pruning shears or scissors, a clear plastic bag or a propagator, a clean pot or container, and a well-draining potting mix.
- Choose a healthy and mature Stenotus Acaulis plant from which to take cuttings. Look for plants that are disease-free, have strong stems, and vibrant foliage.
- Prepare the cutting by cutting a 4-6 inch section of a stem just below a leaf node, using the sterilized pruning shears or scissors. A leaf node is the point where a leaf emerges from the stem.
- Remove any leaves from the lower one-third to one-half of the cutting, as the focus should be on root development. You can gently pinch or prune off the leaves, taking care not to damage the stem.
- Dip the bottom end of the cutting in a rooting hormone powder or gel to encourage root growth. This step is optional but can expedite the rooting process.
- Fill a clean pot or container with a well-draining potting mix. Make a small hole in the soil with your finger or a pencil.
- Insert the bottom end of the cutting into the hole, ensuring that at least one or two leaf nodes are buried in the soil. Press the soil gently around the cutting to hold it in place.
- Mist the cutting and the surrounding soil with water to provide moisture. Alternatively, you can place a clear plastic bag or propagator over the cutting to create a mini greenhouse effect and increase humidity.
- Place the pot or container in a warm and bright location, away from direct sunlight. A temperature range of 70-80°F (21-27°C) is ideal for root development.
- Monitor the cutting regularly, ensuring that the soil remains moist but not waterlogged. Avoid overwatering, as it can lead to rotting.
- After a few weeks, gently tug the cutting to check for resistance, indicating root development. Once the roots have adequately formed, usually in 4-6 weeks, the cutting can be transplanted into a larger pot or directly into the garden.
- Harden off the newly rooted plant before exposing it to the outdoor elements. Gradually acclimate it to direct sunlight and outdoor conditions over a period of one to two weeks.
By following these propagation steps, you can create new Stenotus Acaulis plants and expand your collection or share them with others.


