Plant Overview
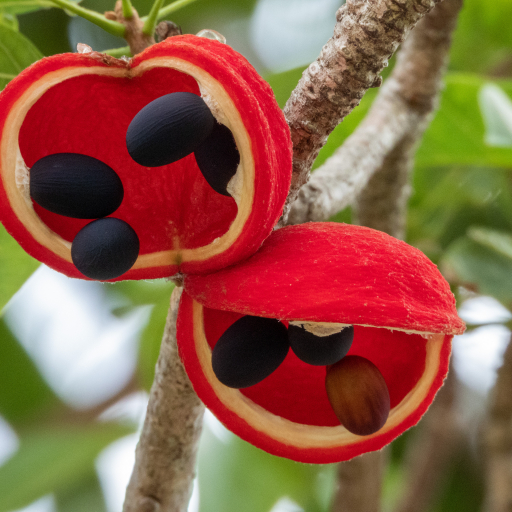
Commonly known as the Peanut Tree or Monkey Nut, this Australian native is a showstopper in any tropical landscape. While its cream-colored flowers are modest, the tree truly comes alive when its leathery, boat-shaped pods burst open to reveal a brilliant orange-red interior. Indigenous Australians have long valued this tree as a "supermarket" of the bush, providing both food and materials for tools.
🔍 How to Identify
- 🍃 Heart-Shaped Leaves: The foliage is lush and broad, with large, ovate leaves that create a dense, cooling canopy.
- 🔔 Bell-Shaped Blooms: In late spring, look for clusters of small, fragrant flowers that are creamy-white or pale green.
- 🛶 The Seed Pods: The most iconic feature is the woody, boat-shaped fruit. When ripe, it splits open to reveal a vibrant red lining and jet-black, peanut-like seeds.
🏡 In Your Garden
- 🌳 A Shade Specialist: Because it can grow quite large (up to 10–15 meters), it is best used as a specimen tree in medium to large gardens where it can provide ample summer shade.
- 🦋 Wildlife Magnet: The bright colors of the open pods are nature's "open for business" sign, attracting birds and various insects that help disperse the seeds.
- 🌱 Root Resilience: It is relatively hardy and drought-tolerant once established, but it prefers well-draining soil and a sunny spot to maximize its fruiting potential.
⚠️ Safety & Toxicity
- 🥜 Edible Seeds: The black seeds are edible and have a nutty flavor similar to raw peanuts. They can be eaten raw or roasted.
- 🧤 Irritating Hairs: Be cautious when handling the inside of the pods; they often contain fine, stinging hairs that can irritate the skin and eyes.
- 🐾 Pet Caution: While the seeds are generally considered safe for human consumption, it is best to keep pets from chewing on the woody pods or large quantities of seeds to avoid digestive upset.
✨ Fun Fact
The bark of the Peanut Tree is incredibly fibrous and strong. Indigenous Australians traditionally used the inner bark to create "kurrajong" (twine) for making fishing nets, bags, and headbands!

Detailed Care Instructions
Growing Sterculia quadrifida, commonly known as the Peanut Tree or Red-fruited Kurrajong, can be a rewarding experience. This Australian native tree is known for its distinctive red seed pods and edible seeds that taste somewhat like peanuts. Here's a step-by-step guide to help you grow Sterculia quadrifida:
1. Seed Collection:
- Finding Seeds: Sterculia quadrifida produces bright red pods that split open to reveal black seeds. Collect the seeds from these pods when they are fully mature.
- Handling Seeds: Be cautious while handling the pods, as they can cause skin irritation for some people.
2. Preparing Seeds:
- Clean Seeds: Rinse the seeds to remove any pulp and let them dry.
- Scarification: Sterculia seeds have a tough outer coat. Scarify them by lightly sanding the seed coat or soaking them in warm water for 24 hours to enhance germination.
3. Sowing the Seeds:
- Potting Mix: Use a well-draining seed-raising mix or a combination of garden soil, sand, and compost.
- Planting Depth: Sow the seeds about 1-2 cm deep into the soil.
- Watering: Water the soil lightly to ensure it is moist but not waterlogged.
4. Germination:
- Position: Place the pots in a warm, sunny location. A temperature range of 20-25°C (68-77°F) is ideal for germination.
- Moisture: Keep the soil consistently moist during the germination period, which can take a few weeks to a couple of months.
5. Transplanting Seedlings:
- When to Transplant: Once the seedlings have developed a few sets of true leaves, they can be transplanted to larger pots or directly into the ground.
- Location: Choose a location with well-draining soil and good sunlight. Sterculia quadrifida can grow in partial shade to full sun.
- Spacing: If planting multiple trees, space them at least 4-5 meters (13-16 feet) apart to accommodate their mature size.
6. Care and Maintenance:
- Watering: Young trees need regular watering until they are established. Mature trees are relatively drought-tolerant.
- Mulching: Apply mulch around the base to retain moisture and suppress weeds.
- Fertilizing: An annual application of a balanced fertilizer can promote healthy growth.
- Pruning: Prune to shape the tree and remove any dead or damaged branches.
7. Pests and Diseases:
- Monitoring: Keep an eye out for common pests such as aphids or scale insects. Treat infestations promptly with appropriate measures.
- Healthy Practices: Ensure good air circulation and sanitation to prevent fungal diseases.
8. Harvesting:
- Pods: The red seed pods can be harvested when they split open. The seeds inside can be roasted and eaten.
By providing optimal conditions and regular care, you can successfully grow a Sterculia quadrifida tree and enjoy its unique beauty and edible seeds.
Watering Sterculia quadrifida requires attention to its natural habitat and growth conditions. Here are the details on how to properly water this plant:
- Frequency: Initially, ensure consistent moisture during the establishment phase. Once established, this plant is relatively drought-tolerant and should only be watered when the top layer of soil becomes dry.
- Soil Moisture: Always aim for well-draining soil to prevent waterlogging. This plant thrives in soil that mimics its natural environment, which usually entails a mix that can retain some moisture without remaining soggy.
- Watering Method: Deep watering is beneficial. This method involves letting water seep deeply into the soil, reaching the roots. Watering should be done slowly to ensure it penetrates the soil rather than running off the surface.
- Seasonal Adjustments: Adjust the watering frequency based on the seasons. During warmer months, you might need to water more frequently, whereas in cooler months, reduce watering significantly to avoid root rot.
- Checking Soil: Before watering, check the soil about an inch deep. If it feels dry, it's time to water. If it's still moist, wait another few days before checking again.
- Avoiding Overwatering: One of the key issues is overwatering. Ensure the plant is not sitting in water. Overwatering can lead to root rot and other fungal issues.
By following these guidelines, you can ensure that your Sterculia quadrifida will have the right amount of water to thrive without suffering from common issues related to improper watering.
Sterculia quadrifida requires a balanced approach to fertilization for optimal growth. Here’s a guideline to help you with that:
- Soil Preparation: Start by ensuring the soil is well-draining and rich in organic matter. You can mix in compost or well-rotted manure to improve soil fertility and texture.
- Fertilizer Type: Use a balanced, slow-release granular fertilizer, such as a 10-10-10 (Nitrogen-Phosphorus-Potassium) formula. This provides an even distribution of essential nutrients over time.
- Application Timing:
- Early Spring: Apply the slow-release fertilizer as the growing season begins. This helps to kickstart new growth.
- Mid-Summer: A second application can be made to support ongoing growth and fruiting (if applicable).
- Early Spring: Apply the slow-release fertilizer as the growing season begins. This helps to kickstart new growth.
- Application Method:
- Granular Fertilizer: Sprinkle the fertilizer evenly around the base of the plant, avoiding direct contact with the trunk. Gently work it into the top layer of the soil with a rake.
- Watering: After applying the fertilizer, water the soil thoroughly. This helps to dissolve the nutrients and ensures they reach the root zone.
- Granular Fertilizer: Sprinkle the fertilizer evenly around the base of the plant, avoiding direct contact with the trunk. Gently work it into the top layer of the soil with a rake.
- Supplemental Feedings:
- Liquid Fertilizer: If you prefer, you can also use a liquid fertilizer, particularly during the active growing season. Dilute it according to the manufacturer's instructions and apply it every 4-6 weeks.
- Foliar Feeding: For a quick nutrient boost, you can use a foliar spray containing trace elements. Apply this directly to the leaves in the early morning or late afternoon to avoid leaf burn.
- Liquid Fertilizer: If you prefer, you can also use a liquid fertilizer, particularly during the active growing season. Dilute it according to the manufacturer's instructions and apply it every 4-6 weeks.
- Considerations:
- Young Plants: Newly planted specimens may benefit from more frequent, lower-dose applications to support strong root development.
- Established Plants: Mature plants typically require less frequent fertilization, as their established root systems are efficient at nutrient uptake.
- Young Plants: Newly planted specimens may benefit from more frequent, lower-dose applications to support strong root development.
- Observation: Regularly monitor for signs of nutrient deficiency like pale leaves or poor growth. Adjust your fertilization schedule as needed based on the plant's response and overall health.
By following these guidelines, you can ensure healthy growth and vitality for your Sterculia quadrifida plant.
Sterculia quadrifida thrives best in well-drained soil that is rich in organic matter. Here are some critical details regarding the soil requirements for cultivating this plant:
- Soil Type:
- Loamy Soil: A balanced mix of sand, silt, and clay which provides good drainage while retaining adequate moisture and nutrients.
- Sandy Loam: This type of soil has a higher proportion of sand, facilitating excellent drainage and root aeration, which is beneficial for the plant.
- Clay Loam: A soil with a bit more clay content, but should still maintain good drainage.
- Loamy Soil: A balanced mix of sand, silt, and clay which provides good drainage while retaining adequate moisture and nutrients.
- pH Level:
- The ideal soil pH for Sterculia quadrifida ranges from slightly acidic to neutral (pH 6.0 to 7.2). This pH range helps in optimal nutrient availability and uptake.
- The ideal soil pH for Sterculia quadrifida ranges from slightly acidic to neutral (pH 6.0 to 7.2). This pH range helps in optimal nutrient availability and uptake.
- Nutrient Content:
- Rich in Organic Matter: Incorporate compost or well-decomposed manure to enhance the soil's fertility, structure, and moisture-retention capabilities.
- Balanced Fertility: Ensure the soil has balanced levels of essential nutrients including nitrogen (N), phosphorus (P), and potassium (K) for healthy growth and development.
- Rich in Organic Matter: Incorporate compost or well-decomposed manure to enhance the soil's fertility, structure, and moisture-retention capabilities.
- Drainage:
- Well-Drained: This plant does not tolerate waterlogged conditions well, so it is crucial that the soil drains properly to prevent root rot. Amending heavy clay soils with coarse sand or organic matter can improve drainage.
- Well-Drained: This plant does not tolerate waterlogged conditions well, so it is crucial that the soil drains properly to prevent root rot. Amending heavy clay soils with coarse sand or organic matter can improve drainage.
- Soil Preparation:
- Before planting, prepare the soil by loosening it to a depth of about 30 cm (12 inches). This ensures proper root development and allows the plant to establish itself quickly.
- Remove any debris, stones, or weeds that might compete with the plant for nutrients and water.
- Before planting, prepare the soil by loosening it to a depth of about 30 cm (12 inches). This ensures proper root development and allows the plant to establish itself quickly.
- Mulching:
- Applying organic mulch around the base of the plant helps retain soil moisture, regulates soil temperature, and suppresses weed growth. Use materials like straw, bark chips, or leaf litter.
By providing Sterculia quadrifida with these soil conditions, you create an environment conducive to its growth and overall health.
- Applying organic mulch around the base of the plant helps retain soil moisture, regulates soil temperature, and suppresses weed growth. Use materials like straw, bark chips, or leaf litter.
Sterculia quadrifida can be propagated through both seed and vegetative methods. Here’s a detailed guide on how to do it:
Seed Propagation
- Seed Collection:
- Harvest seeds from mature, healthy fruits. The best time to collect seeds is when the fruit has fully ripened and the shells start to split open.
- Be cautious when handling the seeds as they may be surrounded by an irritant substance.
- Harvest seeds from mature, healthy fruits. The best time to collect seeds is when the fruit has fully ripened and the shells start to split open.
- Seed Treatment:
- Soak the seeds in warm water for about 24 hours to soften the seed coat and improve germination rates.
- Soak the seeds in warm water for about 24 hours to soften the seed coat and improve germination rates.
- Sowing:
- Prepare a well-draining soil mixture composed of equal parts of sand, peat moss, and compost.
- Sow the seeds at a depth of about 1-2 cm in individual pots or seed trays.
- Keep the soil consistently moist but not waterlogged.
- Prepare a well-draining soil mixture composed of equal parts of sand, peat moss, and compost.
- Germination:
- Place the pots or trays in a warm, sunny location or use a heating pad to maintain a soil temperature around 20-25°C (68-77°F).
- Germination typically occurs within 2-6 weeks, depending on the conditions.
- Place the pots or trays in a warm, sunny location or use a heating pad to maintain a soil temperature around 20-25°C (68-77°F).
- Transplanting:
- Once seedlings have developed 2-3 true leaves and are hardy enough, transplant them into larger pots or directly into the ground, if weather conditions are favourable.
- Choose a site with well-drained soil and partial to full sun exposure.
Vegetative Propagation (Cuttings)
- Once seedlings have developed 2-3 true leaves and are hardy enough, transplant them into larger pots or directly into the ground, if weather conditions are favourable.
- Choosing the Cuttings:
- Select healthy, semi-hardwood cuttings from the parent plant during the growing season.
- Cuttings should be 10-15 cm long with at least two leaf nodes.
- Select healthy, semi-hardwood cuttings from the parent plant during the growing season.
- Preparing the Cuttings:
- Remove the leaves from the lower half of the cutting to reduce water loss.
- Optionally, dip the cut end into a rooting hormone powder to encourage root development.
- Remove the leaves from the lower half of the cutting to reduce water loss.
- Planting the Cuttings:
- Prepare a potting mix of equal parts sand and peat moss for good drainage.
- Insert the cuttings into the potting mix, ensuring at least one leaf node is buried.
- Firm the soil around the cuttings and water them well.
- Prepare a potting mix of equal parts sand and peat moss for good drainage.
- Caring for Cuttings:
- Place the pots in a warm, humid environment with indirect sunlight.
- Keep the soil consistently moist but avoid waterlogging.
- Covering the pots with a plastic bag can help maintain humidity.
- Place the pots in a warm, humid environment with indirect sunlight.
- Root Development:
- Roots should begin to develop within a few weeks to a couple of months.
- Tug gently on the cuttings to check for resistance, indicating root growth.
- Roots should begin to develop within a few weeks to a couple of months.
- Transplanting:
- Once a robust root system has developed, transplant the cuttings into larger pots or directly into the ground.
- Follow standard planting procedures, ensuring good soil drainage and appropriate sunlight exposure.
General Care Tips
- Once a robust root system has developed, transplant the cuttings into larger pots or directly into the ground.
- Ensure good air circulation around the plants to prevent fungal diseases.
- Water moderately, allowing the soil to dry out slightly between watering.
- Fertilize with a balanced, slow-release fertilizer during the growing season.
- Prune to maintain shape and remove any dead or diseased branches.
By following these detailed steps, you can successfully propagate Sterculia quadrifida through seeds or cuttings and enjoy healthy, vibrant plants.


