Plant Overview
Often called the "Devil's-bit Scabious," this charming perennial is a staple of European meadows and ancient folklore. According to legend, the devil bit off the plant’s root in a fit of rage because its medicinal properties were so effective at curing people. It is a late-season superstar, providing a final burst of deep purple just as most other summer flowers begin to fade.
🔍 How to Identify
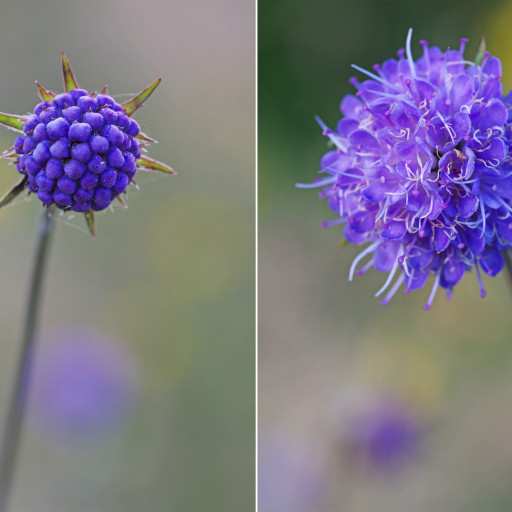
- 🌸 The Flower Head: Look for perfectly spherical, "pincushion" blooms. Unlike other scabious varieties, these are more compact and usually a rich, deep violet or lavender-blue.
- 🍃 The Foliage: Long, elliptical, dark green leaves that are mostly smooth and form a dense rosette at the base of the plant.
- 🦷 The Root: If you were to see the root system, the thick rhizome ends abruptly as if it were severed or "bitten" off, which is the plant's most famous identifying trait.
🏡 In Your Garden
- 🦋 A Pollinator Magnet: This plant is one of the most critical nectar sources for the rare Marsh Fritillary butterfly and various long-tongued bees during the late summer months.
- 💧 Moisture Lover: While it is surprisingly adaptable, it thrives in heavy, damp soils. It’s the perfect choice for "difficult" spots like marshy edges, pond-side borders, or clay-heavy garden patches.
- 🌱 Slow and Steady: It is a clump-forming plant that doesn't spread aggressively, making it a polite neighbor in a mixed perennial bed.
⚠️ Safety & Toxicity
- ✅ Safe Status: Succisa pratensis is generally considered non-toxic to humans, cats, and dogs.
- 🌿 Gentle Handling: Unlike some field plants that have prickly stems or irritating sap, the Devil's-bit Scabious is soft to the touch and safe for children’s "fairy gardens."
✨ Fun Fact
The name "Scabious" comes from the Latin word scabere (to scratch), because the plant was historically used as a folk remedy to treat the itch of the bubonic plague and various skin conditions!

Detailed Care Instructions
To grow Succisa pratensis, also known as devil's bit, follow these steps:
- Choose the right location: Devil's bit prefers full sun to partial shade. It can tolerate a variety of soil types but thrives in moist, well-draining soil.
- Prepare the soil: Clear any weeds or debris from the area where you plan to plant the succisa pratensis. Loosen the soil with a garden fork or tiller to improve drainage and root penetration.
- Planting: You can sow devil's bit seeds directly into the ground in spring or autumn, or you can start seeds indoors and transplant the seedlings once they are established. Plant the seeds or seedlings about 12-18 inches apart to allow for growth and airflow.
- Watering: Devil's bit prefers to be kept consistently moist. Water the plant regularly, especially during dry spells, to keep the soil evenly moist but not waterlogged.
- Mulching: Apply a layer of organic mulch around the plants to help retain moisture, suppress weeds, and provide nutrients as it breaks down.
- Propagation: Devil's bit can also be propagated by dividing the plant in early spring or early autumn. Dig up the mature plant, separate the clumps, and replant each division with adequate spacing.
- Maintenance: Remove any dead or faded flowers to encourage continuous blooming. After the flowering season, cut back the plant to maintain its shape and prevent self-seeding.
- Pests and diseases: Devil's bit is generally pest and disease resistant. However, keep an eye out for common garden pests like aphids or snails, and treat them accordingly if they become a problem.
By following these steps, you should be able to successfully grow Succisa pratensis in your garden.

Place in a bright room that is sun drenched almost all day. Or directly in a south-facing window.

To water this plant, ensure that the soil is dry to the touch before watering, as overwatering can lead to root rot. When watering, use a small watering can or a gentle stream of water to avoid disturbing the plant's roots. Water slowly and evenly over the soil until it appears moist. Avoid getting water on the leaves or stem of the plant, as this can promote the growth of fungal diseases. Monitor the moisture level of the soil regularly to ensure that it does not dry out or become waterlogged. Water this plant regularly, but avoid overwatering.
To properly fertilize the Succisa Pratensis plant, you can follow these instructions:
- Choose a balanced, water-soluble fertilizer that includes nitrogen, phosphorus, and potassium in equal amounts (such as a 10-10-10 or 15-15-15 formulation).
- Dilute the fertilizer according to the package instructions to a quarter or half strength.
- Water the plant thoroughly beforehand to ensure the soil is moist.
- Apply the diluted fertilizer to the soil around the base of the plant, avoiding direct contact with the leaves.
- Use a watering can or hose with a gentle flow to evenly distribute the fertilizer.
- Avoid over-fertilizing, as this can harm the plant. Stick to a regular fertilizing schedule instead, such as once every four to six weeks during the growing season.
- Monitor the plant's response to fertilization. If you notice any signs of fertilizer burn or excessive growth, reduce the amount or frequency of fertilization.
- Regularly check the soil's moisture levels and adjust the watering accordingly, as proper watering in combination with fertilizer application will help ensure healthy growth.
Note: It is always recommended to check specific care guidelines for each plant variety and adjust fertilizer application accordingly.
When planting Succisa Pratensis, it is recommended to use a well-draining soil with a neutral to slightly alkaline pH level. The soil should contain a mixture of organic matter, such as compost, and inorganic material, like sand or perlite, to promote healthy root growth and drainage. It is also important to avoid over-fertilization, as this can negatively impact the plant's growth and development. Additionally, Succisa Pratensis prefers a moderate to full sun exposure, so it should be planted in a location that receives at least six hours of direct sunlight per day.
Propagation of Succisa pratensis, a flowering perennial plant, can be done through several methods such as seed propagation, division, and root cuttings. Below are the step-by-step details on each method:
- Seed propagation:
- Collect mature seeds from the plant when the seed heads turn brown and dry out.
- Store the seeds in a cool, dry place until ready for sowing.
- Prepare a seed tray or pots with well-draining soil or a seed-starting mix.
- Scatter the seeds evenly over the surface of the soil or lightly press them into the soil, depending on their size.
- Optionally, cover the seeds with a thin layer of fine vermiculite or sand to provide some moisture retention.
- Water the tray or pots gently to moisten the soil without causing excessive waterlogging.
- Place the tray or pots in a warm, bright location with indirect sunlight.
- Keep the soil consistently moist but avoid overwatering.
- Germination may take several weeks to a couple of months depending on the conditions.
- Once the seedlings have developed a few sets of true leaves, they can be transplanted into individual pots or a prepared garden bed.
- Collect mature seeds from the plant when the seed heads turn brown and dry out.
- Division:
- Choose a healthy, mature Succisa pratensis plant.
- In spring or early autumn, dig up the plant carefully, trying to minimize disturbance to the roots.
- Gently separate the plant into smaller sections, ensuring that each division has a good portion of roots and healthy shoots or buds.
- Trim any damaged or excessive growth from the divided sections.
- Plant each division at the same depth it was previously growing, either in pots with well-draining soil or directly in a prepared garden bed.
- Water the divisions thoroughly and place them in a suitable location with adequate sunlight.
- Choose a healthy, mature Succisa pratensis plant.
- Root cuttings:
- Select a well-established, healthy plant to take root cuttings from in early spring or late autumn.
- Dig around the base of the plant to expose its roots and select a thick, healthy-looking root.
- Carefully cut 2-3 inch (5-7.5 cm) sections from the root, ensuring that each cutting has at least one bud or shoot.
- Fill pots or seed trays with a well-draining potting mix or soil.
- Place the root cuttings horizontally on the surface of the soil, burying about half of each cutting.
- Firmly press the soil around the cuttings to ensure good contact.
- Water the cuttings gently, keeping the soil consistently moist but avoid soaking.
- Keep the cuttings in a warm, bright location with indirect sunlight.
- Root development may take several weeks to a few months.
- Once the cuttings have established roots and developed new shoots, they can be transplanted into individual pots or a prepared garden bed.
Remember to provide appropriate care to the newly propagated plants, including regular watering, suitable sunlight exposure, and protection from extreme weather conditions.
- Select a well-established, healthy plant to take root cuttings from in early spring or late autumn.


