Plant Overview
Often called simply the "Xanadu," this Brazilian beauty is the ultimate "easy-mode" tropical for those who want a lush look without the hassle of climbing vines. Unlike many of its cousins that scramble up trees, the Xanadu is a "self-heading" plant, meaning it grows into a dense, tidy mound. It’s a staple in interior design for its ability to look like a piece of living sculpture.
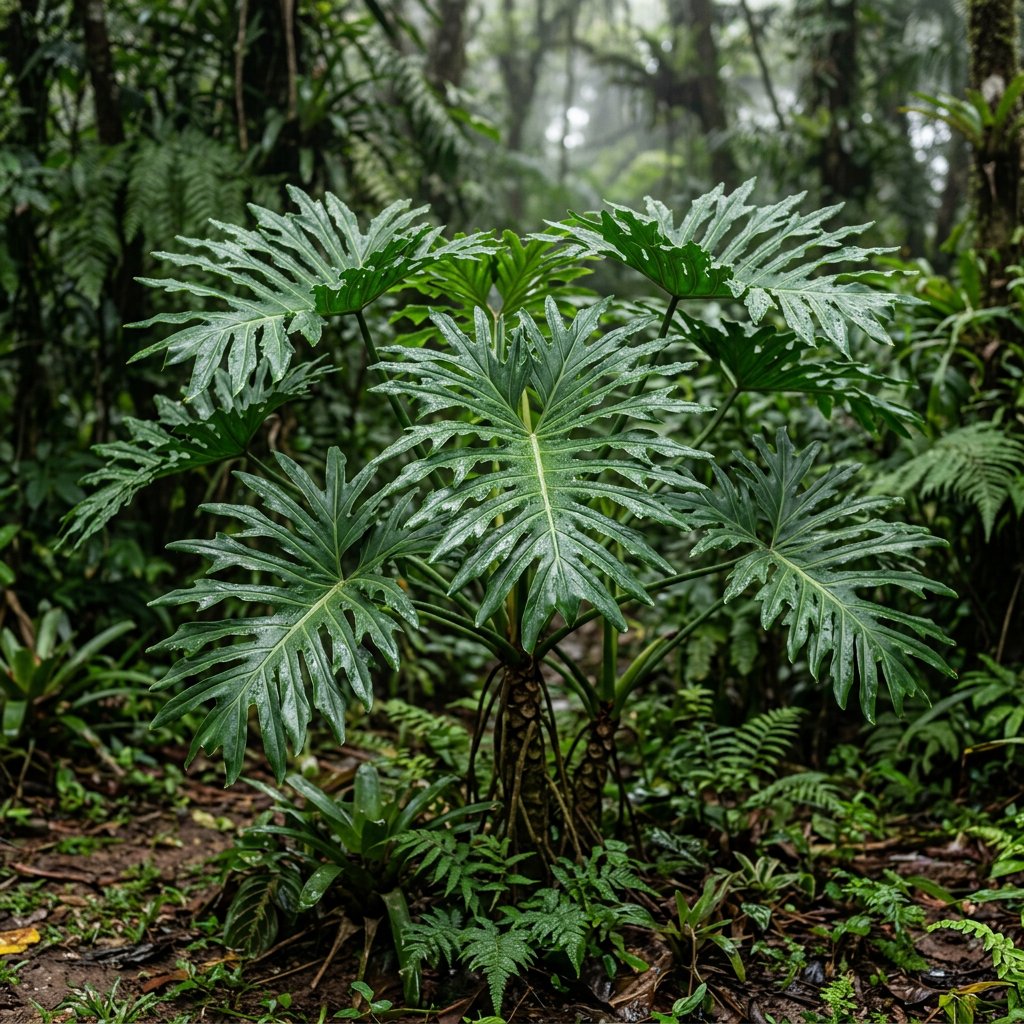
🔍 How to Identify
- 🍃 The Foliage: Large, leathery, and glossy dark-green leaves. Each leaf is deeply "pinnatifid," meaning it’s split into multiple finger-like lobes that give it a serrated, prehistoric appearance.
- 🪴 Growth Habit: It grows in a compact, mounding shape rather than trailing. As it ages, it develops a thick, woody trunk that remains hidden beneath the dense canopy of leaves.
- 🪵 Aerial Roots: You may notice thick, brown "ropes" growing from the stems toward the soil; these are aerial roots used for stability and moisture absorption.
🏡 In Your Garden
- ☀️ Light Logic: While it loves bright, indirect light, the Xanadu is surprisingly tolerant of lower light levels compared to other Thaumatophyllums. However, if the leaves start to grow smaller and the stems look "stretched," it’s craving a brighter spot.
- 🪴 Potting & Soil: This plant has a massive, vigorous root system. It prefers being slightly "pot-bound" but will eventually need a wide container. Use a chunky, well-draining mix (like a blend of bark, perlite, and potting soil) to prevent the roots from suffocating.
- ✂️ Maintenance: It is a low-maintenance superstar. Because it doesn't climb, you never need to provide a moss pole. Simply snip off the older, lower leaves as they naturally yellow to keep the plant looking sharp.
⚠️ Safety & Toxicity
- 🐾 Toxic to Pets: Like most members of the Araceae family, the Xanadu contains insoluble calcium oxalate crystals. If chewed by cats or dogs, it causes intense oral pain, drooling, and swelling.
- 👶 Human Safety: Keep this plant out of reach of small children. Ingestion can cause a burning sensation in the mouth and throat, and the sap may cause mild skin irritation in sensitive individuals.
✨ Fun Fact
For decades, the Xanadu was believed to be a "man-made" hybrid created in a nursery in Australia. It wasn't until much later that botanists discovered it was actually a wild, naturally occurring species from the rainforests of Brazil!

Detailed Care Instructions
| Humidity | High |
| Lighting | Part Sun |
| Difficulty | Easy |
| Hibernation | Cold Period |
| Temperature | 18°C - 25°C |
| Hardiness Zones | Max 10A |
To help grow a Thaumatophyllum Xanadu plant, you can follow these steps:
- Choose a suitable location: Thaumatophyllum Xanadu plants prefer bright, indirect sunlight. They should be placed in a location with consistent temperature and minimal drafts.
- Provide proper watering: Keep the soil evenly moist, but not overly soggy. Thaumatophyllum Xanadu plants prefer moderately moist soil, so water them when the top inch of soil feels dry. Avoid overwatering, as it can lead to root rot.
- Maintain humidity: These plants enjoy higher humidity levels. If the air in your home is dry, consider using a humidifier or place the plant on a pebble tray filled with water to increase humidity around it.
- Fertilize regularly: Feed the plant with a balanced, diluted liquid fertilizer once a month during the growing season (spring and summer). Reduce fertilizing frequency in fall and winter.
- Repot when necessary: Thaumatophyllum Xanadu plants can be repotted every 1-2 years or when they outgrow their current pot. Use a well-draining potting mix and a slightly larger pot.
- Prune as needed: Remove any dead, damaged, or yellowing leaves to maintain the plant's appearance. Trim longer stems to encourage bushier growth if desired.
- Watch for pests: Keep an eye out for common houseplant pests such as spider mites, mealybugs, and scale. If detected, treat the infestation promptly using insecticidal soap or neem oil.
Remember that each plant has slightly different care requirements, so observe your Thaumatophyllum Xanadu plant closely and adjust your care routine as needed.

Place in a window with dappled sun or a spot in the middle of a room. Or directly in a window facing west or east.

The Thaumatophyllum Xanadu plant should be watered thoroughly and consistently, ensuring that the soil is moist but not waterlogged. It is important to allow the top layer of soil to dry out slightly before watering again, as overwatering can lead to root rot. Watering should be reduced during the winter months, as the plant goes into a dormant phase. It is recommended to use room temperature or lukewarm water, as cold water can shock the plant and cause damage. It is also important to avoid getting water on the foliage, as this can lead to fungal growth.
To fertilize this plant, use a balanced fertilizer with equal parts nitrogen, phosphorus, and potassium. Apply the fertilizer once every two months during the growing season, which is typically spring and summer. Be careful not to over-fertilize as this can damage the plant. Water the plant well before applying the fertilizer, and make sure to evenly distribute the fertilizer across the soil surface. Avoid getting the fertilizer on the leaves or stem, as this can also damage the plant.
Thaumatophyllum Xanadu requires well-draining soil that is rich in nutrients and organic matter. It prefers a slightly acidic soil with a pH range of 6.0 to 6.5. The soil should have good water retention capacity, but not be waterlogged as it can lead to root rot. A mixture of peat moss, perlite, and coarse sand with a ratio of 3:1:1 is ideal for growing Thaumatophyllum Xanadu. Additionally, adding good quality compost or organic fertilizer to the soil can provide the necessary nutrients for the plant's growth.
To propagate this plant, you will need to take stem cuttings from a mature, healthy plant. Make sure the cutting is around 4-6 inches in length, and that it has several leaves attached. Using a clean, sharp knife or shears, make a clean cut just below a node on the stem. Remove any leaves from the lower half of the stem, leaving only a few at the top.
Next, dip the cut end of the stem into rooting hormone powder, which will encourage the stem to grow roots. Fill a small pot with a well-draining potting mixture, such as a mix of peat moss and perlite, and water the soil well. Using a pencil or your finger, make a small hole in the soil and insert the cutting into the hole. Gently press the soil around the cutting to hold it in place.
Cover the pot with a plastic bag or a cloche to create a humid environment for the cutting. Place the pot in a bright, warm location, but out of direct sunlight. Check the cutting regularly to see if it has grown roots. Once you see new growth and roots beginning to form, you can remove the plastic cover and move the plant to a brighter spot.
Continue to care for the new plant by keeping the soil moist but not waterlogged, and by providing it with bright, indirect light. Once the plant has grown to a size where it can be repotted, you can move it to a larger pot or plant it outside in the garden.
Common pests of the cut-leaf philodendron include Scale insect, mealybugs, spider mites, fungus gnats, thrips. Make a habit of checking your cut-leaf philodendron frequently for pests so that any infestations can be caught and managed early.


