Plant Overview
Known as the Field Pennycress or sometimes the less-flattering "Stinkweed," Thlaspi arvense is a common sight in meadows and disturbed roadsides across the globe. It earned its "Penny" nickname because its flat, circular seed pods look like tiny silver coins scattered along the stem. While many gardeners dismiss it as a mere weed, this plant is actually a fascinating member of the mustard family with a secret potential for modern green energy.
🔍 How to Identify
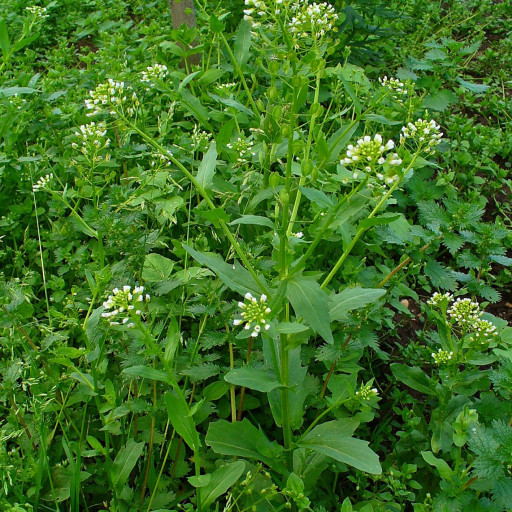
- 🪙 Seed Pods: The most recognizable feature is the flat, round, disc-like seed pods (silicles). They have a distinct notched tip and look like miniature fans or coins.
- ☁️ White Blooms: It produces clusters of tiny, four-petaled white flowers at the top of its stems, typical of the Brassicaceae family.
- 🌿 Leaf Shape: The leaves at the base are rosetted, while the upper leaves "clasp" the stem with arrow-shaped bases, giving them a unique hugging appearance.
🏡 In Your Garden
- 🌱 Disturbed Soil Enthusiast: You will likely find this plant appearing in freshly tilled garden beds or areas where the soil has been moved. It’s an "opportunist" that helps stabilize bare earth.
- 👃 The Scent Test: If you crush the leaves, they emit a sharp, pungent odor reminiscent of garlic or onions—hence the name "Stinkweed." This is a natural defense mechanism against herbivores.
⚠️ Safety & Toxicity
- 🐾 Mildly Irritating: While not considered deadly, Field Pennycress contains glucosinolates. If eaten in large quantities by pets or livestock, it can cause stomach upset or a bitter taste in milk.
- 👶 Kid-Friendly Identification: For children, it’s a safe plant to touch and study, though its bitter taste and strong smell usually discourage them from trying to eat it.
✨ Fun Fact
Scientists are currently breeding "domesticated" versions of Field Pennycress to be used as a winter cover crop. Because its seeds are incredibly oily, it is being pioneered as a sustainable source for carbon-neutral jet fuel!

Detailed Care Instructions
| Humidity | High |
| Lighting | Full Sun |
| Difficulty | Easy |
| Hibernation | Cold Period |
| Temperature | 10°C - 21°C |
| Hardiness Zones | 5 - 9 |
To grow Thlaspi arvense, also known as field pennycress, you can follow these steps:
- Seeds: Purchase Thlaspi arvense seeds from a reliable nursery or online seed supplier.
- Timing: Sow the seeds either in early spring or autumn. Thlaspi arvense is a cold-tolerant plant, so it can survive frost and cold weather.
- Soil: Choose well-draining soil that is fertile and loamy. Thlaspi arvense prefers slightly acidic to neutral soil pH.
- Sunlight: Field pennycress thrives in full sun, so make sure to provide at least 6-8 hours of direct sunlight daily.
- Preparation: Prepare the soil by removing any weeds or grasses. Break up the soil and smooth the surface.
- Sowing: Sow the seeds directly into the prepared soil. Scatter the seeds evenly and lightly cover them with a quarter-inch layer of soil.
- Watering: Water the planted area thoroughly, but avoid overwatering. Keep the soil moist but not waterlogged.
- Maintenance: As the plants grow, keep an eye out for weeds and remove them regularly to avoid competition for nutrients. Thlaspi arvense does not require much additional care, as it is a hardy and low-maintenance plant.
- Harvesting: Depending on the purpose of growing the plant, you can harvest the plant when the seeds are mature to collect the seeds. Thlaspi arvense is sometimes used as a cover crop or for soil erosion control.
- Propagation: Thlaspi arvense is an annual plant that readily self-seeds. If you wish to propagate the plant, you can save the seeds from the mature plants and sow them in the following growing season.
- Pest and disease control: Thlaspi arvense is generally resistant to pests and diseases. However, if you notice any issues, consult a local gardening expert for appropriate remedies.
Remember to check your local regulations on growing Thlaspi arvense, as it may be considered as an invasive species in some regions.

Place in a window with dappled sun or a spot in the middle of a room. Or directly in a window facing west or east.

1. Check the soil: Before watering the plant, make sure to check the soil around it. The soil should be slightly moist to the touch but not waterlogged.
2. Watering from below: One way to water the plant is by placing it in a tray of water. The plant will absorb the water through its roots.
3. Watering from above: Alternatively, you can water the plant from above using a watering can or a hose. Be careful not to create too much pressure as it can damage the delicate plant.
4. Frequency: Thlaspi Arvense plant prefers moist soil, but it is important not to overwater it. Water the plant when the soil becomes dry to the touch.
5. Drainage: Make sure the pot has good drainage, as the plant can suffer from root rot if the soil becomes waterlogged.
6. Avoid leaf watering: When watering the plant, be sure to avoid getting water on the leaves, as this can promote fungal growth.
7. Monitor: Keep an eye on the plant and adjust the watering schedule as needed. Different environmental factors can affect how much water the plant needs, so it is essential to observe and respond accordingly.
For optimal growth, provide the Thlaspi Arvense plant with a balanced fertilizer that contains nitrogen, phosphorus, and potassium. Apply the fertilizer according to the manufacturer's instructions, usually every four to six weeks during the growing season. Avoid over-fertilizing as this can burn the roots and damage the plant. Water the soil thoroughly after fertilizing to ensure that the nutrients are absorbed by the roots. Additionally, ensure that the plant has adequate sunlight and water.
Thlaspi Arvense plant grows best in a well-drained soil that is slightly acidic with a pH of around 6.0 to 6.5. The soil should be fertile, with moderate to high organic matter content. The plant prefers a loose, loamy soil that is rich in nutrients and minerals. It can tolerate sandy soil, but it may not grow as well in heavy clay soils that do not drain well. The soil should also be moist but not wet, as the plant can be prone to rot if the soil is too waterlogged. Overall, the ideal soil for Thlaspi Arvense plant is one that is rich in nutrients, drains well, and is kept consistently moist.
Thlaspi Arvense is a flowering plant of the Brassicaceae family that can be propagated using two methods - by seeds and by division.
Seed propagation:
- Collect mature seeds from the plant when the seed pods start to turn brown and dry.
- Spread the seeds on a flat surface and leave them to dry out for a few days.
- Prepare a seed tray or pot filled with potting soil and sprinkle the seeds over the surface.
- Cover the seeds with a thin layer of soil and spray with water.
- Place the tray or pot in indirect sunlight and keep the soil moist but not overwatered.
- After a few weeks, the seeds should start to germinate.
- When they have grown to a decent size, transplant them to bigger containers or outdoors in a sunny spot.
Division propagation: - Choose a mature plant with healthy roots and stems.
- Dig up the entire plant and shake off the excess soil or gently rinse it off with water.
- Inspect the roots and look for any damaged or rotten parts.
- Use a sharp knife or garden shears to cut the plant into several smaller sections, each with a healthy root system and at least one stem.
- Prepare a new planting spot or pot with well-draining soil.
- Plant each section in the new spot or pot and water it well.
- Keep the newly divided plants in a shaded area for a week or two before gradually introducing them to sunlight.


