Plant Overview
Commonly known as the Foxglove Gloxinia, Titanotrichum oldhamii is a rare and breathtaking treasure from the shaded, misty cliffs of East Asia. Often found clinging to damp rocks near waterfalls in Taiwan and Japan, it carries the elegance of a woodland foxglove but is actually a cousin to the African Violet. This "living relic" is a favorite among collectors for its dramatic, nectar-rich blooms that look like golden lanterns hanging in the shade.
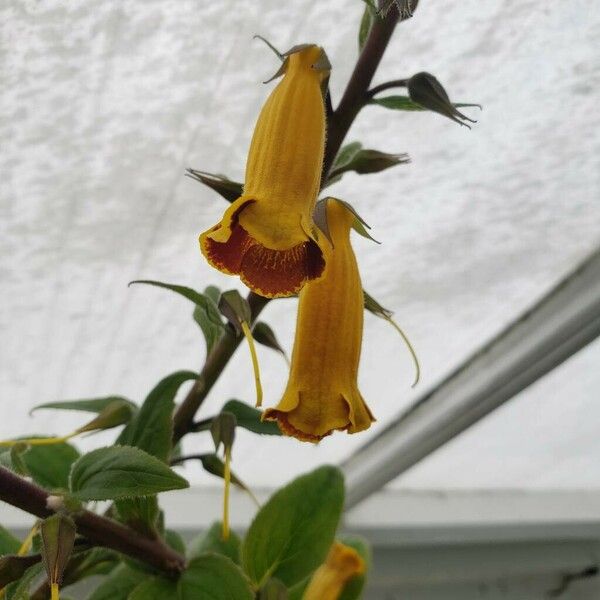
🔍 How to Identify
- 🍃 Velvety Foliage: The leaves are large, oval, and covered in a coat of fine, soft hairs that give the plant a luxurious, matte green texture.
- 🎺 Golden Trumpets: It produces tall spikes of bell-shaped flowers that are a brilliant lemon-yellow on the outside with a deep, dramatic mahogany or "blood-red" speckled throat.
- 📏 Scaly Rhizomes: Beneath the soil, the plant grows from unique, scaly underground stems (rhizomes) which help it survive dormant periods.
🏡 In Your Garden
- 💧 The Waterfall Effect: Because its ancestors live near waterfalls, this plant craves high humidity and consistently moist, well-draining soil. It is perfect for a "cool" greenhouse or a sheltered, shady nook in a temperate garden.
- 🧪 Survival Strategy: If the plant feels the season is ending or conditions aren't perfect for seeds, it will often grow tiny "bulbils" (miniature clones) along its flower stalk—a fascinating way of ensuring its own survival!
⚠️ Safety & Toxicity
- ✅ Generally Safe: Titanotrichum oldhamii is not known to be toxic to humans or common household pets like cats and dogs.
- 🧤 Sensory Note: While not poisonous, the fine hairs on the leaves can occasionally trap dust or cause very mild skin tickling for those with highly sensitive skin; handling with care is always a good practice.
✨ Fun Fact
This plant is what botanists call "monotypic." This means it is a lonely branch on the evolutionary tree—it is the only species within its entire genus, having no close living relatives!

Detailed Care Instructions
Titanotrichum oldhamii, commonly known as the giant elephant ear or giant taro, is a tropical plant that can add a striking presence to your garden or indoor plant collection. Here are some steps and tips for growing it successfully:
1. Location
- Light: Titanotrichum oldhamii prefers bright, indirect light. While it can tolerate partial shade, it generally benefits from some filtered sunlight.
- Temperature: This plant thrives in warm conditions. Ideal temperatures range between 70°F to 90°F (21°C to 32°C). It is not frost-tolerant, so protect it from cold drafts and frost.
2. Soil
- Type: Use well-draining soil that retains some moisture. A mix of potting soil, peat moss, and perlite works well.
- pH: Aim for a slightly acidic to neutral pH (around 6.0 to 7.0).
3. Watering
- Keep the soil consistently moist but not soggy. Water when the top inch of soil feels dry. Reduce watering in the winter months when the plant is not actively growing.
4. Humidity
- This plant enjoys high humidity levels. Ideally, humidity should be around 50% to 70%. You can increase humidity by misting the plant, using a pebble tray with water, or placing a humidifier nearby.
5. Fertilizing
- Feed the plant with a balanced liquid fertilizer every 4-6 weeks during the growing season (spring and summer). Reduce feeding in fall and winter.
6. Repotting
- Repot Titanotrichum oldhamii every 1-2 years or when it outgrows its container. Choose a pot that is one size larger with good drainage.
7. Pests and Diseases
- Watch for pests such as spider mites, aphids, and mealybugs. Treat infestations with insecticidal soap or neem oil. Ensure good air circulation around the plant to reduce the risk of fungal diseases.
8. Propagation
- Propagation can be done via division. When repotting, carefully separate the offsets (pups) from the main bulb and replant them.
9. Indoor vs. Outdoor
- If growing indoors, provide adequate light, possibly using grow lights in lower-light conditions. If grown outdoors, ensure it is in a sheltered location with protection from harsh sunlight and wind.
10. Seasonal Care
- In colder climates, consider bringing the plant indoors before the first frost or treating it as a seasonal annual.
By following these guidelines, you should be able to successfully cultivate Titanotrichum oldhamii and enjoy its lovely foliage.

Place in a window with dappled sun or a spot in the middle of a room. Or directly in a window facing west or east.

Titanotrichum Oldhamii requires careful consideration when it comes to watering to ensure its health and growth. Here are detailed guidelines for watering this particular plant:
1. Soil Check: Before watering, always check the moisture level of the soil. Insert your finger about an inch (2.5 cm) into the soil; if it feels dry at that depth, it's time to water.
2. Water Quality: Use clean, preferably distilled or rainwater to avoid chemical buildup. Tap water can be used if it's allowed to sit for 24 hours to let chlorine dissipate.
3. Watering Technique: Water the plant thoroughly until you see excess water draining from the bottom of the pot. This ensures that the entire root system absorbs moisture.
4. Drainage: Ensure that the pot has proper drainage to prevent water from pooling at the bottom, which can cause root rot. If the plant is in a decorative container without drainage holes, it’s best to remove it after watering to allow excess water to escape.
5. Frequency: The frequency of watering will depend on the environmental conditions, such as humidity and temperature. Generally, during the growing season (spring and summer), this plant may require more frequent watering, while in the dormant season (fall and winter), reduce the watering frequency.
6. Humidity Considerations: This plant benefits from higher humidity levels. If the environment is dry, consider misting the leaves or placing a humidity tray beneath the pot to increase moisture levels around the plant.
7. Signs of Overwatering: Watch for signs that you are overwatering, such as yellowing leaves, wilting, or a mushy root system. If you suspect overwatering, allow the soil to dry out before the next watering.
8. Signs of Underwatering: Conversely, if you notice crispy or browning leaf tips, this may indicate underwatering. In this case, adjust your watering schedule to ensure the soil retains adequate moisture.
By following these guidelines, you can help maintain the optimal moisture balance for this specific plant species.
Titanotrichum oldhamii is a tropical plant that thrives in well-draining, nutrient-rich soil. Here are some fertilizing instructions for this plant:
- Fertilizer Type: Use a balanced, water-soluble fertilizer with equal N-P-K ratios (e.g., 20-20-20) or a slow-release formula that includes micronutrients.
- Dilution: Follow the manufacturer's instructions for dilution. Typically, a half-strength solution is appropriate for regular feeding.
- Frequency: Fertilize every 4-6 weeks during the growing season (spring and summer). Reduce or cease fertilization during the dormant period (fall and winter).
- Application Method: Water the plant lightly before applying fertilizer to prevent root burn. Apply the fertilizer solution evenly around the base, avoiding direct contact with the plant’s stem.
- Soil Testing: Consider performing a soil test to monitor nutrient levels and adjust your fertilization regime accordingly.
- Signs of Nutrient Deficiency: Keep an eye out for symptoms such as yellowing leaves or stunted growth, which may indicate a need for additional nutrients.
- Organic Options: If preferred, you can also use organic fertilizers, such as compost or well-rotted manure, applied in smaller amounts to enrich the soil.
By following these guidelines, you can help ensure that your Titanotrichum oldhamii remains healthy and vibrant.
Titanotrichum Oldhamii, a member of the family Acanthaceae, thrives in specific soil conditions to achieve optimal growth. Here's a detailed overview of the ideal soil characteristics for this plant:
- Soil Type: The plant prefers a well-draining soil mix. A combination of loamy and sandy soils enables good drainage while retaining some moisture.
- pH Level: Aim for a slightly acidic to neutral pH range, typically between 6.0 and 7.0. This pH range facilitates nutrient availability and overall plant health.
- Organic Matter: Incorporate organic matter into the soil mix to improve its structure and nutrient content. Well-composted organic materials can enhance soil fertility and provide essential nutrients.
- Aeration: Ensure good aeration in the soil to support healthy root development. Adding perlite or coarse sand can improve the soil’s texture and prevent compaction.
- Moisture Retention: While good drainage is crucial, the soil should also retain some moisture. A balanced mix that retains enough water without becoming soggy is ideal.
- Nutrient Content: Having a balanced mix that is rich in essential nutrients can support the plant's growth. Regularly amend the soil with a slow-release fertilizer or organic amendments to maintain nutrient levels.
- Container Considerations: If grown in pots, ensure they have adequate drainage holes. A potting mix designed for tropical plants, amended with additional drainage materials, can work well.
By creating a soil environment that meets these conditions, you can promote healthy growth and development for Titanotrichum Oldhamii.
Titanotrichum oldhamii is a perennial plant that can be propagated through various methods, primarily seed sowing and vegetative propagation. Here are detailed steps for each method:
Seed Propagation
- Harvest Seeds: Once the fruits of the plant mature, collect seeds. Ensure they are fully ripe for optimal germination rates.
- Seed Preparation: Clean the seeds to remove any fruit pulp and rinse them in water. Some growers recommend soaking seeds in water for 24 hours to enhance germination.
- Growing Medium: Prepare a well-draining potting mix. A mixture of peat, perlite, and sand works well to provide adequate drainage and aeration.
- Sowing Seeds: Plant the seeds about 1-2 cm deep in the prepared growing medium. Space them appropriately to avoid crowding.
- Watering: Moisten the soil gently after sowing but avoid waterlogging. Maintain consistent moisture.
- Light Conditions: Place the containers in a location with bright, indirect light. Avoid direct sunlight, which may scorch the young seedlings.
- Temperature Requirements: Keep the seeds in a warm environment, ideally between 20°C to 25°C (68°F to 77°F), to encourage germination.
- Germination Time: Be patient, as germination may take several weeks. Monitor the soil moisture regularly.
- Transplanting: Once seedlings have developed a couple of true leaves, they can be transplanted into larger pots or directly into the garden. Ensure they are acclimatized to outdoor conditions if transplanting outside.
Vegetative Propagation
- Selecting a Parent Plant: Choose a healthy and vigorous specimen from which to take cuttings.
- Taking Cuttings: Use a sharp, sterile razor or knife to take 10-15 cm (4-6 inches) long cuttings from the stems. Ensure each cutting has at least one node.
- Preparing Cuttings: Remove the lower leaves from the cuttings to prevent rot, while leaving a few leaves at the top.
- Rooting Hormone: Dip the cut end of each cutting into rooting hormone (optional) to encourage faster root development.
- Planting Cuttings: Plant the cuttings in a well-draining growing medium. This could be a mix of potting soil and perlite or sand.
- Watering: Water the cuttings thoroughly, ensuring the soil is evenly moist but not soggy.
- Humidity and Light: To maintain humidity, cover the cuttings with a plastic bag or place them in a propagator. Keep them in bright, indirect light.
- Temperature: Maintain a warm environment, similar to the seed propagation method.
- Root Development: After a few weeks, gently tug on the cuttings to check for root resistance, which indicates successful rooting.
- Transplanting: Once well-established roots are present, the cuttings can be transplanted into individual pots or placed in the garden.
Care After Propagation
- Watering: Regular watering is essential, but ensure the soil is well-draining to prevent root rot.
- Fertilizing: After a few weeks of growth, you can start feeding the plants with a diluted, balanced fertilizer every few weeks.
- Acclimatization: If the plants were grown indoors, acclimatize them gradually to outdoor conditions to prevent shock.
Always observe and adapt care requirements based on the specific growth conditions and responses of the plants to ensure successful propagation.


