Plant Overview
Often overlooked in the grass, the Clustered Clover is a resilient little legume that weaves a green carpet across meadows and lawns. Known as the "Ball Clover," this Mediterranean native is a master of the "low profile," hugging the earth to survive grazing animals and heavy foot traffic. It is a quiet hero of the soil, working behind the scenes to enrich the earth wherever it spreads.
🔍 How to Identify
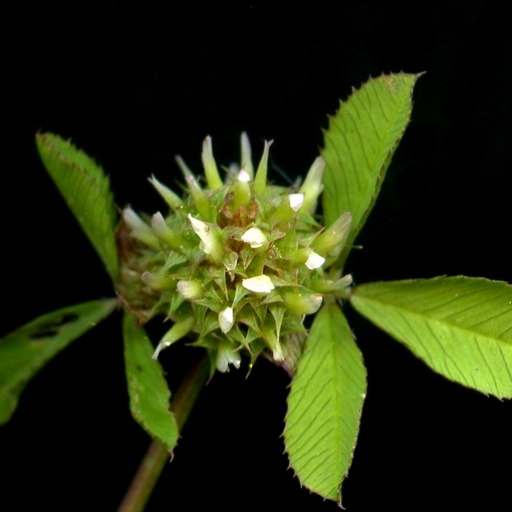
- 🌸 Flower Heads: Look for tiny, rose-pink to purple flowers packed into dense, spherical clusters. Unlike many clovers, these "balls" sit directly in the leaf axils (where the leaf meets the stem) without a separate stalk.
- ☘️ The Leaves: It features the classic "trifoliate" pattern (three leaflets). Each leaflet is teardrop-shaped with very fine, sharp teeth along the edges and a distinct vein pattern.
- 🌱 Growth Habit: It has a prostrate habit, meaning it spreads horizontally along the ground. It rarely grows tall, usually staying tucked beneath the height of a lawnmower blade.
🏡 In Your Garden
- 🚜 Soil Improver: This plant is a natural nitrogen-fixer. It hosts special bacteria in its roots that "grab" nitrogen from the air and turn it into plant food, naturally fertilizing the surrounding soil for your grass and flowers.
- 🏜️ Drought Survivor: It thrives in dry, sandy, or gravelly spots where other greens might wither. If you see it popping up, it’s a sign of well-drained soil and a sun-soaked environment. It hates being waterlogged and prefers to dry out between rains.
⚠️ Safety & Toxicity
- ✅ Generally Safe: Clustered Clover is not known to be toxic to humans, dogs, or cats. It is a common component of wild forage.
- 🐄 Livestock Note: Like many legumes, if consumed in massive quantities by livestock (especially sheep), it can contribute to "bloat," but in a garden or backyard setting, it is considered harmless and safe to handle.
✨ Fun Fact
The specific name glomeratum comes from the Latin word glomerare, which means "to form into a ball." This perfectly describes the flower heads, which look like tiny, pink pom-poms scattered throughout the grass.

Detailed Care Instructions
To grow Trifolium Glomeratum, also known as Clustered Clover, you can follow these steps:
- Choose the right location: Trifolium Glomeratum thrives in full sunlight to partial shade. Make sure the location receives at least 4-6 hours of direct sunlight each day.
- Prepare the soil: The plant prefers well-draining soil. If your soil is heavy or clayey, amend it with organic matter like compost or well-rotted manure. This helps improve drainage and provides essential nutrients.
- Sow the seeds: Sow Trifolium Glomeratum seeds directly in the soil during early spring or fall. Scatter the seeds evenly over the prepared soil and lightly rake them into the soil, ensuring good seed-to-soil contact.
- Watering: Keep the soil consistently moist but not waterlogged. Water the seeds gently after sowing, and maintain regular watering until the plants are well-established.
- Fertilization: Trifolium Glomeratum usually doesn't require excessive fertilization. If the soil lacks nutrients, you can apply a balanced, slow-release organic fertilizer according to the package instructions.
- Weed control: Keep the area around the plants clear of weeds, as they can compete for nutrients and water. Regularly remove any weeds that may appear.
- Maintenance: Trifolium Glomeratum is relatively low-maintenance. You can trim the plants back to promote new growth and prevent legginess, but this is optional.
- Harvesting or propagation: Trifolium Glomeratum is often grown as a ground cover or green manure. If you wish to harvest it, you can cut the plants at the base when they reach the desired size. You can also propagate the plants by collecting and sowing their seeds.
Remember to consult local gardening guides or nursery experts for specific advice tailored to your region and local climate.

Place in a bright room that is sun drenched almost all day. Or directly in a south-facing window.

To water this type of plant, it is important to carefully monitor the condition of the soil and the amount of moisture it contains. It is recommended to water the plant deeply and infrequently, rather than giving it frequent but shallow watering. This helps the roots to grow deeper and stronger, and also avoids the risk of waterlogging and root rot. The frequency of watering will depend on the climate, season, and soil conditions, but generally, it is best to wait until the top inch of soil is dry before watering again. It is also important to avoid getting the foliage wet, as this can increase the risk of fungal diseases. Water should be applied directly to the soil around the base of the plant, and not on the leaves or stems. To prevent evaporation and to help retain moisture in the soil, a layer of mulch can be added around the plant.
To fertilize this plant, apply a balanced fertilizer with equal parts nitrogen, phosphorus, and potassium in the spring when new growth appears. Use a slow-release fertilizer to avoid over-fertilization. Apply the fertilizer according to the instructions on the label and avoid applying too much, as this can lead to burned foliage. Water the plant after fertilization to help the nutrients reach the roots.
For growing the plant in question, it is recommended to use a well-draining soil mixture that is not too heavy. A soil that contains a mixture of sand, loam, and peat moss is ideal for this plant. The pH of the soil should be slightly acidic, around 6.0-6.5, as this plant prefers slightly acidic soils. Additionally, it is recommended to mix in some organic matter, such as compost or well-rotted manure, to improve the soil's fertility and overall health. The plant can be grown in both full sun and partial shade, so the soil should be able to retain moisture but also drain well to prevent waterlogging. Regular watering is necessary, but the soil should not be constantly waterlogged.
To propagate this plant, first, choose a healthy mature plant with a strong root system. Take a cutting from the plant by using clean and sharp pruning shears. Make sure the cutting is at least four inches long. Remove any leaves from the bottom two inches of the cutting.
Prepare a pot with a well-draining potting mix. Wet the soil and allow it to drain. Dip the end of the cutting in rooting hormone powder and plant it in the soil. Make sure it is deep enough so that the bottom two inches of the cutting are buried in the soil.
Water the cutting well and place it in a warm location with bright, indirect light. Cover the pot with a plastic bag to create a mini greenhouse and increase humidity. Keep the soil moist but not soggy.
Check on the cutting after a couple of weeks to see if it has rooted. Gently tug on the cutting, and if you feel resistance, roots have formed. Remove the plastic bag and gradually acclimate the new plant to brighter light over a period of a few days.
Transplant the new plant into a larger pot with well-draining potting mix once it has grown a few new leaves. Water regularly and fertilize every other week with a balanced fertilizer. Repeat this process to propagate more plants.
Common pests of the ball clover include Spider mites, aphids. Make a habit of checking your ball clover frequently for pests so that any infestations can be caught and managed early.


