Plant Overview
The humble Clover, often called the "Shamrock," is far more than just a lucky charm found in a patch of grass. These resilient little legumes have been symbols of faith, hope, and love for centuries, and they are the unsung heroes of healthy ecosystems. Whether you are looking for a four-leafed mutation or a sustainable lawn alternative, the Trifolium genus is a fascinating world of tiny, hardworking plants.
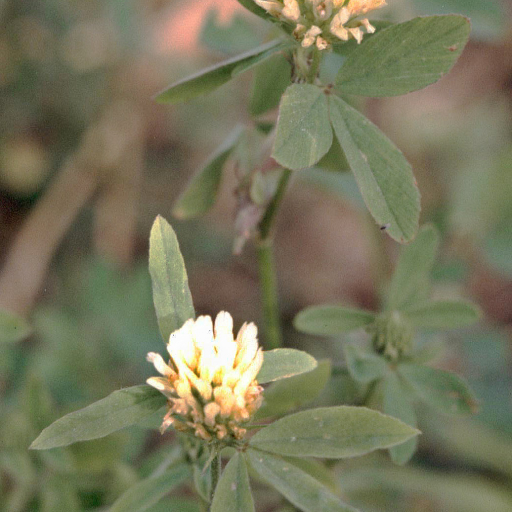
🔍 How to Identify
- ☘️ The Foliage: Most species feature the iconic "trifoliate" pattern—three round or oval leaflets joined at a single point. Many varieties, like the White Clover, display a distinct white "V" or "chevron" watermark on each leaf.
- 🌸 The Blooms: Flowers appear as dense, globe-shaped clusters (heads) made up of many tiny, tubular florets. They range in color from snowy white and cream to vibrant pink and deep crimson.
- 🌱 Growth Habit: Clovers typically grow in low-spreading mats, often sending out "stolons" (creeping stems) that root into the ground as they travel, allowing them to fill in empty patches of soil quickly.
🏡 In Your Garden
- 🧪 The Nitrogen Fixer: Clovers have a "superpower"—they live in a symbiotic relationship with soil bacteria to pull nitrogen from the air and turn it into natural fertilizer. This makes them excellent "green manure" for keeping your soil rich and healthy without chemicals.
- 🐝 Pollinator Paradise: If you want a garden buzzing with life, Clover is a must-have. The nectar-rich flowers are a primary food source for honeybees, bumblebees, and butterflies, providing essential forage throughout the spring and summer.
- 🚜 Resilient Groundcover: Unlike traditional turf grass, Clover stays green even during the heat of mid-summer and requires very little mowing. It’s a "lazy gardener’s" dream for a lush, eco-friendly backyard.
⚠️ Safety & Toxicity
- ✅ General Status: Clovers are considered non-toxic to humans, dogs, and cats. In fact, many species (like Red Clover) have a long history of use in herbal teas.
- 🐎 Livestock Note: While safe for household pets, certain types of clover can cause "bloat" in cattle or horses if consumed in massive quantities, particularly when the dew is still on the leaves.
- 🌾 Sensitivities: Some individuals may experience mild hay fever symptoms from the pollen during peak blooming season.
✨ Fun Fact
Your chances of finding a genuine four-leaf clover are roughly 1 in 10,000. This rare occurrence is caused by a genetic mutation or environmental stress, and throughout history, each leaf has been said to represent a different virtue: the first is for faith, the second for hope, the third for love, and the fourth for luck!

Detailed Care Instructions
| Lighting | Full Sun |
To grow Trifolium (commonly known as clover), follow these steps:
- Choose the right type of clover: There are several species of clover, so consider which one suits your needs. For example, white clover (Trifolium repens) is commonly used as ground cover, while red clover (Trifolium pratense) is known for its medicinal properties.
- Prepare the soil: Clover prefers well-drained soil that is slightly acidic to neutral, with a pH range of 6.0 to 7.0. Loosen the soil and remove any weeds or debris. You can also add organic matter, such as compost or aged manure, to improve the soil's fertility.
- Sow the seeds: Clovers can be grown from seeds. Broadcast the seeds evenly over the prepared soil and lightly press them into the ground. It's important to note that clover seeds require sunlight for proper germination, so avoid burying them too deep.
- Water regularly: Keep the soil moist but not waterlogged. Water the clover regularly, especially during the germination phase. Once established, clover is generally drought-tolerant and requires less water.
- Provide adequate sunlight: Clover thrives in full sun to partial shade. Ensure that the plants receive at least 6 hours of direct sunlight per day. However, some species of clover can tolerate shade better than others, so select the appropriate type based on your garden's sunlight conditions.
- Fertilize if required: Clover is a legume, meaning it can fix nitrogen in the soil with the help of nitrogen-fixing bacteria present in specialized nodules on its roots. However, if the soil lacks nutrients, you can fertilize with a balanced fertilizer suitable for legumes. Follow the manufacturer's instructions for application rates.
- Control weeds: Clovers are generally excellent competitors against weeds due to their dense growth habit. However, during the establishment phase, keep an eye out for invasive weeds and remove them promptly to prevent competition for resources.
- Mulch for moisture retention: Mulching around clover plants can help retain soil moisture and suppress weed growth. Apply a layer of organic mulch, such as straw or wood chips, around the plants, being careful to avoid crowding the stem.
- Regularly mow or trim: Depending on your desired clover height, you may need to mow or trim the plants occasionally to maintain the desired aesthetic or prevent them from becoming excessively tall.
- Monitor for diseases and pests: While clovers are generally resilient, they can still be prone to certain diseases and pests, such as powdery mildew or aphids. Regularly inspect the plants for any signs of damage or disease, and take appropriate measures to control them if necessary.
By following these steps, you can successfully grow Trifolium plants in your garden or landscape.

Place in a bright room that is sun drenched almost all day. Or directly in a south-facing window.

One way to properly water this plant is to make sure the soil is moist but not waterlogged. Before watering, check the top inch of soil to ensure it has dried out slightly. When watering, use a watering can with a spout to direct the water towards the base of the plant and avoid getting the leaves wet. Water until the soil is damp to a depth of about 6 inches. It is important to not overwater, as this can lead to root rot. In hot weather, the plant may need to be watered more frequently to prevent it from drying out.
- Determine the ideal fertilization schedule for the plant based on its stage of growth and local growing conditions.
- Choose a slow-release fertilizer that is high in nitrogen, phosphorous, and potassium.
- Apply the fertilizer evenly and at the recommended rate based on the plant's size and growth stage.
- Water the plant deeply after fertilization to ensure that the nutrients are absorbed by the roots.
- Avoid over-fertilizing, as this can lead to burnt leaves and stunted growth.
Trifolium plants prefer well-drained soil that is rich in organic matter and nutrients. The soil should be slightly acidic, with a pH between 6.0 and 6.8. A mix of loam, sand, and peat moss is ideal for Trifolium plants, as it provides the necessary drainage and aeration without becoming too dry or compacted. Organic compost or manure can be added to the soil to improve its fertility, but care should be taken not to over-fertilize as this can lead to excessive foliage growth at the expense of flower production. Additionally, Trifolium plants benefit from being grown in a location that receives full to partial sunlight and regular irrigation to keep the soil moist but not waterlogged.
To propagate the plant, you will need to prepare a healthy stem cutting. Choose a stem that is about 4 inches long and has a few leaves. Using a clean, sharp pair of scissors, cut the stem at a 45-degree angle.
Next, remove the leaves from the bottom half of the stem. This will allow the cutting to focus its energy on developing roots rather than sustaining the leaves. You can use the leaves that you removed to propagate additional cuttings if you wish.
Dip the cut end of the stem in rooting hormone powder and gently tap off any excess. This will encourage the stem to develop roots more quickly.
Fill a small container with a well-draining potting mix. Using your finger, make a small hole in the soil and insert the stem cutting. Gently press the soil around the stem to secure it in place.
Water the cutting thoroughly and place it in a warm, bright spot out of direct sunlight. Keep the soil moist, but not waterlogged, and mist the cutting with water every few days to prevent it from drying out.
Within a few weeks, you should start to see new growth emerging from the stem cutting. Once the cutting has established roots and is producing new growth, you can transplant it into a larger pot or directly into the garden.


