Plant Overview
Known as Yellow Oatgrass or Golden Oatgrass, this perennial meadow grass is famous for the shimmering, sun-kissed glow it brings to pastures in early summer. Originally native to Europe and Asia, it has traveled across the globe, often used in traditional hay mixtures for its delicate texture. Its name, Trisetum, literally means "three bristles," referring to the tiny, hair-like structures on its seeds.
🔍 How to Identify
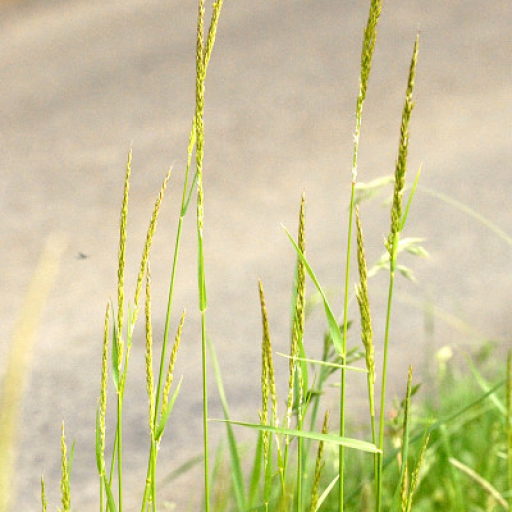
- 🌾 Golden Panicles: The flowering heads are upright and airy, transitioning from a pale lime green to a distinct, metallic yellow-gold as the season progresses.
- ✨ Triple-Awned Spikelets: If you look closely at the tiny seed clusters, you will see three fine, bent bristles (awns) protruding from each one, giving the grass a "fuzzy" appearance.
- 🍃 Soft Foliage: The leaf blades are flat and relatively narrow, often featuring a light coating of soft, fine hairs near the base where the leaf wraps around the stem.
🏡 In Your Garden
- ⛰️ The Lime Indicator: This grass is a "calcicole," meaning it has a strong preference for alkaline or calcium-rich soils. If it pops up naturally in your yard, it’s a sign that your soil is likely limestone-based or chalky.
- 🚜 Meadow Aesthetics: While rarely sold as a standalone ornamental, it is a key component in "wildflower meadow" seed mixes because it fills space gracefully without choking out delicate flowers.
⚠️ Safety & Toxicity
- 🐄 Livestock Risk: Interestingly, this plant is more dangerous to cows and horses than to humans. It contains a compound that mimics Vitamin D; if livestock graze on it exclusively for too long, it can cause calcium to deposit in their joints and heart (a condition called calcinosis).
- 🐾 Pet Safety: For household pets like dogs and cats, the grass is non-toxic. However, like any grass with "awns" (bristles), the dry seeds can occasionally get stuck in a pet's fur, ears, or between their toes, causing minor irritation.
✨ Fun Fact
Trisetum flavescens is one of the few plants in the world that can actually cause "Vitamin D poisoning." Because it contains a powerful analog of the vitamin, it was studied by scientists to better understand how calcium is absorbed in the animal kingdom!

Detailed Care Instructions
Growing Trisetum flavescens, commonly known as yellow oat-grass, requires some specific steps. This perennial grass is native to Europe and thrives in temperate regions. Here’s a guide to help you grow Trisetum flavescens successfully:
Soil and Site Selection
- Soil Type: Yellow oat-grass prefers well-drained soil. It can tolerate a range of soil types from loamy to sandy and slightly acidic to neutral pH levels (6.0 to 7.5).
- Sunlight: Choose a location that receives full sun to partial shade. Trisetum flavescens generally performs best in full sunlight.
Planting Seeds
- Seed Preparation: Purchase high-quality seeds from a reputable supplier. Soak the seeds in water for 24 hours before planting to enhance germination.
- Sowing Time: The best time to sow seeds is in the spring or fall when temperatures are cooler.
- Sowing Method:
- Prepare the planting area by tilling the soil and removing any weeds.
- Scatter the seeds evenly over the soil surface.
- Lightly rake the soil to ensure the seeds make good soil contact.
- Cover the seeds with a thin layer of soil (about 1/8 inch) or simply press them into the soil if sowing directly on the surface.
Watering
- Prepare the planting area by tilling the soil and removing any weeds.
- Initial Watering: After sowing, water the area gently but thoroughly to keep the soil consistently moist until germination occurs, which typically takes 2-3 weeks.
- Ongoing Watering: Once the plants are established, they require less frequent watering. Water during dry spells to prevent drought stress but avoid waterlogging.
Maintenance
- Weeding: Regularly remove weeds to reduce competition for nutrients and water.
- Fertilization: Yellow oat-grass generally does not require heavy fertilization. A light application of balanced fertilizer in the early growing season can help with initial growth.
- Mowing: If planting in a meadow or lawn setting, mow the grass to a height of 3-4 inches to promote healthy growth and prevent seed head formation if you don't want self-seeding.
Pests and Diseases
Trisetum flavescens is relatively resistant to pests and diseases. However, keeping your garden clean and removing any diseased plants can prevent potential issues.
Dividing
As a perennial, Trisetum flavescens can be divided every few years in the early spring or fall to maintain plant vigor and expand your planting area.
Ecological Benefits
Yellow oat-grass provides habitat and food for many insects and birds, making it an excellent choice for naturalistic landscapes and ecological gardening.
Following these steps will help you successfully grow Trisetum flavescens in your garden. Happy gardening!

Place in a bright room that is sun drenched almost all day. Or directly in a south-facing window.

To properly water this plant, you should first assess the soil moisture level by digging your finger an inch or two into the soil. If the soil feels dry, it may be time to water. When watering, aim to soak the soil to a depth of several inches. It is important to avoid watering too frequently or allowing the soil to become waterlogged. Wait until the top inch or two of soil feels dry before watering again. Additionally, consider providing adequate drainage to prevent the soil from becoming overly saturated.
Sure, here are the fertilizing instructions for Trisetum flavescens:
- Soil Preparation: Before planting, incorporate a balanced, slow-release granular fertilizer into the soil to provide a good nutrient foundation. Look for a fertilizer with an N-P-K ratio such as 10-10-10.
- Initial Fertilization: At planting time, you can mix compost or well-rotted manure into the soil. This will improve soil structure and provide essential nutrients.
- Spring Feeding: In early spring, apply a balanced 10-10-10 or 14-14-14 slow-release fertilizer. Follow the manufacturer’s recommendations on the amount to use based on the plant's size and growth rate.
- Mid-Season Boost: If the plant shows signs of nutrient deficiency during the growing season, such as yellowing of leaves or poor growth, apply a light feeding of a balanced fertilizer or an organic liquid feed every 6-8 weeks.
- Avoid Over-Fertilization: Be cautious not to over-fertilize, as excessive nutrients can lead to nutrient run-off and potential harm to the plant's root system.
- Watering-In: Always water the plant thoroughly after applying fertilizer to help the nutrients penetrate the soil and reach the root system effectively.
- Organic Alternatives: For an organic approach, use compost tea, fish emulsion, or a seaweed extract as a liquid fertilizer following the application rates indicated on their packaging. These organic options can be applied every 4-6 weeks during the growing season.
By following these steps and observing the health and growth of your Trisetum flavescens, you can ensure it remains healthy and vibrant.
Trisetum Flavescens is a plant that grows well in a soil that is slightly acidic with a pH range between 5.5 to 6.5. The soil should be well-draining and fertile, containing a good balance of organic matter and nutrients. It is recommended to use a loamy soil with good drainage to avoid waterlogging, which can damage the plant's root system. Adding a layer of mulch on top of the soil can help retain moisture and provide enough nutrients to the plant. Trisetum Flavescens is adaptable to different types of soils, but it prefers soils that are rich in humus and have good moisture retention.
Trisetum flavescens is a perennial grass species that can be propagated through seed or division. Here are the detailed steps for each method:
Propagation by Seed:
- Seed Collection:
- Collect seeds from mature plants in late summer to early fall when the seed heads are dry and brown.
- Gently strip the seeds from the seed heads or shake them into a container.
- Collect seeds from mature plants in late summer to early fall when the seed heads are dry and brown.
- Seed Preparation:
- Clean the seeds to remove any debris or chaff.
- Optionally, cold stratification can be performed to enhance germination rates. Place the seeds in a moist, sand-filled bag and refrigerate for 4-6 weeks.
- Clean the seeds to remove any debris or chaff.
- Sowing:
- Prepare a seed tray with a well-draining potting mix.
- Sprinkle the seeds evenly over the surface and cover lightly with a thin layer of soil, about 1/4 inch deep.
- Water gently to moisten the soil without washing away the seeds.
- Prepare a seed tray with a well-draining potting mix.
- Germination:
- Place the seed tray in a warm location with indirect sunlight, maintaining consistent moisture.
- Seeds should germinate within 2-3 weeks. Maintain proper moisture levels but avoid waterlogging.
- Place the seed tray in a warm location with indirect sunlight, maintaining consistent moisture.
- Transplanting:
- Once the seedlings have developed a few sets of true leaves and are large enough to handle, transplant them into individual pots or a prepared garden bed.
- Harden off the young plants by gradually exposing them to outdoor conditions before transplanting them permanently.
Propagation by Division:
- Once the seedlings have developed a few sets of true leaves and are large enough to handle, transplant them into individual pots or a prepared garden bed.
- Selecting Plants:
- Choose healthy, established plants in the early spring or early fall for division.
- Choose healthy, established plants in the early spring or early fall for division.
- Preparation:
- Water the plant thoroughly a day before you plan to divide it to ease the removal and reduce root stress.
- Water the plant thoroughly a day before you plan to divide it to ease the removal and reduce root stress.
- Division Process:
- Dig up the entire plant, taking care to preserve as much of the root system as possible.
- Gently shake off excess soil to expose the roots.
- Use a sharp, sterile knife or spade to divide the root clump into smaller sections, ensuring each section has several shoots and a healthy root system.
- Dig up the entire plant, taking care to preserve as much of the root system as possible.
- Replanting:
- Replant the divisions immediately in a well-prepared garden bed or pots with a suitable soil mix.
- Space the divisions according to the mature size of the plant, generally about 1-2 feet apart.
- Water the new divisions thoroughly to settle the soil around the roots.
- Replant the divisions immediately in a well-prepared garden bed or pots with a suitable soil mix.
- Aftercare:
- Keep the soil consistently moist but not waterlogged for the first few weeks to help the plants establish.
- Mulch around the plants to retain moisture and suppress weeds.
By following these propagation methods, you can successfully grow new plants from Trisetum flavescens, ensuring a healthy and thriving garden.
- Keep the soil consistently moist but not waterlogged for the first few weeks to help the plants establish.


