Plant Overview
Known as Zanduri wheat, this ancient grain hails from the rugged mountains of Georgia in the Caucasus region. While your local bakery likely uses common bread wheat, Triticum timopheevii is a hardy, wilder relative that has survived for millennia by being significantly tougher than its modern cousins. It is often celebrated by botanists as a "genetic goldmine" because of its incredible natural immunity to many common crop diseases.
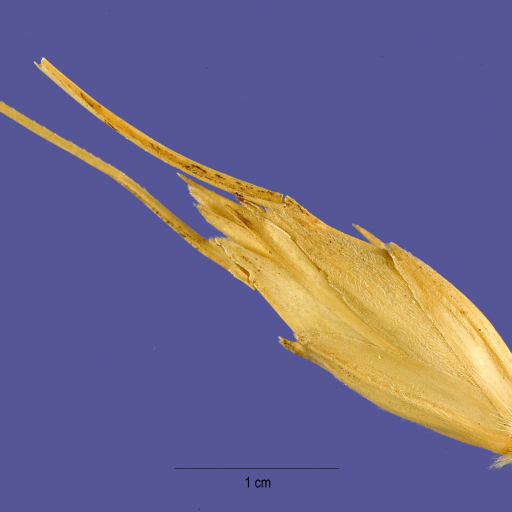
🔍 How to Identify
- 🌾 Spike Structure: The seed heads (spikes) are dense and somewhat flattened, giving it a more compact and "stiff" appearance compared to the drooping heads of common wheat.
- ☁️ Velvety Texture: One of its most distinctive traits is the presence of fine, soft hairs (pubescence) that cover the leaves and the husks protecting the seeds, giving the plant a slightly fuzzy look.
- 🎨 Color Profile: Before it turns golden for harvest, the plant often displays a striking bluish-green tint, a waxy coating that helps it retain moisture.
🏡 In Your Garden
- 🏔️ Mountain Resilience: This plant is an "extremophile" of the grain world. It is naturally adapted to high altitudes and cooler, damp climates where common wheat might succumb to mold or rot.
- 🛡️ Built-in Protection: It is famous for its "nontraditional" genome, which provides a natural shield against fungal infections like leaf rust and powdery mildew. It rarely requires the chemical interventions that modern crops do.
⚠️ Safety & Toxicity
- ✅ Status: Non-toxic and edible. As a relative of standard wheat, it is safe for handling and consumption.
- 🌾 Gluten Alert: Just like common bread wheat, Zanduri wheat contains gluten. It is not suitable for individuals with Celiac disease or gluten intolerances.
- 🐾 Pet Safety: The young green blades (wheatgrass) are safe for cats and dogs to nibble on, though the dried, sharp husks of a mature plant could cause minor mouth irritation if chewed.
✨ Fun Fact
Scientists consider Triticum timopheevii a "biological rebel." While most cultivated wheats share a similar genetic history, this species carries a unique "G" genome, making it a vital resource for plant breeders trying to create "super-wheats" that can survive climate change!

Detailed Care Instructions
To grow Triticum timopheevii plant, also known as Timopheev's wheat, you can follow these steps:
- Select a suitable location: Choose a spot that receives full sun, as Timopheev's wheat requires at least 6 hours of direct sunlight daily. Ensure the soil is well-draining and fertile.
- Prepare the soil: Loosen the soil using a garden fork or tiller. Remove any weeds or rocks and add organic matter like compost or well-rotted manure to improve soil fertility.
- Sow the seeds: Scatter the Triticum timopheevii seeds evenly over the prepared soil. Lightly press them into the soil, but do not bury them too deep. It's recommended to sow the seeds in rows, with about 6-8 inches spacing between them.
- Watering: Keep the soil consistently moist but avoid overwatering, as it can lead to root rot. Water the seeds gently using a watering can or a gentle spray from a hose to avoid displacing the seeds.
- Maintenance: Keep the area around the plants free from weeds to avoid competition for nutrients and water. Provide support like bamboo stakes if required, especially during heavy wind or rain.
- Fertilization: Feed the plants with a balanced fertilizer during the growing season, following the package instructions. This will help promote healthy growth and increase yield.
- Harvesting: Monitor the plants for ripening spikes. Harvest the spikes when the kernels are fully mature and golden. Cut the spikes just above the ground and let them dry before threshing to separate the seeds from the chaff.
- Storage: Once harvested and dried, store the seeds in a cool, dark, and dry place until you are ready to use them or plant them for the next growing season.
Remember to regularly monitor your plants for any signs of pests or diseases, and take appropriate steps to control them if necessary.
To water the Triticum Timopheevii plant, you should follow these guidelines:
- Consider the plant's watering needs: Triticum Timopheevii plants generally prefer moist soil but can tolerate periods of dryness. It is important to avoid overwatering to prevent root rot or fungal diseases.
- Observe the plant's soil moisture: Before watering, check the soil's moisture content by inserting your finger about an inch deep into the soil. If it feels dry at this depth, it indicates that it's time to water the plant.
- Use the right amount of water: The amount of water required depends on various factors like the plant's size, environmental conditions, and pot type. A general rule of thumb is to water until the soil feels moist, but not soggy or waterlogged. Ensure that excess water drains out through drainage holes to prevent water accumulation.
- Watering frequency: The frequency of watering Triticum Timopheevii plants depends on environmental conditions such as temperature, humidity, and sunlight exposure. As a guideline, check the soil's moisture every 2-3 days. Watering might be required more frequently during warmer months or if the plant is in direct sunlight.
- Watering techniques: To water the Triticum Timopheevii plant, you can use a watering can or a hose with a gentle flow setting. Water the soil around the base of the plant, aiming directly at the root zone. Avoid wetting the leaves excessively, as this can promote fungal diseases.
- Time of watering: It is generally recommended to water Triticum Timopheevii plants in the morning. This allows the foliage to dry out during the day, reducing the risk of fungal infection. Watering in the evening or night may cause the plant to remain wet for an extended period, increasing the chances of diseases.
- Consider environmental factors: Adjust the watering schedule based on environmental factors such as rainfall. If there has been sufficient natural precipitation, hold off on watering until the soil begins to dry out.
Remember that individual plant care can vary, so it's essential to monitor your Triticum Timopheevii plant closely and adjust the watering routine accordingly.
To successfully fertilize Triticum Timopheevii plants, follow these instructions:
- Start fertilizing when the plant has established a strong root system, typically after about 2-3 weeks of growth.
- Choose a balanced, slow-release fertilizer with equal parts nitrogen (N), phosphorus (P), and potassium (K). This can be expressed as an NPK ratio, such as 10-10-10 or 20-20-20.
- Apply the fertilizer according to the package instructions, as different brands may have varying application rates.
- Spread the fertilizer evenly around the base of the plant, taking care to avoid direct contact with the foliage or stem.
- Gently work the fertilizer into the topsoil, making sure it is well incorporated.
- Water the plant thoroughly after fertilizing to help nutrients reach the plant's root system.
- Repeat the fertilizer application every 4-6 weeks throughout the growing season.
- Monitor the plant for any signs of nutrient deficiencies or excesses, such as yellowing leaves or stunted growth. Adjust the fertilizer application accordingly.
- Avoid over-fertilizing, as this can lead to nutrient imbalances, nutrient runoff, or environmental pollution.
- Additionally, consider supplementing the fertilizer with organic matter, such as compost or well-rotted manure, to improve soil fertility and overall plant health.
When cultivating Triticum Timopheevii plants, it is essential to choose the appropriate soil that provides the necessary conditions for optimal growth. The preferred soil should have a well-balanced composition and possess specific characteristics to accommodate the plant's requirements.
The ideal soil for Triticum Timopheevii plants is typically loamy soil. Loam is a fertile soil type that consists of a combination of sand, silt, and clay particles. It offers a balanced soil structure, allowing for sufficient water drainage while retaining adequate moisture and nutrients.
The soil should have good drainage capabilities to prevent waterlogging, which can potentially harm the plant's root system. Adequate drainage helps ensure that the roots receive enough oxygen and avoids the risk of root rot. You can improve drainage by incorporating organic matter, such as compost or well-rotted manure, into the soil.
Triticum Timopheevii plants also prefer a soil pH level ranging from slightly acidic to neutral. A pH level between 6 and 7 is generally recommended for these plants to thrive. Monitoring the soil's pH level periodically can help maintain the optimal conditions for growth.
Moreover, it is essential to ensure that the soil is well-aerated. This allows the roots to breathe and facilitates the uptake of nutrients. Incorporating organic matter into the soil can help improve its structure and aeration.
Additionally, the soil should be rich in nutrients, as Triticum Timopheevii plants have relatively high nutrient requirements. Adding organic matter or using a balanced slow-release fertilizer can contribute to providing the necessary nutrients for healthy growth.
To summarize, when selecting soil for Triticum Timopheevii plants, opt for loamy soil with good drainage capabilities, a slightly acidic to neutral pH range, and adequate aeration. Additionally, enrich the soil with organic matter and consider providing a slow-release fertilizer to ensure optimal nutrient availability for the plant's development.
To propagate Triticum Timopheevii plant, you can follow these steps:
- Start by selecting a healthy parent plant that is disease-free and has desirable traits that you wish to propagate.
- Choose a suitable time for propagation, ideally during the spring or early summer when the plant is actively growing.
- Prepare the planting medium, which can be a mixture of well-draining soil, sand, and compost. Ensure that the medium is fertile and provides adequate nutrients for the plant's growth.
- Take cuttings from the parent plant using sanitized pruning shears or a sharp knife. Select young, vigorous shoots that are approximately 4-6 inches long.
- Remove any lower leaves from the cuttings, leaving only a few at the top. This will prevent excess moisture loss and encourage root formation.
- Dip the end of the cuttings in a rooting hormone powder or liquid to promote root development.
- Make small holes in the prepared planting medium and insert the cuttings, ensuring at least half of the cutting is buried in the medium.
- Gently firm the soil around the cuttings to provide stability and good soil-to-cutting contact.
- Water the newly planted cuttings thoroughly, ensuring the soil is moist but not waterlogged.
- Place the cuttings in a warm and humid environment, such as a greenhouse or place a clear plastic bag over the pot to create a mini greenhouse effect.
- Provide indirect light to the cuttings to avoid excessive sun exposure that could damage them.
- Regularly monitor the moisture levels in the soil and water as needed to keep it consistently moist.
- After about 4-6 weeks, check for root development by gently tugging on the cuttings. If you feel resistance, it indicates that roots have formed.
- Once the cuttings have developed a well-established root system, they can be carefully transplanted into individual pots or containers filled with a suitable growing medium.
- Continue to provide proper care, including regular watering, balanced fertilization, and adequate sunlight, to ensure the healthy growth of the propagated Triticum Timopheevii plants.
By following these steps, you can successfully propagate Triticum Timopheevii plants and expand your collection.


