Plant Overview
Known as the "Star-flowered Tulip," Tulipa turkestanica is a botanical treasure originating from the high-altitude, stony slopes of Central Asia. Unlike the heavy-headed hybrid tulips found in grocery store bouquets, this wild species offers a delicate, starry elegance that feels both ancient and ethereal. It is a favorite among "lazy" gardeners because it is a reliable naturalizer, meaning it returns and multiplies year after year without needing to be replanted.
🔍 How to Identify
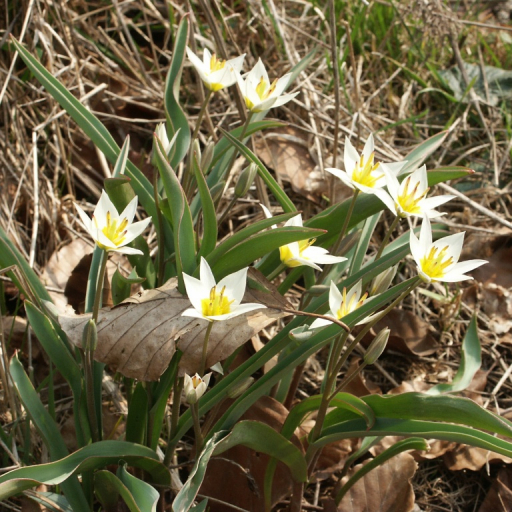
- 🌟 Star-Shaped Blooms: The flowers open wide into a sharp, six-pointed star. They are creamy white on the edges with a rich, glowing orange or deep yellow "eye" at the center.
- 🌿 Multi-Stem Habit: This is a standout feature; while most tulips produce one flower per stalk, this species can produce anywhere from 1 to 12 individual flowers on a single stem.
- 🍃 Glaucous Foliage: The leaves are narrow, lance-shaped, and have a distinctive dusty, blue-green (glaucous) tint that provides a cool backdrop to the bright flowers.
🏡 In Your Garden
- ☀️ The Summer Bake: These tulips evolved in regions with hot, dry summers. They actually prefer to be left in dry, "baked" soil during their dormant period (summer). Avoid planting them in areas with heavy irrigation or damp clay.
- 🏔️ Rock Garden Specialist: Because of their small stature and love for drainage, they are the perfect candidates for rock gardens or the edges of gravel paths. They hate "wet feet," so ensure your soil is gritty and well-drained to prevent bulb rot.
⚠️ Safety & Toxicity
- 🚫 Toxic if Ingested: All parts of the Tulipa turkestanica, especially the bulb, contain alkaloids and glycosides known as tulipalins.
- 🐾 Pets & Kids: If eaten, it can cause significant mouth irritation, drooling, and digestive upset. It is best to plant these in areas where curious pets or toddlers won't be tempted to dig them up or snack on the petals.
✨ Fun Fact
While modern hybrid tulips are often treated as annuals because they "fizzle out" after one year, Tulipa turkestanica is a true perennial. If it likes its home, it will form a larger and larger colony every spring, effectively creating a "snow-covered" look on your garden floor!

Detailed Care Instructions
Tulipa Turkestanica, also known as the Turkestan tulip, is a beautiful and easy-to-grow plant that produces white flowers with a yellow center. Here are some tips on how to grow Tulipa Turkestanica:
- Choose a location: Tulipa Turkestanica prefer full sun to partial shade and well-drained soil. Plant them in an area that receives at least 6 hours of sunlight per day.
- Planting: Plant Tulipa Turkestanica bulbs in the fall, around 6-8 weeks before the first frost. Dig a hole that is 2-3 times the depth of the bulb and place the bulb in the hole with the pointed end facing upwards. Space the bulbs about 4-6 inches apart.
- Watering: Water the bulbs well after planting and keep the soil moist but not waterlogged. Once the plants have established, they are quite drought-tolerant and will only need occasional watering.
- Fertilizing: You can fertilize Tulipa Turkestanica in the spring with a balanced, slow-release fertilizer to promote healthy growth and flowering.
- Mulching: Adding a layer of mulch around the plants can help retain moisture in the soil and suppress weeds. Avoid mulching directly over the bulbs to prevent rotting.
- Maintenance: Remove any faded flowers to prevent the plant from going to seed and allow it to focus its energy on producing new blooms. After the plant has finished flowering and the leaves have turned yellow, you can cut them back to the ground.
By following these tips, you can successfully grow Tulipa Turkestanica and enjoy their beautiful blooms in your garden.

Place in a bright room that is sun drenched almost all day. Or directly in a south-facing window.

Tulipa Turkestanica plants should be watered thoroughly but sparingly. It is important to ensure the soil is evenly moist but not waterlogged. Watering should be done directly at the base of the plant to avoid wetting the foliage, which can lead to disease and rot. Allow the top inch of soil to dry out before watering again, usually every 1-2 weeks depending on environmental conditions. It is recommended to water in the morning to allow for adequate absorption before the cooler evening temperatures. Avoid watering during rainy periods or if the soil is already moist to prevent overwatering. Regularly check the soil moisture levels by inserting a finger into the soil, and adjust the watering schedule accordingly.
To fertilize Tulipa Turkestanica, apply a balanced, water-soluble fertilizer in early spring when the plant begins to emerge from the soil. Follow the instructions on the fertilizer package for dilution and application rates. Avoid fertilizing too frequently, as this can lead to excessive growth and poor flower production. Water the plant thoroughly after fertilizing to help the nutrients penetrate the soil and reach the roots.
Tulipa Turkestanica plants prefer a well-draining soil that is slightly acidic to neutral in pH. A sandy loam or loamy soil is ideal for these plants, as it allows for good drainage while still retaining some moisture. Adding compost or organic matter to the soil can help improve its structure and fertility, which can benefit the health and growth of the plants. It is also important to ensure that the soil is not overly compacted, as this can restrict root growth and development. Overall, the key is to provide a soil that is well-draining, fertile, and has a pH level that is suitable for Tulipa Turkestanica plants.
Tulipa Turkestanica can be propagated through division or by collecting and planting its seeds. To propagate through division, wait until the plant has finished flowering and the foliage has died back. Carefully dig up the plant and separate the bulbs, making sure each division has some roots attached. Replant the divisions in a well-draining soil mix at the same depth as they were originally planted.
To propagate through seeds, collect the seeds from the plant after they have fully ripened and turned brown. Sow the seeds in a seed tray filled with a well-draining soil mix, pressing them lightly into the surface of the soil. Keep the soil moist and place the tray in a warm, bright location. Germination can take several weeks to several months, so be patient. Once the seedlings have developed several leaves, they can be transplanted into individual pots or directly into the garden.
Both methods of propagation can be successful with proper care and attention to the needs of the plant.
Common pests of the turkestan tulip include Aphids, snails. Make a habit of checking your turkestan tulip frequently for pests so that any infestations can be caught and managed early.


