Plant Overview
Known as the Amazon Lily, this elegant tropical bulb is the undisputed "Queen of the Shade." Hailing from the humid forest floors of the Andes in Peru and Colombia, it has been a favorite in Victorian glasshouses for centuries. It is celebrated for its pristine white blooms that resemble a cross between a daffodil and a star, filling the air with a sophisticated, sweet citrus perfume.
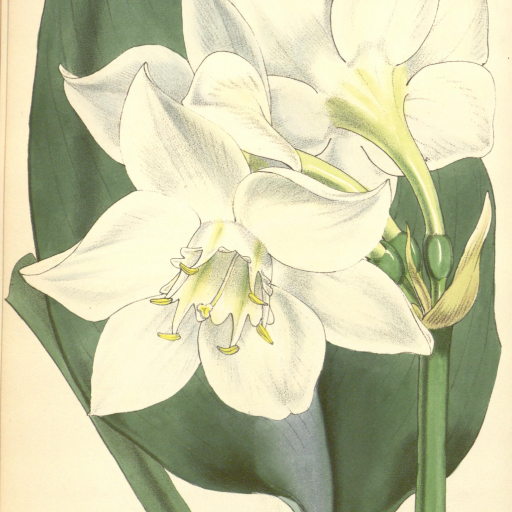
🔍 How to Identify
- 🍃 Lush Foliage: Deep, glossy green leaves that are broad and paddle-shaped. They look remarkably like Hosta leaves, providing a tropical feel even when the plant isn't blooming.
- ❄️ Star-Shaped Blooms: Clusters of 5–10 pure white, nodding flowers. Each flower features a distinctive central "cup" (corona) tinged with a delicate lime green.
- 📏 Stately Scapes: The flowers sit atop tall, leafless stalks that rise gracefully above the foliage, making them excellent for high-end floral arrangements.
🏡 In Your Garden
- ☁️ The Forest Floor Effect: Because it evolved under the dense canopy of the Amazon, this plant is highly sensitive to direct sunlight. It prefers "bright shade"; too much sun will quickly scorch those deep green leaves.
- 🪴 Homebody Roots: This plant is notoriously "repot-phobic." It performs best when its roots are slightly crowded and can take a year or more to recover its bloom cycle if moved. Only repot when the bulbs are literally pushing against the sides of the container.
- 💧 Humidity over Wetness: While it loves a humid environment, the bulbs are prone to rot if the soil stays soggy. Think of it as a tropical dance: keep the air moist, but let the soil breathe.
⚠️ Safety & Toxicity
- 🚫 Toxic Status: Contains lycorine and other alkaloids.
- 🐾 Pet & Child Risk: If ingested, it can cause vomiting, drooling, and digestive distress in cats, dogs, and humans. It is not a "true lily" (Lilium), so it is less likely to cause the acute kidney failure seen in true lilies, but it should still be kept out of reach.
✨ Fun Fact
Despite its delicate appearance, the Amazon Lily is a "repeat bloomer." If you provide a short "rest period" by slightly reducing water for a few weeks in the winter, the plant will often reward you with a second or even third flush of fragrant flowers throughout the year!

Detailed Care Instructions
To grow an Urceolina Amazonica plant, also known as the Amazon lily, you can follow these steps:
- Choose a suitable pot or container: Select a container with drainage holes to prevent waterlogging. The size of the pot should be slightly larger than the plant's current root ball to allow for growth.
- Provide the right soil: Use a well-draining, rich soil mix with a pH range of 6.0-6.5. You can create a soil mix by combining potting soil, peat moss, perlite, and a small amount of sand.
- Find the right location: Urceolina Amazonica plants prefer bright, indirect light. Place them near a window where they can receive filtered sunlight or provide artificial grow lights if needed.
- Maintain proper temperature and humidity: These plants thrive in warm and humid environments. Keep the temperature between 65-80°F (18-27°C) during the day and around 60-70°F (15-21°C) at night. Maintain humidity levels by using a humidifier or placing the pot on a tray filled with water and pebbles.
- Watering routine: Keep the soil evenly moist, but not soggy. Water your plant once the top inch of soil feels slightly dry, allowing excess water to drain out completely. Avoid overwatering, as it can lead to root rot.
- Fertilize regularly: Use a balanced liquid fertilizer designed for houseplants during the growing season (spring to summer). Follow the instructions on the package for the correct dosage and frequency.
- Pruning and propagation: Trim back any yellow or damaged leaves, maintaining the plant's bushy appearance. You can propagate Urceolina Amazonica through stem cuttings. Take a cutting from a healthy plant, around 4-6 inches in length, and place it in water or a moist soil mix until roots develop.
- Repotting: As the plant grows, it may outgrow its pot. Repot during the spring, every 1-2 years, using a slightly larger container and fresh soil mix.
By following these steps and providing the right care, you can grow a thriving Urceolina Amazonica plant.

Place in a window with dappled sun or a spot in the middle of a room. Or directly in a window facing west or east.
The Urceolina Amazonica plant requires a specialized watering routine to thrive. Here is a detailed guide on how to water this particular plant:
- Assess the moisture level: Before watering, it is crucial to check the moisture level of the soil. Insert your finger about 2 inches deep into the soil. If it feels dry, it's time to water the plant.
- Select suitable water: Use water that is at room temperature or slightly lukewarm. Avoid using chlorinated water or water with high mineral content, as it can be harmful to the plant.
- Water thoroughly: To ensure proper hydration, water the plant until the excess water drains out from the bottom of the pot. This allows the soil to be evenly moistened and helps prevent waterlogging.
- Watering frequency: This plant prefers consistent moisture, but it's important to avoid overwatering. Typically, water the Urceolina Amazonica plant once every 7-10 days during the growing season (spring and summer). Adjust the frequency slightly during winter, reducing it to once every 10-14 days.
- Observe the foliage: Keep a close eye on the plant's foliage. If the leaves appear droopy or limp, it could be a sign of under-watering. However, if the lower leaves turn yellow or the plant starts showing signs of root rot, you might be overwatering, and you should adjust your watering routine accordingly.
- Consider humidity: Urceolina Amazonica plants thrive in a humid environment. To mimic their natural habitat, you can increase humidity by misting the leaves daily using a spray bottle or placing a water-filled tray near the plant.
- Water source alternatives: If you want to provide even more humid conditions, consider using a pebble tray or a humidifier near the plant. These methods allow for slow and sustained release of moisture in the air.
Remember, it is essential to monitor the plant's response to watering and adjust accordingly. Each plant has its own unique moisture requirements, so being attentive to the specific needs of the Urceolina Amazonica plant is crucial for its overall health and well-being.
To provide proper fertilizing instructions for Urceolina Amazonica, without using its common names, you can follow the following guidelines:
- Choose a well-balanced fertilizer with equal ratios of nitrogen (N), phosphorus (P), and potassium (K). Look for a fertilizer labeled 10-10-10 or similar.
- Dilute the fertilizer according to the manufacturer's instructions. Generally, a ratio of 1 tablespoon of fertilizer per gallon of water is sufficient.
- Apply the diluted fertilizer once a month, during the growing season, which typically spans from spring to early autumn.
- Take care not to over-fertilize, as excessive nutrients can harm the plant. If in doubt, it's better to provide less fertilizer than too much.
- Distribute the fertilizer evenly around the base of the plant, taking care not to allow it to come into direct contact with the leaves or stems.
- Water the plant thoroughly after applying the fertilizer to help distribute the nutrients to the roots.
- Monitor the plant's response to the fertilizer and adjust the frequency or strength of the applications if needed. Ensure that the plant remains healthy and doesn't show signs of nutrient deficiencies or excesses.
Remember, following general fertilizing practices helps promote healthy growth and ensures your Urceolina Amazonica receives the nutrients it requires for optimal development.
The Urceolina Amazonica plant, also known as [common names withheld], thrives in well-draining soil that is conducive to its growth requirements. When selecting soil for this plant, it is essential to consider a few factors to ensure optimal growth and overall health.
Firstly, the soil should be rich in organic matter to provide necessary nutrients and moisture retention. This can be achieved by using a mixture that includes compost, well-rotted manure, or peat moss. Organic matter aids in improving soil structure and fertility, which promotes root development and overall plant vigor.
Secondly, the soil should have excellent drainage capabilities to prevent waterlogging, which can cause root rot and other plant health issues. To ensure proper drainage, mixing perlite, sand, or coarse gravel into the soil can be beneficial. These amendments create air pockets and allow excess water to flow out, preventing water saturation around the plant's roots.
Furthermore, it is advisable to maintain a slightly acidic to neutral pH level in the soil for the Urceolina Amazonica plant. A pH range of 6.0 to 7.0 is generally recommended. To achieve this, adding pine bark or sphagnum moss to the soil mixture can help increase acidity if needed.
Lastly, it is important to avoid using heavy clay or compacted soils, as these can hinder root growth and restrict overall plant development. The soil should be loose, friable, and well-aerated to allow proper root penetration and nutrient uptake.
In summary, the ideal soil for the Urceolina Amazonica plant should consist of a well-balanced blend of organic matter, provide adequate drainage, maintain a slightly acidic to neutral pH level, and promote root growth and development. By selecting the right soil conditions, you can help ensure a healthy and thriving Urceolina Amazonica plant.
Propagation of Urceolina Amazonica is typically achieved through division or by taking stem cuttings. Here is a detailed description of the propagation process:
- Prepare the plant: Start by selecting a healthy and robust Urceolina Amazonica plant. Ensure that it is free from any diseases or pests. Water the plant a day or two before propagation to ensure it is adequately hydrated.
- Division method: Dividing the plant is the easiest and most common method of propagation. Gently remove the plant from its pot or garden bed and carefully separate the root mass into several sections. Each section should have a good amount of roots and a few shoots or leaves.
- Cutting method: This method is best done during the plant's active growing season, usually in spring or summer. Choose a healthy and mature stem of the Urceolina Amazonica plant. Using a clean and sharp pair of scissors or pruning shears, cut a section of the stem, around 4-6 inches long. Ensure that the cutting has at least two or three nodes.
- Prepare the planting medium: Use a well-draining and nutritious planting medium for both division and cutting methods. A mixture of potting soil, perlite, and organic matter (such as compost or peat moss) in equal parts can be used. Sterilize the soil before use to minimize the risk of diseases.
- Plant the divisions or cuttings: For division, plant each separated section in an appropriately sized pot or a well-prepared garden bed. Make sure the roots are well-covered with soil, and gently firm it around the base of the plant. For cuttings, remove the lower leaves and dip the cut end in a rooting hormone powder to enhance root development. Insert the cutting into the planting medium and firm the soil gently around it.
- Provide proper care: Place the newly propagated Urceolina Amazonica plants in a warm and bright location but away from direct sunlight. Maintain a consistently warm temperature, ideally around 70-80°F (21-27°C). Keep the soil evenly moist but not waterlogged, as excessive moisture can cause root rot.
- Encourage root growth: Maintain high humidity levels by covering the newly propagated plants with a clear plastic bag or using a propagation tray with a transparent lid. This will create a mini greenhouse effect, retaining moisture and promoting root development.
- Monitor and transplant: Regularly check the plants for signs of new growth, which indicates successful propagation. After a few weeks or months, depending on the propagation method, the newly propagated Urceolina Amazonica plants should establish roots and start developing a strong root system. Once the plants are well-established, they can be transplanted into larger pots or the desired garden location.
Remember, propagation success may vary based on environmental conditions and the overall health of the mother plant. Patience, care, and attention to detail are key to successfully propagate Urceolina Amazonica.


