Plant Overview
The Vaccinium deliciosum, commonly known as the Cascade Bilberry or Blueleaf Huckleberry, is a low-growing mountain treasure. Its Latin name doesn't lie—deliciosum refers to its fruit, which many foragers consider the most flavorful of all wild huckleberries. Native to the subalpine meadows of the Pacific Northwest, this hardy shrub creates a stunning groundcover that shifts from waxy blues in summer to fiery reds in the autumn.
🔍 How to Identify
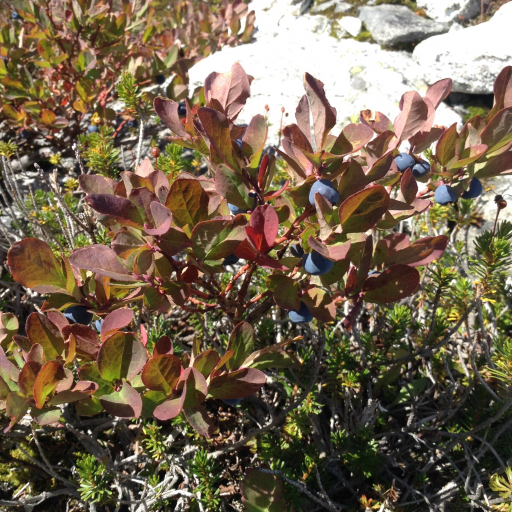
- 🍃 The Foliage: Look for small, oval leaves with a distinct "glaucous" (waxy, blue-green) coating on both sides. This powdery look distinguishes it from its cousins.
- 🌸 The Blooms: In late spring, it produces solitary, nodding flowers that look like tiny pink or creamy-white urns tucked under the leaves.
- 🫐 The Fruit: The berries are round and dark blue to black, but they are almost always covered in a thick, pale blue "bloom" (waxy powder) that makes them look dusty.
🏡 In Your Garden
- 🏔️ Mountain Mimicry: Because this plant naturally grows in high-altitude meadows, it thrives in cool, acidic soil. It is particularly fond of areas that receive heavy winter snow, as the snowpack protects its low branches from freezing winds.
- ⏳ A Lesson in Patience: This is a slow-growing, rhizomatous shrub. It spreads via underground runners rather than rushing upward. If you are planting it, avoid moving it once established, as its root system is sensitive to disturbance.
- 🍂 Seasonal Fire: If you want a plant that provides "winter interest" through color rather than height, this is it. The leaves turn a brilliant, glowing crimson before dropping, signaling the end of the harvest season.
⚠️ Safety & Toxicity
- 🍴 Status: Entirely edible and highly sought after by humans and wildlife alike.
- 🐾 Details: It is non-toxic to dogs, cats, and horses. In the wild, it is a vital food source for black bears and songbirds. However, always ensure you have identified the plant correctly before consuming wild berries, as some "look-alikes" in the forest can be belly-achers!
✨ Fun Fact
The "dusty blue" powder on the berries isn't dirt—it’s a natural epicuticular wax that acts as a built-in sunscreen and water repellent for the fruit, helping the plant survive the intense UV rays of high-mountain summers!

Detailed Care Instructions
To grow Vaccinium deliciosum, also known as Cascade huckleberry or blue huckleberry, follow these steps:
- Choose an appropriate planting location: Vaccinium deliciosum thrives in acidic soil with a pH between 4.5 and 6.0. Find a spot in your garden that receives partial shade to full sun. Ensure that the soil is well-draining and has good organic content.
- Obtain Vaccinium deliciosum seeds or seedlings: You can purchase seeds or young plants from a local nursery or online. Make sure they are from a reputable source.
- Prepare the soil: Before planting, loosen the soil and dig in some organic compost or well-rotted manure to improve drainage and fertility.
- Plant the seeds or seedlings: If you have seeds, sow them in the prepared soil according to the instructions on the packet. For seedlings, dig a hole that is slightly wider and deeper than the root ball of the plant. Place the seedling in the hole and backfill with soil, gently firming it around the roots.
- Watering: Keep the soil consistently moist but not waterlogged. Water the plants deeply whenever the top inch of the soil feels dry. Avoid overwatering as it can cause root rot.
- Mulching: Apply a layer of organic mulch around the base of the plant to conserve moisture, suppress weed growth, and provide essential nutrients as it breaks down.
- Pruning: As the plant grows, prune any dead, diseased, or damaged branches. This will promote healthy growth and improve air circulation.
- Fertilization: Vaccinium deliciosum does not typically require much fertilization, especially if the soil is already well-nourished. However, you can apply a balanced fertilizer designed for acid-loving plants once or twice a year in spring.
- Pest control: Keep an eye out for pests such as aphids, spider mites, or leafrollers. If necessary, treat affected plants with an appropriate insecticide or use natural pest control methods.
- Harvesting: Vaccinium deliciosum produces tasty edible berries. Harvest the berries when they turn dark blue or purple and are fully ripe, usually in late summer or early fall. Be careful not to damage the plant while picking the berries.
By following these steps, you can successfully grow Vaccinium deliciosum plants and enjoy their delicious berries.

Place in a bright room that is sun drenched almost all day. Or directly in a south-facing window.

To properly water this particular plant, it is important to avoid overwatering. Water should be applied slowly and evenly over the soil surface, avoiding any pooling. It is also important to provide adequate drainage, as this plant likes moist but well-drained soil. During hot summer months, the plant may need water daily, but in cooler or overcast weather, watering can be reduced to once or twice a week. Keep an eye on the soil moisture level and adjust watering as needed. It’s better to slightly under-water than overwater.
To fertilize this plant, you should apply a balanced fertilizer formula in early spring or late fall. Make sure to avoid applying fertilizer during the plant's dormant period. Also, avoid using fertilizers that are too high in nitrogen as this can lead to excessive leaf growth and reduced fruit production. Instead, choose a fertilizer with an equal balance of nitrogen, phosphorus, and potassium. Apply the fertilizer according to the package instructions, taking care not to apply too much. Finally, water the plant after fertilizing to help the nutrients reach the roots.
Vaccinium deliciosum plants prefer well-draining acidic soil with a pH level between 4.5 and 5.5. It is recommended to use a mix of peat moss and acidic compost when planting or repotting these plants. Avoid using soil that is high in alkaline or has a pH level above 5.5, as this can harm the plant's roots and overall health. Additionally, adding perlite or sand to the soil mixture can help improve drainage and prevent waterlogging, which can lead to root rot. Fertilize the soil with a slow-release acidic fertilizer specifically formulated for acid-loving plants to provide the necessary nutrients for healthy growth.
To propagate this particular plant, you will need to gather mature, healthy leaves and stems. Using a sharp, clean pair of scissors, make a clean cut about 1-2 inches below the node of each stem. Remove any leaves from the bottom 1/3 of the stem.
Fill a small container with a well-draining soil mix (such as a mixture of perlite, sand, and peat moss). Water the soil until it is moist but not saturated.
Dip the cut end of each stem in hormone rooting powder, tapping off any excess. Then, gently insert each stem into the soil, pressing the soil around it firmly to ensure good contact.
Cover the container with a plastic bag or plastic wrap, creating a mini greenhouse effect. Place the container in a location with bright, indirect light and consistent temperature (around 70 degrees Fahrenheit is ideal).
Check the soil moisture periodically and water as needed to keep it moist but not soaking wet. After a few weeks, new growth should appear at the base of each stem, indicating that the cuttings have successfully rooted.
Once the new growth is about an inch tall, remove the plastic covering and gradually acclimate the new plants to normal indoor or outdoor conditions over the course of a few days.
After a few more weeks of growth, the new plants should be ready to transplant into larger containers or into a garden bed outdoors.


