Plant Overview
Known affectionately as the Wild Medlar, Vangueria infausta is a rugged beauty of the African bushveld. Despite its scientific name meaning "unlucky," it is a treasure for foragers and wildlife enthusiasts alike. This deciduous tree is beloved for its rusty-brown, apple-flavored fruits that bridge the gap between ornamental beauty and practical utility in a drought-resistant garden.
🔍 How to Identify
- 🍃 Velvety Foliage: The leaves are large, oval, and covered in soft, tawny hairs, giving them a distinct felt-like texture that is incredibly soft to the touch.
- 🍎 The "Medlar" Fruit: Look for glossy green, round fruits that eventually turn a dull, wrinkled tan or brown as they ripen, resembling a small, rustic apple.
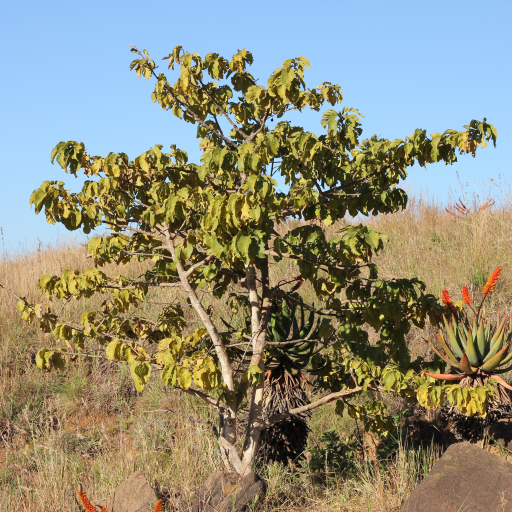
- 🌳 Growth Habit: It typically grows as a multi-stemmed shrub or a small tree with a dense, spreading crown, reaching heights of 3 to 7 meters.
- 🌼 Greenish Blooms: In spring, it produces clusters of small, inconspicuous greenish-yellow flowers that hide among the large leaves.
🏡 In Your Garden
- 🪨 Hardy Survivor: Because it naturally thrives in rocky outcrops and sandy soils, it is incredibly drought-tolerant once established. It prefers "tough love" and well-drained spots over pampered, soggy soil.
- 🦋 Wildlife Magnet: If you want a "living" garden, this is your plant. The flowers attract a buzz of pollinators, while the ripening fruit is a magnet for fruit-eating birds, baboons, and even tortoises.
- ✂️ Low Maintenance: It requires very little pruning. Its deciduous nature means it will drop its leaves in winter, providing a skeletal, architectural look to the garden before bursting into green in spring.
⚠️ Safety & Toxicity
- 🍴 Edible Fruit: The pulp of the ripe fruit is safe and highly nutritious for humans. It is often used to make traditional puddings or eaten raw for its tart, apple-like flavor.
- 🐾 Pet & Child Safety: While the fruit pulp is non-toxic, the seeds are quite large and hard; they should be discarded to avoid a choking hazard. There are no major reports of toxicity for dogs or cats, though ingesting large amounts of raw leaves may cause mild digestive upset.
✨ Fun Fact
The species name infausta means "unlucky" or "unfortunate." This stems from an old African superstition where it was believed that burning the wood of this tree would bring bad luck to a homestead or cause the cattle to only produce male offspring!

Detailed Care Instructions
To grow Vangueria infausta, also known as the Wild Medlar plant, you can follow these steps:
- Climate and Location: This plant is typically found in tropical and subtropical regions, so it requires a warm and sunny location. Make sure the climate and environment in your area are suitable.
- Soil Type: Vangueria infausta prefers well-draining soil. A mixture of sandy loam and organic compost will work well. The pH level should be slightly acidic to neutral, around 5.5-7.
- Propagation: The plant can be propagated from seeds or stem cuttings. If you choose to start from seeds, collect ripe fruits and remove the seeds, then sow them in seed trays or pots filled with the appropriate soil mixture. Keep the soil slightly moist and place the tray in a warm location. Germination may take several weeks to a few months.
- Planting: Once the seeds have germinated or if you are using stem cuttings, plant them in larger pots or directly in the ground. Ensure the soil is well-prepared and enriched with compost. Space the plants around 10 feet apart to allow for their growth potential.
- Watering: Vangueria infausta requires regular watering, especially during the dry season. However, it is important to avoid waterlogged conditions, as excessive moisture can lead to root rot. Allow the top inch of soil to dry out between waterings.
- Fertilization: Apply a balanced fertilizer during the growing season, typically from spring to summer. Use a slow-release fertilizer or organic compost to provide essential nutrients to the plant.
- Pruning and Shaping: Regular pruning will help to maintain the shape and control the size of the plant. Remove any dead or diseased branches. Lightly prune after the fruiting season to encourage new growth.
- Pollination: Vangueria infausta relies on cross-pollination for fruit production. Having multiple plants can increase the chances of successful pollination and fruiting. Bees and other insects are important pollinators, so avoid using harmful pesticides.
- Harvesting: The fruits of Vangueria infausta are edible and resemble small plums. Harvest the ripe fruits when they turn yellowish or reddish in color. They should be soft and easily detachable from the stem. You can eat them fresh or use them in various culinary preparations.
Remember to research any specific considerations or requirements for your particular climate or region to ensure the successful growth of Vangueria infausta.

Place in a bright room that is sun drenched almost all day. Or directly in a south-facing window.

Vangueria infausta is a plant that needs regular watering to thrive. It is recommended to water the plant consistently, but not excessively. This means that the soil should be kept moist, but not waterlogged. Overwatering can lead to fungal diseases and root rot, while under watering can cause the leaves to wilt and dry out. It is best to water the plant deeply, allowing the water to soak into the soil, and then allowing the soil to dry out slightly before watering again. The frequency of watering will depend on factors such as the size of the plant, the type of soil, and the environmental conditions. Watering should be reduced during the winter months, when the plant is dormant, and increased during hot summer weather. When watering, it is important to avoid getting water on the leaves, which can cause spotting and damage to the foliage. Instead, water at the base of the plant, and use a watering can or hose with a gentle flow to avoid water pooling around the roots.
To fertilize this plant, mix a balanced fertilizer that contains equal amounts of nitrogen, phosphorus, and potassium. Apply the fertilizer to the soil around the base of the plant, being careful not to let it come into contact with the leaves. Water the plant thoroughly after fertilizing to help the nutrients penetrate the soil. Repeat this process every four to six weeks during the growing season to promote healthy growth and blooming. Avoid fertilizing during the winter months when the plant is dormant.
The Vangueria Infausta plant requires well-draining and nutrient-rich soil for optimal growth. The soil should have a slightly acidic to neutral pH level and should be able to retain moisture without becoming waterlogged. A mixture of equal parts sandy loam, perlite, and peat moss is a suitable soil blend for this plant. Additionally, it is recommended to incorporate organic matter into the soil to improve fertility and water retention. It is important to avoid using heavy clay soils and to ensure that the soil is free of any pathogens or diseases.
To propagate this plant, you can start by taking a cutting from a healthy and mature plant. Use a sharp, sterile cutting tool to make a clean cut just below a node. Remove any leaves or flowers from the bottom of the cutting, leaving only a few leaves at the top.
Next, dip the cut end of the cutting in a rooting hormone powder. This will encourage the development of roots. Insert the cutting into a pot filled with moist and well-draining soil. Firm the soil around the cutting to ensure it is secure.
Cover the pot with a clear plastic bag or place it in a propagator to increase humidity. Keep the soil moist but not waterlogged and place the pot in a warm spot that receives indirect light.
Within a few weeks, the cutting should start to form roots. Once the plant has developed a strong root system, transplant it into a larger pot or directly into the ground. Water the plant regularly and provide it with bright, indirect light.
With proper care, your propagated plant should grow into a healthy and vibrant specimen.


