Plant Overview
Often called Brazilian Vervain, this South American native is the "architect" of the wildflower world. It is beloved for its ability to create a misty, purple haze in meadows without blocking the view of the plants behind it. While it looks delicate, it is a rugged survivor that has traveled from the grasslands of Brazil to become a staple in sun-drenched gardens globally.
🔍 How to Identify
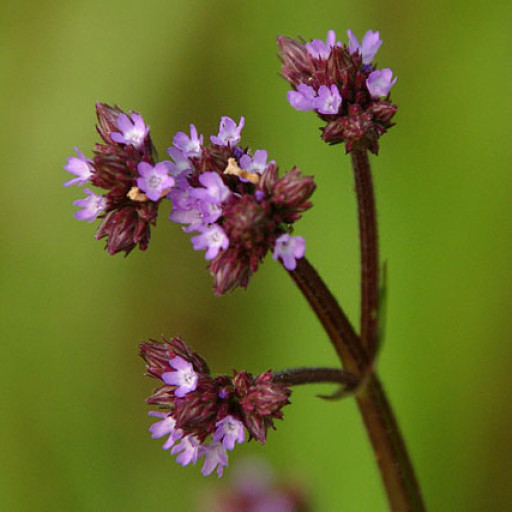
- 🟪 Tiny Flowers: It produces dense, terminal spikes of microscopic lilac to deep purple flowers that cluster at the ends of long, branching stalks.
- 📐 Square Stems: Like many in its family, the stems are distinctly four-sided, very stiff, and have a rough, sandpaper-like texture.
- 🍃 Clasping Leaves: The leaves are narrow, sharply toothed, and "clasp" directly onto the stem rather than growing on their own little stalks (petioles).
🏡 In Your Garden
- 🌬️ The "See-Through" Effect: Because the foliage stays mostly at the base and the flower stems are so thin, you can plant this in the front or middle of a border. It provides height and color without creating a visual "wall."
- 🌱 Self-Seeding Spirit: This plant is an opportunist. It produces thousands of seeds and will happily pop up in sidewalk cracks or gravel paths. In some regions, it is considered a bit too successful (invasive), so deadheading the spent flowers is a smart move to keep it in check.
- ☀️ Drought Resilience: Its deep taproot allows it to withstand long dry spells that would wither other perennials. It prefers "lean" soil—too much fertilizer will actually make the stems weak and floppy.
⚠️ Safety & Toxicity
- 🌿 Low Toxicity: Verbena brasiliensis is generally considered non-toxic to humans and most garden visitors.
- 🐾 Pet Caution: While not high-risk, ingestion of large amounts by dogs or cats can cause mild stomach upset. The rough, hairy texture of the leaves can also be a minor skin irritant for humans with sensitive skin during pruning.
✨ Fun Fact
Despite its somewhat "weedy" reputation in the wild, this plant is a high-performance nectar station. It is one of the few plants that can provide a steady food source for migrating Monarch butterflies and hummingbirds even during the hottest, driest weeks of late summer.

Detailed Care Instructions
To grow Verbena Brasiliensis, follow these steps:
- Choose a sunny location: Verbena Brasiliensis thrives in full sun, so find a spot in your garden that receives at least 6-8 hours of direct sunlight per day.
- Prepare the soil: Verbena Brasiliensis prefers well-draining soil. If your soil is heavy or clayey, amend it with organic matter such as compost or peat moss to improve drainage.
- Planting: Dig a hole in the prepared soil slightly larger than the root ball of the plant. Place the plant in the hole, ensuring that the top of the root ball is level with or slightly above the surrounding soil. Fill the hole with soil and gently firm it around the plant.
- Watering: Water the newly planted Verbena Brasiliensis thoroughly to settle the soil and help the plant establish roots. Afterward, water the plant regularly, providing about 1 inch of water per week. Adjust the frequency depending on rainfall and the moisture level of the soil.
- Mulching: Apply a layer of organic mulch around the plant, such as wood chips or bark, to help retain soil moisture, suppress weeds, and regulate soil temperature.
- Fertilizing: Verbena Brasiliensis is not a heavy feeder, but you can fertilize it with a balanced, slow-release fertilizer once or twice during the growing season. Follow the instructions on the fertilizer package for application rates.
- Pruning: Regularly deadhead spent blooms by removing the faded flowers to encourage continuous blooming. You can also trim back the plant to shape it and promote bushier growth.
- Pest and disease control: Verbena Brasiliensis is generally resistant to pests and diseases, but it is still important to monitor for any issues and take appropriate action. Remove any infected or infested plant material promptly to prevent the spread of diseases or pests.
- Overwintering: In colder climates, Verbena Brasiliensis may not survive the winter. Consider growing it as an annual or take precautions to protect it during the winter. Mulch around the base of the plant to insulate the root system, or consider bringing potted plants indoors.
By following these steps, you can successfully grow Verbena Brasiliensis plants in your garden and enjoy their vibrant blooms.

Place in a bright room that is sun drenched almost all day. Or directly in a south-facing window.

To water this plant, first check the soil moisture level by inserting your finger about an inch into the soil. If it feels dry, it's time to water. Use a watering can or hose to thoroughly water the soil around the base of the plant, making sure to wet the entire root system. Be careful not to overwater, as this can lead to root rot. Allow the soil to dry out slightly between waterings. If the plant is in a container, make sure there are drainage holes in the bottom to prevent water from pooling and damaging the roots.
- Begin by selecting a high-quality, balanced fertilizer that is suitable for use on flowering plants.
- Mix the fertilizer according to the instructions provided on the package.
- Water your plant thoroughly before applying the fertilizer.
- Use a watering can or sprayer to apply the fertilizer to the soil around the base of the plant. Avoid getting any fertilizer on the foliage to prevent burning.
- Apply the fertilizer once every 4-6 weeks during the growing season.
- Monitor the plant for any signs of over-fertilization, such as yellowing or burned leaves, and adjust the application frequency or amount as needed.
- Stop fertilizing in the fall to allow the plant to prepare for winter dormancy.
- When spring arrives, resume fertilizing as usual to promote healthy growth and vibrant blooms.
The recommended soil for Verbena Brasiliensis is well-draining soil that is not too wet or too dry. The soil should be fertile and rich in organic matter. This plant prefers a neutral to slightly acidic soil with a pH level between 6.0 and 7.0. The soil should be loose and airy to promote healthy root growth and water absorption. A mix of sandy and loamy soil is ideal for Verbena Brasiliensis, as it provides good drainage while retaining moisture. Heavy clay soil or soil that is dense and compacted should be avoided, as it can lead to root rot and other problems for the plant. The soil should also be checked regularly to ensure that it is not too wet or dry, as this can affect the health and growth of the plant.
To propagate this plant, start by taking stem cuttings from a healthy parent plant. Choose stems that are about 4-6 inches long and have at least two nodes. Remove the lower leaves from the stem, leaving just a couple of leaves at the top.
Dip the cut end of the stem into rooting hormone powder, and gently tap off any excess. Prepare a container with well-draining soil, such as a mixture of sand and peat moss.
Make a small hole in the soil using a dibber or your finger, and insert the stem cutting into the hole. Firmly press the soil around the stem to secure it in place.
Water the cutting thoroughly, and cover the container with a clear plastic bag or a plastic dome. This will help to create a humid environment that will encourage rooting.
Place the container in a bright location, but out of direct sunlight. Check the cutting regularly to ensure that the soil remains moist, but not waterlogged.
After a few weeks, gently tug on the stem cutting to see if it has rooted. If there is resistance, it means that roots have formed, and you can remove the plastic covering.
Transplant the rooted cutting into a larger container or into the garden, and continue to care for it as you would for an established plant.


