Plant Overview
Known as the "Burkwood Viburnum," this shrub is a sensory masterpiece designed to announce the arrival of spring. It is a celebrated hybrid prized primarily for its intoxicating, spicy-sweet fragrance that mimics the scent of cloves. Whether used as a privacy screen or a standalone specimen, its shimmering dark foliage and "snowball" blossoms make it a timeless favorite for traditional and cottage gardens alike.
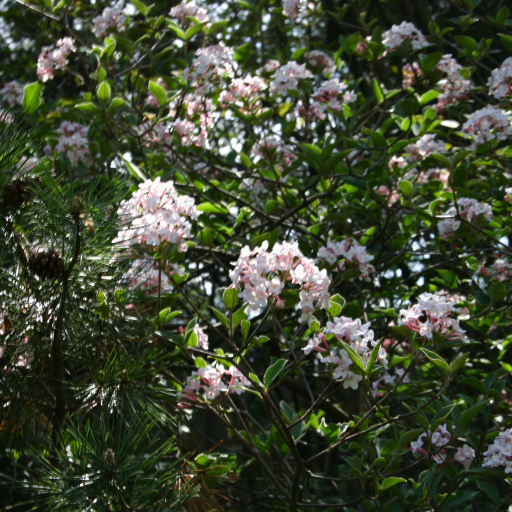
🔍 How to Identify
- 🌸 The Blossoms: Tight clusters of pink-tinged buds open into dome-shaped white flower heads (corymbs) that are roughly 2 to 3 inches wide.
- 🍃 The Foliage: The leaves are oval-shaped, dark green, and remarkably glossy on the surface, with a pale, slightly fuzzy texture underneath.
- 🍇 The Fruit: Following the flowers, the plant produces small, flattened berries that transition from a bright red to a deep, waxy black as they ripen.
🏡 In Your Garden
- 🌬️ Strategic Placement: Because the scent is so powerful, this viburnum is best planted near windows, patios, or frequently used walkways where its perfume can be fully appreciated.
- ✂️ Pruning Timing: This plant develops its flower buds on "old wood." To avoid losing next year's blooms, only prune the branches immediately after the current flowers have faded in late spring.
⚠️ Safety & Toxicity
- 🐾 Pet Safety: Viburnum × burkwoodii is generally considered non-toxic to cats and dogs by major veterinary associations.
- 🤢 Human Caution: While the berries are technically not classified as "deadly," they are not edible for humans. Ingesting large quantities can lead to mild stomach upset, nausea, or vomiting, especially in young children.
✨ Fun Fact
The Burkwood Viburnum is a "man-made" wonder; it was first bred in 1924 by the Burkwood brothers in England by crossing the Korean Spice Viburnum with the Service Viburnum to create a plant that was both incredibly fragrant and winter-hardy.

Detailed Care Instructions
To grow Viburnum × Burkwoodii, also known as Burkwood viburnum, you can follow these steps:
- Planting: Select a suitable location that receives full sun to partial shade. Ensure that the soil is well-drained, fertile, and slightly acidic to neutral. Dig a hole that is as deep and wide as the root ball of the plant.
- Soil Preparation: Mix compost or well-rotted manure with the soil to improve fertility and drainage. This will provide essential nutrients for healthy growth.
- Planting the Viburnum: Place the plant in the prepared hole, making sure that the top of the root ball is level with the ground. Backfill the hole with soil and firm it gently around the plant to remove air pockets.
- Watering: After planting, water the Viburnum thoroughly and deeply. Thereafter, water it regularly, providing about 1 inch of water per week during dry spells. Avoid overwatering as it can lead to root rot.
- Mulching: Apply a layer of organic mulch, such as wood chips or shredded bark, around the base of the plant. This will suppress weeds, conserve moisture, and regulate soil temperature.
- Pruning: Viburnum × Burkwoodii requires minimal pruning. However, you can shape the plant by removing dead, damaged, or crossing branches. Prune after the plant has finished flowering.
- Fertilizing: Apply a slow-release fertilizer in early spring to promote healthy growth. Follow the package instructions for dosage.
- Pest and Disease Control: Viburnum × Burkwoodii is generally resistant to pests and diseases. However, monitor the plant regularly for signs of common issues like aphids or powdery mildew. Treat potential problems promptly to maintain plant health.
- Winter Care: This shrub is hardy and can withstand winter temperatures. However, cold winds and frost can damage the flower buds. Protect the plant during extreme weather by covering it with burlap or a frost blanket.
- Regular Maintenance: Regularly check the plant for any issues or signs of stress. Provide supplemental watering during prolonged dry periods. Also, remove any weeds around the base of the plant to prevent competition for nutrients.
By following these care instructions, your Viburnum × Burkwoodii plant should grow and thrive, providing beautiful flowers and foliage for your garden.
Viburnum × Burkwoodii is a shrub that requires frequent watering to grow and thrive. When watering this plant, it's important to ensure that the soil around the roots is sufficiently moist. The amount of water required will vary depending on the climate and weather conditions.
The best time to water Viburnum × Burkwoodii is early in the morning or late in the afternoon when the sun is less intense. This will help ensure that the water does not evaporate quickly and that the plant has time to absorb the moisture before the sun becomes too hot.
When watering, it's important to direct the water towards the base of the plant, avoiding the leaves and flowers. This will help prevent fungal growth and disease. Using a watering can or hose with a gentle spray setting can also help distribute the water evenly around the roots.
It's important not to overwater Viburnum × Burkwoodii, as this can lead to root rot and other issues. A good rule of thumb is to water deeply once a week, ensuring that the soil around the roots is moist but not waterlogged. If the soil feels dry to the touch, it's time to water.
Overall, consistent and careful watering is essential for the health and vitality of Viburnum × Burkwoodii.
To fertilize a Viburnum × Burkwoodii plant, follow these instructions:
- Choose a balanced, slow-release fertilizer with an NPK ratio of 10-10-10 or 15-15-15.
- Start fertilizing in late winter or early spring, just before new growth appears.
- Apply the fertilizer evenly around the base of the plant, keeping it a few inches away from the trunk or stems.
- Follow the recommended dosage mentioned on the fertilizer packaging; typically, it is around 1/4 to 1/2 pound per 100 square feet.
- Lightly scratch the fertilizer into the top inch of soil, ensuring it is well-distributed.
- Water the plant thoroughly after fertilizing to help the nutrients reach the root zone.
- Repeat the fertilization process once or twice during the growing season, with a gap of 6-8 weeks between applications.
- Avoid over-fertilization as it may lead to excessive growth or nutrient imbalances.
- During the fall, stop fertilizing to allow the plant to enter dormancy.
Keep in mind that these instructions may vary slightly depending on your specific Viburnum × Burkwoodii plant, so consult a local gardening expert or nursery for more precise guidelines if needed.
The best type of soil to use with this plant is a well-draining, loamy soil that is rich in organic matter. The soil should be slightly acidic, with a pH between 5.5 and 6.5. It should also be moist, but not waterlogged, as this may lead to root rot.
It is recommended to prepare the soil before planting by loosening it to a depth of at least 12 inches and incorporating compost or other organic matter. This will ensure that the soil has the proper nutrients and structure to support healthy growth.
If the soil in your area is not well-suited for Viburnum × Burkwoodii, you may need to amend it with materials such as peat moss, perlite, or sand to improve its drainage and texture. It is important to avoid planting this shrub in heavy clay soil, as it may lead to poor growth and development.
Propagation of Viburnum × Burkwoodii involves several methods, including softwood cuttings, hardwood cuttings, and layering. Here's a detailed guide on how to propagate this plant using these techniques:
- Softwood cuttings: Softwood cuttings are typically taken in late spring or early summer when the plant is actively growing.
a. Select a healthy, non-flowering stem that is young and still flexible.
b. Cut a 4-6 inch long section just below a leaf node.
c. Remove the lower leaves, leaving only a few at the top.
d. Dip the cut end of the cutting into a rooting hormone powder to enhance root development.
e. Place the cutting into a pot filled with a well-draining rooting medium (such as a mix of perlite and peat moss).
f. Water the cutting, ensuring the soil remains consistently moist but not waterlogged.
g. Cover the pot with a clear plastic bag or use a propagator to maintain humidity.
h. Place the pot in a warm and bright location, but avoid direct sunlight.
i. Check for root development regularly by gently tugging the cutting. If there is resistance, roots have likely formed.
j. Once roots have developed, transplant the cutting to a larger pot or into the garden, ensuring it receives proper care.
- Hardwood cuttings: Hardwood cuttings are taken during winter dormancy.
a. Collect hardwood cuttings in late fall or winter when the plant has become dormant.
b. Select mature stems, around pencil thickness, and cut them into 8-12 inches long sections.
c. Make a straight cut at the base, just below a leaf node, and an angled cut at the top.
d. Dip the base end in rooting hormone to encourage root growth.
e. Insert the cuttings vertically into a container or directly into a pre-prepared bed, leaving only the top angled cut exposed.
f. Ensure the cuttings are buried deep enough to stabilize them.
g. Water thoroughly and cover the area with mulch to retain moisture and protect the cuttings from extreme temperatures.
h. Keep the cuttings in an area with partial shade and maintain moist soil.
i. Check for root development in the following spring. Once established, transplant the rooted cuttings to desired locations.
- Layering: Layering is an alternative propagation method suitable for plants with flexible branches.
a. Choose a healthy, low-growing branch that is easily bent towards the ground.
b. Make a small wound on the bottom side of the branch where it touches the soil.
c. Dig a small trench near the selected branch.
d. Place the wounded section of the branch into the trench, ensuring it remains in contact with the soil.
e. Secure the branch in place with a U-shaped metal pin or a stone.
f. Cover the branch with soil, leaving the tip exposed.
g. Water the area and keep it consistently moist until roots develop.
h. After roots have established, sever the rooted layer from the parent plant and transplant it into a pot or to its desired location.
Remember to provide appropriate care and maintenance as the new plants establish themselves.


