Plant Overview
Known affectionately as the David Viburnum, this evergreen shrub is a structural masterpiece originating from the mountains of Western China. It is prized by landscape designers for its architectural, leathery foliage and its almost otherworldly metallic-blue berries. Because it remains compact and low-growing, it acts as a sophisticated, permanent groundcover that keeps its lush green color even in the depths of winter.
🔍 How to Identify
- 🍃 Deeply Veined Leaves: The most striking feature is the dark teal-green, leathery leaves that feature three prominent, deeply recessed veins running parallel from the base to the tip.
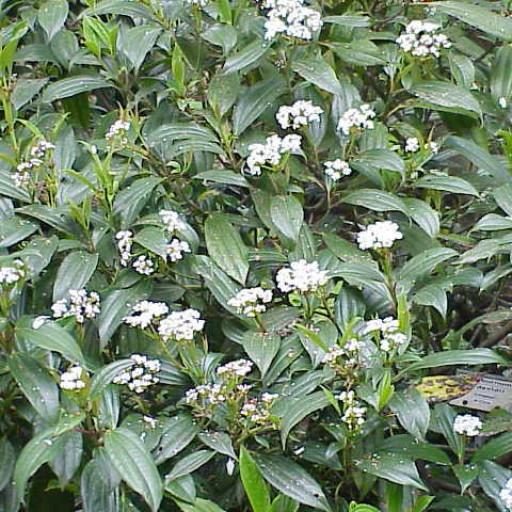
- 🌸 Lacy Flower Clusters: In late spring, the plant produces flattened clusters (cymes) of tiny, white flowers that occasionally show a subtle hint of pink.
- 💎 Turquoise Berries: If pollination is successful, the flowers transform into ovoid berries that shift from green to a stunning, "electric" metallic blue by autumn.
🏡 In Your Garden
- 🤝 The Power of Two: This species is "dioecious," meaning individual plants are typically either male or female. To see those famous blue berries, you must plant at least one male plant in close proximity to a group of females.
- ☂️ Cooler Shadows: Unlike many flowering shrubs that crave the sun, David Viburnum thrives in partial shade. It is the perfect choice for the "north side" of a house or tucked under the canopy of larger trees where the soil stays cool.
- 💧 Drainage is Key: While it loves consistent moisture, it is prone to root rot if left in standing water. It prefers rich, acidic soil that breathes well.
⚠️ Safety & Toxicity
- 🐾 Mildly Toxic: The berries and leaves contain compounds that can cause minor stomach upset, vomiting, or diarrhea if ingested in large quantities by dogs, cats, or curious toddlers.
- 🚫 Not for Foraging: While the berries look like tiny jewels, they are not considered edible for humans. They have a bitter, unpleasant taste that usually prevents significant ingestion.
✨ Fun Fact
This plant was named after Father Armand David, a French missionary and botanist who is also credited with introducing the Giant Panda and the Ginkgo tree to the Western world!

Detailed Care Instructions
| Humidity | Normal |
| Lighting | Part Sun |
| Difficulty | Easy |
| Temperature | 21°C - 30°C |
| Hardiness Zones | 7 - 9 |
To grow Viburnum davidii, you will need to follow a few steps:
- Choose a suitable location: Viburnum davidii prefers partial shade to full sun, with well-drained soil. Make sure the location provides enough space for the shrub to grow and spread.
- Prepare the soil: Before planting, amend the soil with organic matter like compost to improve drainage and fertility. Ensure the pH level of the soil is slightly acidic to neutral.
- Planting: Dig a hole that is slightly larger and deeper than the root ball of the plant. Place the plant in the hole, ensuring it is at the same depth as it was in the container. Fill the hole with soil and gently tamp it down around the plant.
- Watering: Water the newly planted viburnum deeply to help establish its root system. Keep the soil moist but not waterlogged. During dry spells, water regularly to provide enough moisture for the plant.
- Mulching: Apply a layer of organic mulch around the base of the plant, leaving a gap around the stem to prevent moisture buildup. Mulch helps conserve moisture, suppress weed growth, and regulate soil temperature.
- Pruning: Viburnum davidii generally requires minimal pruning. However, you can prune it in late winter or early spring to remove any dead, damaged, or crossing branches. Pruning can also help maintain its desired shape and size.
- Fertilizing: Feed the plant with a balanced slow-release fertilizer in early spring to promote healthy growth. Follow the instructions on the fertilizer packaging for the appropriate application rate.
- Pests and diseases: Viburnum davidii is relatively resistant to pests and diseases. However, regular inspection is necessary to catch any problems early. Treat any issues promptly with appropriate organic or chemical solutions, if necessary.
- Propagation: You can propagate Viburnum davidii from semi-hardwood cuttings in late summer or autumn. Ensure the cuttings have a healthy length of stem with 2-3 pairs of leaves. Dip the cut end in rooting hormone, and plant them in a well-draining, moist potting mix. Place the cuttings in a warm and bright location, misting them regularly to maintain humidity.
By following these steps and providing proper care, your Viburnum davidii plant should grow and thrive in your garden.

Place in a window with dappled sun or a spot in the middle of a room. Or directly in a window facing west or east.

To water this plant, first ensure that the soil is well-drained and not waterlogged. Water deeply and thoroughly, allowing the water to penetrate into the root zone. Avoid getting water on the leaves as this can lead to fungal diseases. Water only when the top inch of soil feels dry to the touch. During the growing season, water more frequently to keep the soil evenly moist but not waterlogged. In winter, reduce watering as the plant is dormant and does not require as much water. Use a watering can or hose to water the plant slowly and evenly, and ensure that the water reaches the entire root zone.
Vigorous Viburnum species should be fertilized with a balanced fertilizer blend every spring, after the plant has broken dormancy. To encourage lush foliage growth, you can supplement the fertilizer with an organic compost or a slow-release fertilizer granule. Be sure not to over-fertilize, as this can cause the plant to become leggy and weak. Instead, follow the fertilizer instructions carefully and adjust the amount and frequency of fertilizer application as needed based on the health and growth of your plant.
Viburnum Davidii thrives in well-drained soil with a pH level ranging from slightly acidic to slightly alkaline. It prefers soil rich in organic matter, but not excessively nutrient-rich or heavy. A mixture of loam and sand is ideal, with additional compost or peat moss added to improve moisture retention. Avoid using heavy clay soil and ensure adequate drainage to prevent waterlogging. The soil should be consistently moist but not waterlogged, and adequate drainage is essential to prevent root rot. Adding a layer of mulch around the base of the plant can help prevent moisture loss and protect the roots from extreme temperatures.
To propagate this plant, take a cutting from a healthy, mature plant in the spring or summer. Cut a section of stem that is about 4-6 inches long, making a clean cut just below a node. Remove the leaves from the bottom third of the cutting and dip the cut end into rooting hormone. Plant the cutting in well-drained soil and keep it moist. You can cover the cutting with a clear plastic bag to create a mini greenhouse effect and promote root growth. After a few weeks, check for roots by gently pulling on the cutting. If it resists, there are roots forming and you can remove the plastic bag. Once the cutting has a good root system, you can transplant it to a larger container or into your garden.
Common pests of the david's viburnum include Aphids, larvae. Make a habit of checking your david's viburnum frequently for pests so that any infestations can be caught and managed early.


