Plant Overview
Known affectionately as the Baker's Violet or the Mountain Yellow Violet, this hardy perennial is a golden gem of the Western North American mountains. Often found at high elevations, it is one of the first splashes of color to emerge as alpine snowpacks begin to melt. While many violets are associated with shady, damp woodlands, Viola bakeri is a rugged sun-seeker that thrives in the rocky, open slopes of the Cascades and Sierra Nevada.
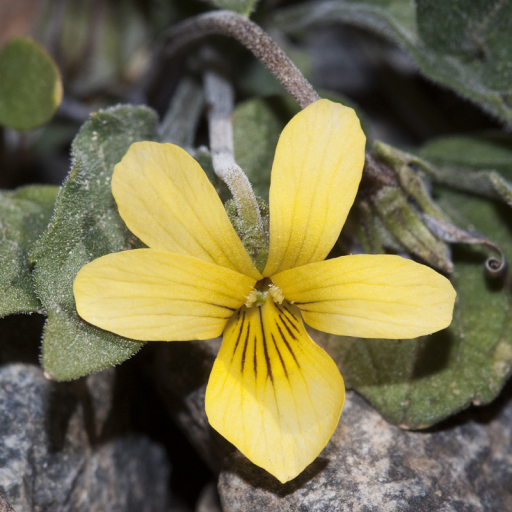
🔍 How to Identify
- 🌼 The Bloom: Small, cheery flowers consisting of five bright yellow petals. The three lower petals are usually etched with delicate, dark brownish-purple veins known as "honey guides."
- 🍃 Leaf Shape: Unlike the classic heart-shaped leaves of common violets, Baker's Violet features narrow, lance-shaped or elliptical leaves that often stand relatively upright.
- 🌱 Growth Habit: It is a low-growing, stemless herb, rarely reaching more than a few inches in height, forming small, tidy clumps among the mountain scree.
🏡 In Your Garden
- ⛰️ Alpine Ambitions: If you are trying to grow this at home, it requires excellent drainage. It mimics its mountain home best in rock gardens or alpine troughs where water won't sit around its roots.
- ❄️ The Cold Requirement: This plant is adapted to harsh winters and requires a period of "vernalization" (cold dormancy) to bloom. It is not a plant for tropical climates; it needs the chill to trigger its spring awakening.
- 🦋 Pollinator Support: It serves as a vital early-season food source for native bees and small butterflies that emerge in the thin mountain air when few other nectar sources are available.
⚠️ Safety & Toxicity
- ✅ Safe Status: Viola bakeri is generally considered non-toxic to humans, cats, and dogs.
- ⚠️ Wild Caution: While many wild violets are technically edible, always ensure a 100% positive identification before consumption, as they can sometimes be confused with other yellow-flowered mountain plants that may cause stomach upset.
- 🐾 Garden Chemicals: If you are growing these in a backyard setting, remember that the safety status only applies to the plant itself, not to any pesticides or fertilizers applied to it.
✨ Fun Fact
The dark "honey guide" veins on the petals aren't just for aesthetics; they are biological roadmaps! They are designed to guide pollinating insects directly to the center of the flower, ensuring the bee finds the nectar and the plant gets pollinated in one swift visit.

Detailed Care Instructions
To grow Viola Bakeri plants, you can follow these steps:
- Choose a suitable location: Viola Bakeri plants thrive in partial shade to full sun. Select a location in your garden or a pot on your balcony that receives 4-6 hours of sunlight each day.
- Prepare the soil: Viola Bakeri plants prefer well-draining soil with a pH between 6.0-7.0. Amend the soil with organic matter to improve drainage and fertility.
- Planting: Dig a hole that is slightly larger than the root ball of the plant. Place the plant in the hole, making sure the crown (where the stem meets the roots) is level with the soil surface. Backfill the hole with soil, gently firming it around the plant.
- Watering: Keep the soil consistently moist but not waterlogged. Water the plant thoroughly after planting and then water as needed, typically once or twice a week, depending on the weather conditions. Mulching around the plant can help retain moisture and suppress weed growth.
- Fertilizing: Viola Bakeri plants do not require much fertilization. You can apply a balanced, slow-release fertilizer once in early spring and again in mid-summer.
- Pruning: Regular deadheading (removing spent flowers) will encourage continuous blooming. Additionally, you can trim back the plant in late summer or early fall to promote compact and bushy growth.
- Pests and diseases: Viola Bakeri plants are generally resistant to pests and diseases, but keep an eye out for aphids, slugs, and snails. In case of an infestation, treat with appropriate organic or chemical controls.
- Propagation: Viola Bakeri plants can be propagated by collecting seeds or by taking stem cuttings. Sow seeds in early spring or take stem cuttings in late spring or early summer.
By following these steps, you can successfully grow Viola Bakeri plants and enjoy their colorful flowers for a long time.

Place in a bright room that is sun drenched almost all day. Or directly in a south-facing window.

To properly water the Viola Bakeri plant, it is important to check the soil moisture levels regularly. This can be done by sticking a finger into the soil up to the first knuckle. If the soil feels dry at this depth, it is time to water the plant.
When watering, make sure to avoid the foliage and instead water the soil directly at the base of the plant. Use a watering can or a hose with a gentle spray setting to avoid overwatering or damaging the plant. Water the plant until the soil feels moist, but not water-logged.
It is important to note that the Viola Bakeri plant prefers to be kept consistently moist but not water-logged. Overwatering can lead to root rot and other problems. Conversely, underwatering can cause the plant to wilt and die.
In addition to regular watering, the Viola Bakeri plant may benefit from occasional misting to increase humidity levels and prevent drying out of the foliage. It is also important to ensure adequate drainage in the plant's pot or area in the ground to prevent water from sitting around the roots.
To fertilize this plant, use a balanced, water-soluble fertilizer with equal parts nitrogen, phosphorus, and potassium. Dilute the recommended amount of fertilizer in water and apply it to the plant's soil every two weeks during the growing season. Make sure to follow the manufacturer's instructions for dilution and application. Avoid over-fertilizing, as this can damage the plant.
Viola Bakeri plants prefer a well-drained soil that is organically rich with a slightly acidic pH level of around 6.0 to 6.5. A mix of loamy soil, peat moss, and perlite can provide the plant with the drainage it needs while retaining moisture and nutrients. It is also recommended to add a slow-release fertilizer to the soil to ensure that the plant receives sufficient nutrients throughout its growth period. Additionally, it is essential to keep the soil evenly moist but not waterlogged to prevent root rot.
To propagate this plant, you will need to take stem cuttings from a mature and healthy plant. The cuttings should be taken in the late spring or early summer when the plant is actively growing. Select cuttings that are about 3-4 inches long and have at least 2-3 sets of leaves.
Once you have your cuttings, remove the lower set of leaves and dip the cut end of the stem into rooting hormone powder. Then, insert the cutting into a pot filled with a well-draining soil mix. You can cover the pot with a plastic bag or plastic wrap to create a mini greenhouse, which will help retain moisture and promote faster rooting.
Place the pot in a bright, but shaded location and water the soil once the top inch of the soil feels dry. Be careful not to overwater the cuttings as this can lead to rot. After a few weeks, you should start to see new roots growing from the base of the stem and new growth appearing at the top. Once the new growth is established, you can repot the young plants into their own individual pots or plant them outside in a suitable location.


