Plant Overview
Often called the Yellow Prairie Violet, this sunny little wildflower is a resilient pioneer of the North American grasslands. Named after the famed botanist Thomas Nuttall, it is one of the first splashes of gold to appear as the winter snow melts away, signaling the true arrival of spring in the high plains and mountain foothills.
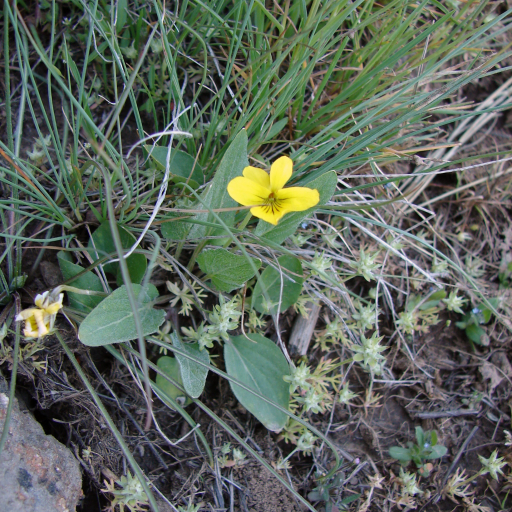
🔍 How to Identify
- 🌼 Sunny Blooms: It features five-petaled, bright yellow flowers. The lower three petals are often etched with delicate brownish-purple "bee lines" that act as landing strips to guide pollinators toward the nectar.
- 🌿 Lance-Shaped Leaves: Unlike the common heart-shaped leaves of garden violets, this species has elongated, lance-shaped (spear-like) leaves that are somewhat fleshy and often covered in fine, soft hairs.
- 🌱 Low Profile: This is a petite perennial that rarely exceeds six inches in height, usually appearing in charming, low-growing clusters tucked between rocks or tufts of prairie grass.
🏡 In Your Garden
- 🏜️ Drought Specialist: Because it originates from semi-arid prairies, it is far more drought-tolerant than its delicate woodland cousins. It thrives in rock gardens or "wild" meadow patches where drainage is sharp and fast.
- 🧱 The Taproot Rule: This violet develops a sturdy, deep taproot to survive dry spells and cold winters. This makes it very difficult to move once established, so choose its permanent "forever home" carefully to avoid transplant shock.
⚠️ Safety & Toxicity
- ✅ Safe Profile: Nuttall’s Violet is generally considered non-toxic to humans. In many indigenous cultures, parts of the plant were historically used for food or medicinal teas.
- 🐾 Pet Friendly: It is not known to be poisonous to cats or dogs, making it a safe choice for a wildlife-friendly backyard. However, as with any plant, keep an eye on curious pets to ensure they don't over-snack on the foliage.
✨ Fun Fact
🦋 Butterfly Nursery: This plant is a critical "host plant" for several species of Fritillary butterflies. The butterflies lay their eggs near the plants so that the emerging caterpillars have an immediate, nutrient-rich food source waiting for them as soon as they hatch!

Detailed Care Instructions
Here are the steps to grow Viola Nuttallii plant:
- Choose a suitable location: Viola Nuttallii plants prefer moist, well-drained soil with partial shade to full sun exposure. They can be grown in containers or directly in the ground.
- Prepare the soil: Ensure the soil is loose and fertile. You can add organic matter like compost or well-rotted manure to improve the soil texture and nutrient content.
- Sow or transplant the Viola Nuttallii seeds or seedlings: If you are starting from seeds, sow them in early spring or fall, following the recommended depth on the seed packet. If you are using seedlings, gently transplant them into the prepared soil, spacing them about 6-12 inches apart.
- Water regularly: Viola Nuttallii plants need regular watering, especially during dry spells. Keep the soil consistently moist but not soggy. Avoid overhead watering to prevent leaf diseases.
- Mulch the soil: Apply a layer of organic mulch like straw or wood chips around the plants to conserve moisture, suppress weeds, and maintain a more even soil temperature.
- Fertilize: Viola Nuttallii plants do not require heavy fertilization. However, you can apply a balanced, slow-release fertilizer in spring to promote healthy growth. Follow the package instructions for proper dosage.
- Deadhead regularly: Remove spent flowers to encourage continuous blooming and prevent the plants from expending energy on seed production.
- Monitor for pests and diseases: Keep an eye out for common pests like aphids or slugs, as well as diseases like powdery mildew. Treat any infestations or infections promptly with appropriate organic or chemical controls.
- Divide and propagate: Every few years, Viola Nuttallii plants can be divided in early spring or fall to rejuvenate them and create new plants. Gently lift the plant, separate the clumps, and replant them in suitable locations.
By following these steps, you can successfully grow Viola Nuttallii plants and enjoy their beautiful flowers in your garden or containers.

Place in a bright room that is sun drenched almost all day. Or directly in a south-facing window.

To properly water this plant, you should first ensure that the soil is dry to the touch. When it is time to water, slowly pour water onto the soil around the base of the plant until it is thoroughly wet. Avoid getting water on the leaves or flowers as this can cause damage. Allow the soil to dry again before the next watering, as overwatering can lead to root rot. It is important to maintain consistent moisture levels and avoid letting the soil become too dry or waterlogged.
To fertilize this plant, apply a balanced fertilizer with an equal ratio of nitrogen, phosphorus, and potassium in early spring. Repeat applications every 4-6 weeks throughout the growing season. Avoid over-fertilization as it can damage the plant. Water the plant thoroughly after fertilization.
Viola Nuttallii plant requires well-draining soil that is slightly acidic with a pH level between 5.5 and 6.5. The soil should also be rich in organic matter and slightly moist. A mixture of peat moss, perlite, and garden soil can make for an ideal growing medium for Viola Nuttallii. It is important to avoid using soil that is too heavy or contains too much clay, as this can cause drainage issues and lead to root rot. Additionally, fertilizing regularly with a balanced liquid fertilizer can help ensure optimal growth and blooming of the plant.
Viola Nuttallii is a plant that can be propagated in several ways. The first method is through division. Dig up the plant and separate the rhizomes into smaller sections with roots attached. Replant each section in a new location.
Another way to propagate this plant is through stem cuttings. Cut a section of stem that has several leaves attached and remove the bottom leaves. Dip the cut end in rooting hormone and plant it in a pot filled with moist soil. Place the pot in a shady location and keep the soil moist. Roots should develop within a few weeks.
The third method is through seed propagation. Collect the seeds and plant them in a pot filled with moist soil. Cover the pot with plastic wrap to create a mini greenhouse. Keep the soil moist and place the pot in a sunny location. Once the seedlings have sprouted, remove the plastic wrap and continue to care for the plants until they are large enough to transplant outside.


