Plant Overview
Often called the Striped Cream Violet or the Pale Violet, Viola striata is the elegant, hard-working relative of the common blue violet. Native to North American woodlands, it brings a touch of "shabby chic" to shaded garden corners with its delicate purple pinstripes. Unlike some fickle forest flowers, this is a resilient survivor that can turn a bare patch of damp earth into a lush, flowery carpet.
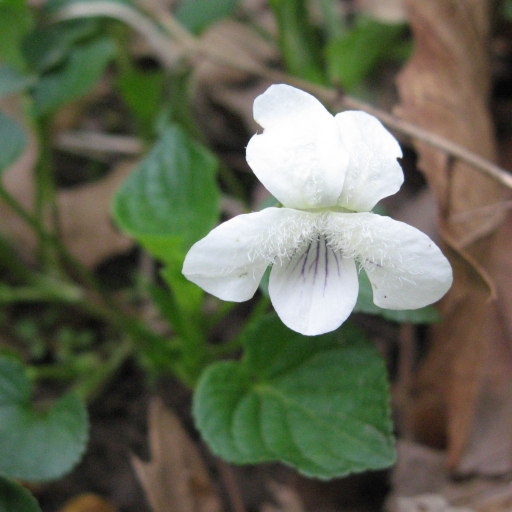
🔍 How to Identify
- 🌸 The Petals: Look for creamy white to pale yellow flowers. The lower petal features distinct, thin purple veins that look like hand-painted "pinstripes."
- 🍃 The Foliage: It sports classic heart-shaped (cordate) leaves with finely toothed edges. They are a bright, cheerful green and feel slightly soft to the touch.
- 🌱 Growth Habit: Unlike "stemless" violets that grow in flat clumps, this species is "caulescent," meaning the flowers and leaves grow along a visible, rising stem that can reach up to 12 inches in height.
🏡 In Your Garden
- 💧 The Moisture Sweet-Spot: This plant thrives in "Goldilocks" soil—not bone-dry, but not a swamp. It is the perfect solution for those troublesome low-lying areas near downspouts or the damp shade under deciduous trees.
- 🦋 A Pollinator Nursery: It serves as a vital host plant for the caterpillars of Fritillary butterflies. By planting these, you aren't just growing flowers; you are providing a nursery for the next generation of woodland butterflies.
⚠️ Safety & Toxicity
- 🟢 Safe for Most: Violets are generally considered non-toxic to humans and have a long history of being used as edible garnishes in salads or desserts.
- 🐾 Pet Watch: While not specifically poisonous, if your dog or cat grazes on a large amount, they may experience mild stomach upset. Always ensure your garden violets haven't been treated with chemical fertilizers or pesticides if pets are nearby.
✨ Fun Fact
- ✨ Secret Flowers: Later in the summer, this plant produces "Cleistogamous" flowers. These are tiny, green, bud-like flowers that never actually open. They self-pollinate in secret underground or under the leaves to ensure the plant can spread even if there are no bees around to help!

Detailed Care Instructions
| Humidity | Normal |
| Lighting | Shade |
| Difficulty | Medium |
| Hibernation | Cold Period |
| Hardiness Zones | 4 - 7 |
To grow a Viola striata plant, also known as Striped Cream Violet, follow these steps:
- Choose a suitable location: Viola striata thrives in partial shade to full shade conditions. Find a spot with well-draining soil that is slightly acidic and rich in organic matter.
- Prepare the soil: Loosen the soil and remove any weeds or rocks. Incorporate compost or well-rotted manure to improve soil fertility and drainage.
- Select healthy plants: Purchase Viola striata plants from a reputable nursery or garden center. Look for plants with vibrant foliage and no signs of diseases or pests.
- Planting: Dig a hole slightly larger than the rootball of the plant. Place the plant in the hole, ensuring that the crown is level with or slightly above the soil surface. Backfill the hole and gently firm the soil around the plant.
- Watering: Water the plant thoroughly after planting and keep the soil consistently moist but not waterlogged. Viola striata prefers moist soil, so water whenever the top inch of soil feels dry.
- Mulching: Apply a layer of organic mulch, such as shredded bark or compost, around the base of the plant. This will help conserve moisture, suppress weed growth, and provide nutrients as it breaks down.
- Fertilizing: Viola striata generally doesn't require much fertilizer. However, if the plant appears weak or lacks vigor, you can apply a balanced slow-release fertilizer according to the package instructions.
- Pruning: Regularly deadhead the spent flowers by pinching or cutting them off. This encourages the plant to produce more flowers and prolongs the blooming period.
- Pest and disease management: Viola striata is typically resistant to pests and diseases. However, it can occasionally suffer from aphid infestations or fungal diseases. Monitor the plant regularly and take appropriate action if any issues arise.
- Winter care: Viola striata is a hardy perennial plant in most areas, but it may benefit from a layer of mulch to protect the roots during freezing temperatures. In colder regions, it's best to divide and transplant the plant in early spring before new growth appears.
By following these steps and providing proper care, you can successfully grow Viola striata to enjoy its beautiful striped flowers.

Place in a window with dappled sun or a spot in the middle of a room. Or directly in a window facing west or east.

To water this plant, first check the soil moisture by inserting your finger about one inch into the soil. If it feels dry, water the plant thoroughly but do not let the soil become waterlogged. Make sure to pour water at the base of the plant and avoid getting water on its leaves. Water this plant on a regular basis, but be mindful not to overwater it as it prefers a slightly dry soil. It is best to water this plant early in the morning or late in the evening to prevent evaporation and allow the roots to absorb the water properly.
To fertilize this plant, you should first choose a balanced fertilizer with equal amounts of nitrogen, phosphorus, and potassium. Dilute the fertilizer according to the instructions on the package. The best time to fertilize is during the growing season, which is usually in the spring and summer. Apply the fertilizer to the soil around the base of the plant, being careful not to get any on the leaves or flowers. Water the plant thoroughly after fertilizing to help distribute the nutrients. Avoid over-fertilizing, as this can cause damage to the delicate roots of the plant.
Viola Striata plants prefer well-draining, slightly acidic soil that is rich in organic matter. A good option is to use a loamy soil mixture that is a blend of equal parts peat moss, perlite, and vermiculite. This type of soil will provide the plant with the necessary nutrients and moisture retention to thrive. Additionally, adding a layer of mulch around the base of the plant can help conserve moisture and regulate soil temperature. It is important to avoid using heavy clay soils, as they may not provide adequate drainage for the Viola Striata plant.
To propagate this plant, you will need to take cuttings. Select a healthy stem and use a clean, sharp pair of scissors or shears to snip off a section of it that is around 4-6 inches long. Be sure to choose a stem that has some leaves on it and that is not too woody or too thin.
Next, remove the leaves from the bottom third of the stem. If the plant has any flowers or buds, remove them as well. Dip the bare end of the stem in rooting hormone powder to encourage it to develop roots.
Fill a small pot with a well-draining potting mix and water it until it is moist but not waterlogged. Use a pencil to make a hole in the center of the potting mix and insert the stem, burying it up to the base of the remaining leaves.
Cover the pot with a clear plastic bag to create a mini greenhouse. Keep the pot in a warm, bright spot but out of direct sunlight. Check the potting mix regularly and water as needed to keep it moist but not waterlogged.
In about 2-4 weeks, the stem should have developed roots and you can remove the plastic bag. Once the roots are established, you can transplant the new plant into a bigger pot or into your garden.


