Plant Overview
Often called the Canyon Grape, Vitis arizonica is a rugged climber that brings a touch of wild lushness to the arid landscapes of the American Southwest. While it thrives naturally near creek beds and rocky canyons, this resilient vine is a favorite for desert gardeners looking to attract songbirds and create natural shade. In the heat of summer, its dense, vibrant foliage provides a cooling green canopy that eventually yields clusters of tiny, tart jewels.
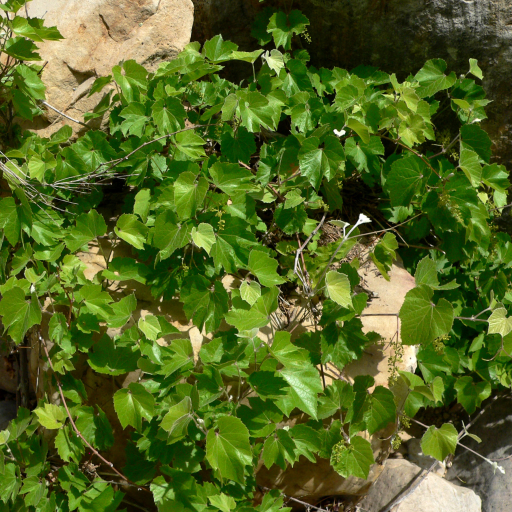
🔍 How to Identify
- 🍃 Toothed Leaves: The leaves are bright green and heart-shaped, featuring jagged, "saw-tooth" edges and a slightly fuzzy underside when young.
- 🍇 Small Fruit: It produces dangling clusters of tiny, dark purple-to-black grapes that are significantly smaller than commercial varieties, usually appearing in late summer.
- 🪵 Shredding Bark: As the vine matures, the woody stems develop a distinctive shaggy or shredding bark that peels away in thin, longitudinal strips.
🏡 In Your Garden
- 💧 Riparian Roots: In the wild, this grape is a "riparian" species, meaning it follows the water. In a garden, it prefers a spot that mimics a canyon wash—well-draining soil with deep, occasional watering to establish a strong root system.
- 🧗 Natural Architect: This vine uses delicate, curling tendrils to hitchhike up trees or fences. Because it grows vigorously, it needs a sturdy support system like a pergola or a heavy-duty trellis to prevent it from smothering smaller companion plants.
⚠️ Safety & Toxicity
- 🐕 Toxic to Pets: While the grapes are a vital food source for wild birds, all grapes and raisins are highly toxic to dogs and can cause acute kidney failure. Keep this plant out of reach of canine companions.
- 😋 Tart for Humans: The fruit is edible for humans and often used for jellies or wines, though eaten raw, the grapes are very seedy and intensely tart. The high acid content can sometimes cause minor mouth irritation if consumed in large amounts.
✨ Fun Fact
- 🧬 Genetic Bodyguard: Vitis arizonica possesses a natural resistance to Pierce’s disease, a deadly bacterial infection that plagues the wine industry. Because of this, viticulturists often use its DNA to breed "super-vines" that can survive in challenging environments.

Detailed Care Instructions
To grow Vitis Arizonica, also known as Arizona grape, you can follow these steps:
- Climate: Check if your climate conditions are suitable for Vitis Arizonica. This plant is native to the Southwestern United States and prefers a hot arid climate.
- Soil: Prepare the soil by making sure it is well-draining and moderately fertile. Sandy or loamy soil works best for Vitis Arizonica. Amend the soil with organic matter if needed.
- Planting: Vitis Arizonica can be propagated from seeds, cuttings, or bare root plants. If starting from seeds, soak them in water for 24 hours before planting. Plant the seeds about 1 inch deep in the prepared soil or potting medium. If using cuttings, place them in water or a rooting hormone before planting.
- Sunlight: Choose a sunny location for planting Vitis Arizonica. This plant thrives in full sun exposure.
- Watering: While Vitis Arizonica is drought-tolerant, it still requires regular watering in the initial growing period to establish itself. Once established, water the plant deeply but infrequently, allowing the soil to dry between waterings.
- Pruning: Prune your Vitis Arizonica plant during late winter or early spring to remove dead or damaged wood and shape the plant. Pruning promotes good airflow and prevents the growth of diseases.
- Trellis or support: Vitis Arizonica is a climbing vine and benefits from a trellis or another climbing support structure. Provide a sturdy trellis or similar support for the plant to train its growth.
- Fertilizer: Apply a balanced, organic fertilizer during the growing season to promote healthy growth. Follow the manufacturer's instructions for application rates.
- Pest and disease management: Monitor your plant for pests like aphids or fungal diseases like powdery mildew. If necessary, use appropriate organic or chemical treatments to control the pests or diseases.
- Harvesting: Vitis Arizonica produces small, black, grape-like fruits that are edible. Harvest the fruits when they are fully ripe and enjoy them fresh or use them in recipes.
Remember to check with your local agricultural extension or gardening experts for specific advice tailored to your region before planting Vitis Arizonica.

Place in a bright room that is sun drenched almost all day. Or directly in a south-facing window.

To water this plant, ensure that the soil is moist but not overly wet. It is important to water deeply, allowing the water to penetrate into the roots. Avoid watering the plant from above as this can damage the leaves and encourage fungal growth. Instead, water at the base of the plant, directing the water towards the soil. To avoid waterlogging the roots, allow the soil to dry out slightly between waterings. During periods of drought, increase the frequency of watering to ensure the plant has enough moisture to thrive.
To fertilize Vitis Arizonica, apply a balanced, slow-release fertilizer with an N-P-K ratio of 10-10-10 in early spring. Apply the fertilizer evenly around the base of the plant, avoiding direct contact with the stems and leaves. Water thoroughly after fertilizing to help the nutrients penetrate the soil. Repeat application once or twice during the growing season, depending on the plant's growth rate and soil conditions. Be sure to follow the manufacturer's instructions carefully and avoid over-fertilizing, which can damage the plant.
The recommended soil for Vitis Arizonica plant is a well-draining, nutrient-rich soil that is slightly acidic with a pH range of 5.5-6.5. It should be a mixture that retains moisture but doesn't become waterlogged. The soil should ideally be a combination of organic matter, such as compost or aged manure, with an equal amount of sand or perlite to improve drainage. Additionally, the soil should be loose and friable to allow for good root growth and water penetration. Finally, the plant requires a soil that is free of toxins, such as heavy metals, pesticides, and chemicals, as it has a low tolerance for these pollutants.
There are different ways to propagate Vitis Arizonica plants, but one method involves taking stem cuttings. To do this, you need to choose a healthy and mature stem that is at least 6 inches long and has several nodes (points where leaves or buds emerge). Using a sharp and clean pruner, cut the stem at a 45-degree angle just below a node.
Remove the lower leaves from the cutting, leaving only 2-3 leaves at the tip. Dip the cut end in rooting hormone powder or gel, if desired, to promote root development. Then, insert the cutting into a container filled with moist and well-drained soil mix. You can also use a mix of sand and peat moss or perlite to enhance drainage.
Cover the container with a plastic bag or dome to create a humid environment and reduce moisture loss. Place it in a shaded or partly shaded area, away from direct sunlight or extreme heat. Keep the soil evenly moist but not waterlogged, and mist the cutting daily to prevent it from drying out.
After several weeks or months, depending on the temperature and humidity, the cutting should start to produce roots and new leaves. Once it has established a strong root system, you can transplant it into a larger container or into the ground in a suitable location. Make sure to acclimate the plant gradually to its new environment and provide proper care, such as watering, fertilizing, and pruning.


