Plant Overview
Known globally as Maize or simply Corn, Zea mays is more than just a summer side dish—it is a giant, domesticated grass that literally fueled the rise of ancient civilizations. Originally bred from a wild grass called Teosinte in Mexico thousands of years ago, it has become one of the most versatile and culturally significant plants on the planet. Whether you call it "The Golden Grain" or "The Tall Grass," its presence in a garden brings a sense of rustic majesty and history.
🔍 How to Identify
- 🌽 Sturdy Stalks: Features a thick, upright, cane-like stem that can reach heights of 6 to 10 feet, depending on the variety.
- 🍃 Ribbon Leaves: Long, broad, sword-shaped leaves with wavy edges that arch gracefully away from the stalk.
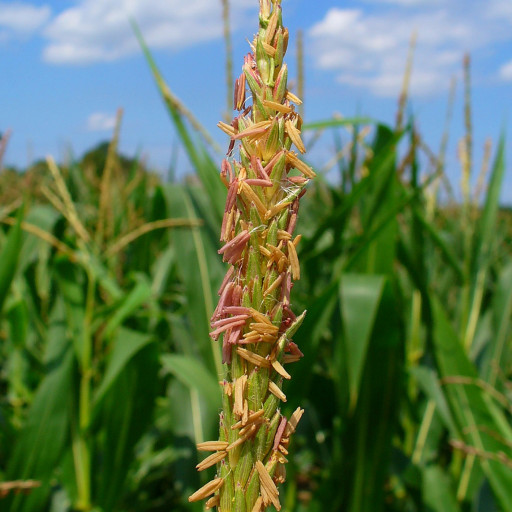
- 🌾 Dual Flowering: Unlike many plants, corn has separate male and female flowers on the same plant. The "tassel" at the very top is the male part, while the "silks" emerging from the leaf axils are the female parts.
🏡 In Your Garden
- 🌬️ The Power of the Block: Corn is wind-pollinated, not bee-pollinated. To ensure your cobs are full of kernels, you must plant them in "blocks" (squares) rather than one long, thin row. This ensures the pollen falling from the tassels actually hits the silks below.
- 🍴 Heavy Feeders: These are the "hungry" residents of the vegetable patch. They require nitrogen-rich soil and consistent watering, especially during the silking stage. They are also famous members of the "Three Sisters" companion planting method, where they provide a natural trellis for climbing beans.
- ⚓ Prop Roots: Don't be alarmed if you see "fingers" growing out of the bottom of the stalk into the dirt. These are aerial prop roots that help stabilize the tall plant against heavy winds.
⚠️ Safety & Toxicity
- ✅ Pet & Human Safe: Zea mays is non-toxic to dogs, cats, and horses. It is a staple food for humans and livestock alike.
- 🧤 Skin Irritation: The leaves have tiny, serrated edges and microscopic hairs that can cause "corn cuts" or itchy skin rashes. It is often best to wear long sleeves when harvesting or walking through a dense corn patch.
- 🍄 Corn Smut: Occasionally, you may see grey, bulbous growths on the ears. This is a fungus called Ustilago maydis. While safe (and even considered a gourmet delicacy called Huitlacoche), those with mold allergies should handle it with care.
✨ Fun Fact
Every single strand of silk on an ear of corn is attached to exactly one potential kernel. If a strand of silk doesn't catch a grain of pollen, that specific kernel will never grow, which is why poorly pollinated corn has "bald spots" on the cob!

Detailed Care Instructions
| Color | Green |
| Soil Ph | 6.0-7.0 |
| Invasive | Weed |
| Toxicity | Non-Toxic |
| Soil Type | Loamy, Well-Drained |
| Bloom Time | Summer |
| Plant Type | Annual |
| Mature Size | 6 To 8 Feet Tall |
| Native Area | North America |
| Sun Exposure | Full Sun |
| Hardiness Zones | 2-11 |
To grow Zea mays, commonly known as corn, follow these steps:
- Choosing the right location: Corn needs full sun, so select a location that receives at least 6-8 hours of direct sunlight every day. Ensure the soil is well-draining and rich in organic matter.
- Preparing the soil: Remove any weeds or grass from the chosen area. Loosen the soil using a garden fork or tiller to a depth of about 8-10 inches. Incorporate compost or well-rotted manure into the soil to improve its fertility.
- Selecting and planting seeds: Choose corn seeds that are suitable for your climate and growing conditions. There are different varieties available, such as sweet corn, field corn, and popcorn. Plant the seeds directly in the soil about 1-2 inches deep and space them at least 12-18 inches apart. Leave 24-36 inches between rows to allow adequate space for growth.
- Watering: Corn plants require regular watering, especially during the first few weeks after planting. Keep the soil evenly moist, but avoid overwatering, as it can lead to rotting. Adequate moisture is crucial during pollination to set good ears of corn.
- Fertilizing: Corn plants need a continuous supply of nutrients for optimal growth. Apply a balanced fertilizer, such as a 10-10-10 or 14-14-14, before planting and side-dress with additional nitrogen-rich fertilizer once the plants are about knee-high.
- Mulching: Apply a layer of organic mulch around the plants to conserve moisture, suppress weed growth, and maintain a stable soil temperature.
- Controlling weeds: Regularly weed the area around the corn plants to prevent competition for nutrients and water. Be careful not to disturb the shallow roots of the corn while weeding.
- Supporting tall varieties: If you're planting tall varieties of corn, it is advisable to provide support to prevent plants from falling over in strong winds. This can be done by gently tying the stalks to sturdy stakes.
- Protecting against pests and diseases: Monitor the plants regularly for any signs of pests or diseases, such as corn borers or fungal infections. Appropriate insecticides or organic pest control methods can be used if necessary.
- Harvesting: Sweet corn is usually ready for harvest when the ears are fully filled and the kernels are plump and milky. Field corn and popcorn are typically left to dry on the stalks before harvesting.
Remember to check the specific recommendations for the corn variety you choose, as different types may have slightly different requirements.

Place in a bright room that is sun drenched almost all day. Or directly in a south-facing window.

To water this plant, make sure to give it a deep watering once or twice a week, rather than frequent shallow waterings. The soil should be kept consistently moist but not waterlogged. It is important to avoid getting water on the leaves and instead water the base of the plant to prevent disease. Allow the top layer of soil to dry out slightly before watering again. During periods of dry weather or when the plant is producing ears, it may require more frequent watering.
To fertilize this plant, first determine the soil's nutrient needs by conducting a soil test. Based on the results, apply a fertilizer with a balanced N-P-K ratio. Apply the fertilizer at the base of the plant, avoiding contact with the foliage and watering thoroughly afterwards. For best results, fertilize the plant during the vegetative stage and again when ears start to form. Avoid over-fertilizing, as excess nutrients can lead to stunted growth and decreased yield.
The ideal soil for Zea Mays plants is a well-draining soil that is rich in organic matter. It should have a slightly acidic to neutral pH level and be able to retain moisture while also allowing for proper drainage. The soil should be loose and not compacted, as compacted soil can hinder the growth of the plant's roots. Additionally, the soil should be able to provide necessary nutrients like nitrogen, phosphorus, and potassium to ensure optimal growth and development of the plant. It is recommended to use a good quality potting soil mixed with compost and sand to create the ideal growing environment.
To propagate Zea Mays, one should begin by selecting healthy mature plants with desirable characteristics. It is best to take cuttings in the early morning or late afternoon to avoid stressing the plant in extreme temperatures. A sharp, sterilized cutting tool should be used to make a cut just below a leaf node. The cutting should be about 4-6 inches long.
The leaves on the bottom half of the cutting should be removed to expose the stem. The stem should be dipped in rooting hormone and then planted in a pot filled with moist soil or in water. If planting in soil, the soil should be kept moist but not waterlogged. If planting in water, the cutting should be placed in a jar or vase with enough water to cover the bottom half of the stem.
The cutting should be placed in a warm, bright location but not in direct sunlight. It is important to monitor the cutting and ensure that the soil or water is always moist. Within a few weeks, the cutting should begin to root and new growth should appear. Once the roots are established, the plant can be transplanted into a larger pot with potting soil or into a garden bed.
Propagation of Zea Mays can also be done through seeds, which should be planted in warm soil after the last frost. Seeds should be planted about an inch deep and about 6 inches apart. The soil should be kept moist, and seedlings should be thinned to ensure that they have enough space to grow.
Common pests of the maize include Spider mites, aphids, thrips, larvae. Make a habit of checking your maize frequently for pests so that any infestations can be caught and managed early.


