Plant Overview
Often called "Golden Alexanders," this vibrant North American native is a celebrated herald of spring. It paints meadows and woodland edges in brilliant gold just as the landscape begins to wake up from winter. Unlike many late-summer yellow flowers, this hardy perennial thrives in the cool, moist air of May and June, providing an early feast for emerging pollinators.
🔍 How to Identify
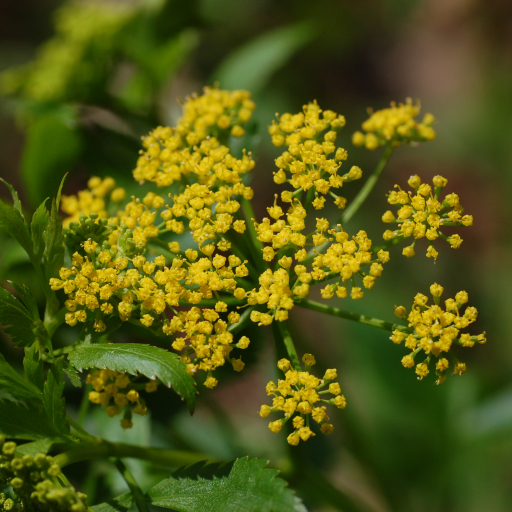
- 🌼 Flower Clusters: Tiny, bright yellow flowers are arranged in flat-topped clusters called "umbels." A key identifier is that the central flower of each small cluster has no stalk, sitting directly on the branch.
- 🍃 Serrated Leaves: The leaves are compound, usually divided into three leaflets with sharply toothed edges. They have a deep green, healthy glow that lasts throughout the growing season.
- 🌱 Upright Stems: The stems are smooth and often develop a reddish-purple tint near the base, growing in a sturdy, multi-branched mound.
🏡 In Your Garden
- 🦋 A Butterfly Nursery: This plant is a "must-have" for conservation-minded gardeners because it is a primary host plant for the Black Swallowtail butterfly. Don't be alarmed if you see striped caterpillars eating the leaves—they are just using your garden as a nursery!
- 💧 The "Wet Foot" Solution: While it is surprisingly adaptable, Golden Alexanders truly shine in spots that stay damp. It is a perfect candidate for rain gardens or those tricky low-lying areas of the yard where other perennials might struggle with root rot.
- ⏳ Self-Seeding Success: Individual plants are relatively short-lived (3-5 years), but they are excellent at "moving" around the garden by dropping seeds. This makes them great for naturalizing a meadow or filling in gaps between larger shrubs.
⚠️ Safety & Toxicity
- ⚠️ The Look-Alike Risk: While Zizia aurea itself is not considered highly toxic, it belongs to the Carrot family (Apiaceae), which contains some of the most poisonous plants in the world. It is frequently confused with the deadly Water Hemlock or the skin-burning Wild Parsnip.
- 🐾 Pet Safety: It is generally non-toxic to cats and dogs. However, because it can be confused with toxic relatives, it is best to keep pets from grazing on it unless you are 100% certain of the identification.
✨ Fun Fact
The name "Alexanders" is a nod to a related European plant (Smyrnium olusatrum) that was allegedly a favorite edible pot herb of Alexander the Great. When early settlers found this golden version in the New World, they named it after the legendary conqueror’s favorite snack!

Detailed Care Instructions
To grow Zizia aurea (Golden Alexanders), follow these steps:
- Choosing the right location: Zizia aurea thrives in full sun to partial shade. It prefers well-draining soil, but can tolerate a variety of soil types, including clay and sandy soils. Find a location in your garden that meets these requirements.
- Planting: Plant the Zizia aurea seeds or nursery-grown plants in early spring or fall. Dig a hole that is slightly larger than the root ball of the plant or the seedling. Gently place the plant in the hole and backfill it with soil, ensuring that the crown of the plant (where the stems meet the roots) is level with the ground surface. Water thoroughly after planting.
- Watering: Water your Zizia aurea regularly, especially during the hot summer months. Keep the soil evenly moist but not waterlogged. Using a mulch layer around the plant can help retain moisture and prevent weed growth.
- Fertilizing: Zizia aurea typically does not require much fertilization. However, incorporating organic matter or compost into the soil during planting can provide nutrients for healthy growth. If needed, you can use a balanced, slow-release fertilizer according to the package instructions.
- Pruning: Zizia aurea generally does not require extensive pruning. However, if you notice any dead or damaged stems, trim them back to promote new growth.
- Controlling pests and diseases: Zizia aurea is relatively resistant to pests and diseases. However, keep an eye out for any signs of common issues such as aphids or powdery mildew. If necessary, treat with appropriate organic pest control methods or consult a local garden center for guidance.
- Propagation: Zizia aurea can be propagated through seed or division. If you want to collect seeds, allow the plant to flower and produce viable seeds, then collect and store them in a cool, dry place until you are ready to sow them. Dividing mature plants can be done in early spring or fall by carefully separating the root ball into smaller sections and replanting them.
- Encouraging pollinators: Zizia aurea is an excellent plant for attracting pollinators such as bees, butterflies, and even hummingbirds. To encourage their visitation, avoid using pesticides and provide a variety of flowering plants in your garden.
By following these steps, you should be able to successfully grow Zizia aurea in your garden and enjoy its beautiful yellow blooms and the wildlife it attracts.

Place in a bright room that is sun drenched almost all day. Or directly in a south-facing window.

This plant requires regular watering, particularly during the hot and dry season. Ensure that the soil is consistently moist, but not waterlogged. Potted specimens require drainage holes to prevent excess water from causing the roots to rot. When watering, aim for the soil around the plant's base, and avoid wetting the leaves and stem to prevent disease. Use lukewarm to tepid water for watering, and ensure that the pot or soil dries out slightly between watering sessions.
To fertilize Zizia Aurea, it is recommended to use a balanced, all-purpose fertilizer with an equal ratio of nitrogen, phosphorus, and potassium. Apply the fertilizer in early spring before new growth appears and again in midsummer to maintain healthy growth. Be sure to follow the instructions on the fertilizer package for the right amount to use. It is also important to water the plant thoroughly before and after fertilization to ensure the fertilizer is absorbed properly into the soil. Avoid over-fertilizing as this can cause damage to the plant and its surrounding environment.
The ideal soil for Zizia Aurea is a well-draining soil that is rich in organic matter. It should be moist but not waterlogged, and slightly acidic to neutral in pH. A mix of garden soil, compost, and sand is a good option. A layer of mulch over the soil can help maintain moisture levels. It is important to avoid using heavy clay soils that can retain too much water and lead to root rot.
To propagate this plant, first locate a mature and healthy specimen. Take a clean, sharp knife or pair of scissors and carefully cut a stem or branch from the plant. Make sure the cutting is at least 3-4 inches in length, with several nodes or leaves along its length.
Remove any leaves or flowers from the bottom half of the cutting, leaving only a few leaves at the top. Dip the cut end of the stem into rooting hormone powder, tapping off any excess.
Prepare a pot or container filled with well-draining soil. Make a hole in the soil with your finger or a pencil and gently insert the stem cutting into the hole. Firmly press the soil around the stem, making sure it is upright and secure.
Water the cutting thoroughly, making sure the soil is evenly moist. Keep the pot in a warm, bright location with indirect sunlight. Mist the cutting occasionally to help keep it moist.
Check the cutting regularly for new growth and root development. Once new leaves or roots have formed, the cutting can be transplanted into a larger pot or directly into the ground.


