Plant Overview
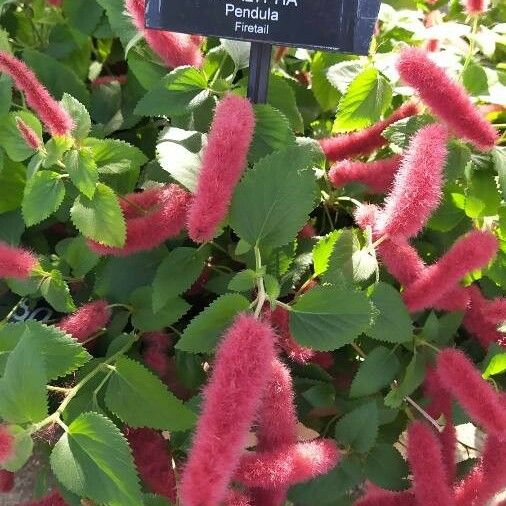
Known affectionately as "Strawberry Firetails" or the "Dwarf Chenille Plant," this Caribbean native looks like a collection of fuzzy red caterpillars playing hide-and-seek among green leaves. It is a showstopper in hanging baskets, where its soft, velvety blooms can dangle freely, creating a whimsical, botanical firework display.
🔍 How to Identify
- 🧶 The "Tails": The most striking feature is the fuzzy, pendulous red catkins (flower spikes) that feel like soft chenille fabric and can grow several inches long.
- 🍃 Foliage: The leaves are vibrant green, heart-shaped, and have distinctly serrated (toothed) edges that provide a sharp contrast to the soft flowers.
- 🌿 Growth Habit: This is a trailing or creeping plant. Unlike its larger upright relatives, it stays low to the ground or spills over the edges of pots in a dense mat.
🏡 In Your Garden
- 💧 Humidity is Key: Hailing from the tropics, this plant is a "humidity hound." If the air is too dry, those iconic red tails will quickly turn brown and crispy at the tips.
- ✂️ Pinch for Plushness: It has a tendency to get "leggy" or thin as it grows. To keep it looking lush and full, you should regularly pinch back the growing tips, which forces the plant to branch out and produce more flowers.
- ☀️ Light Needs: While it loves bright light to keep those red tails vibrant, direct midday sun can scorch the delicate foliage. Aim for "bright, dappled" light.
⚠️ Safety & Toxicity
- 🚫 Toxicity Status: Mildly to moderately toxic.
- 🐾 The Sap Factor: Like many members of the Euphorbiaceae family, it contains a milky sap that can cause skin irritation or a rash. It is best kept out of reach of pets and children, as ingestion can lead to stomach upset and drooling.
✨ Fun Fact
Those "tails" are actually a marvel of efficiency! Each fuzzy spike is composed of hundreds of tiny, individual female flowers huddled together. Because they are wind-pollinated in the wild, they don't need petals; instead, they use those long, red pistils to catch pollen floating by.

Detailed Care Instructions
| Humidity | Normal |
| Lighting | Part Sun |
| Difficulty | Medium |
| Hibernation | Cold Period |
| Temperature | 18°C - 29°C |
| Hardiness Zones | 11 - 12 |
Acalypha pendula, commonly known as the trailing or creeping mullein, is a tropical plant that is often grown for its attractive foliage and trailing habit. Here are some steps and tips for successfully growing Acalypha pendula:
1. Environmental Conditions:
- Light: Acalypha pendula prefers bright, indirect light. While it can tolerate some direct sunlight, too much can scorch the leaves.
- Temperature: This plant thrives in warm temperatures between 65°F (18°C) and 85°F (29°C). Protect it from cold drafts and temperatures below 50°F (10°C).
- Humidity: High humidity levels are beneficial. Aim for 50-70% humidity; you can achieve this by misting the plant regularly or placing it on a humidity tray.
2. Soil Requirements:
- Use a well-draining potting mix that retains some moisture but allows for aeration. A mixture of regular potting soil, perlite, and peat moss works well.
3. Watering:
- Water the Acalypha pendula when the top inch of the soil feels dry. Be careful not to overwater, as this can lead to root rot. The plant likes moist soil but not soggy conditions.
4. Fertilization:
- During the growing season (spring and summer), feed your Acalypha pendula with a balanced, water-soluble fertilizer every 2-4 weeks. Reduce feeding in the fall and winter when the plant’s growth slows down.
5. Pruning:
- Regular pruning helps to encourage bushier growth and maintains the desired shape. You can trim back excessive growth and remove any dead or yellowing leaves to keep the plant healthy.
6. Propagation:
- Acalypha pendula can be propagated through stem cuttings. Take cuttings of healthy stems with several leaves, allow them to dry for a few hours, and then place them in moist potting soil until roots develop.
7. Pest and Disease Management:
- Keep an eye out for common pests such as aphids, spider mites, and mealybugs. If you notice an infestation, treat it with insecticidal soap or neem oil. Ensure good air circulation to prevent fungal diseases.
8. Container Growing:
- If growing in a container, ensure that it has drainage holes to prevent water accumulation. Hanging baskets or tall containers can enhance the trailing effect of the plant.
9. Placement:
- If growing indoors, consider placing it on a shelf or a high location where the trailing vines can cascade down.
By following these guidelines, you can successfully cultivate Acalypha pendula and enjoy its lush, green foliage in your home or garden!

Place in a bright room that is sun drenched almost all day. Or directly in a south-facing window.

Watering Acalypha Pendula properly is essential for its health and growth. Here are detailed instructions on how to effectively water this plant:
1. Soil Preparation: Ensure that the soil is well-draining. A mix of potting soil, perlite, and peat can be beneficial to facilitate proper drainage and aeration.
2. Watering Frequency: The frequency of watering depends on several factors, including the plant's growth stage, the size of the pot, the environment, and the season. Generally, allow the top inch of soil to dry out between waterings.
3. Watering Method: When watering, do so gradually. Use a watering can or hose with a gentle spray to saturate the soil evenly. Avoid pouring water directly onto the leaves, as this can lead to fungal issues.
4. Drainage: Ensure that the pot has drainage holes to prevent water from accumulating at the bottom, which can lead to root rot. After watering, allow excess water to drain out completely.
5. Signs of Under or Overwatering: Monitor the plant for signs of stress. Yellowing leaves can indicate overwatering, while wilting may suggest underwatering. Adjust your watering practices accordingly.
6. Seasonal Adjustments: During the growing season (spring and summer), the plant may require more frequent watering compared to the dormant period in fall and winter. Be mindful of changes in temperature and humidity that may affect soil moisture.
7. Humidity Considerations: This plant prefers a humid environment. If you live in a dry area, consider misting the leaves or placing the pot on a tray filled with pebbles and water to increase humidity around the plant.
By following these guidelines, you can maintain optimal moisture levels for Acalypha Pendula, promoting vigorous growth and a healthy appearance. Remember to observe the plant's response and adjust your watering routine as needed.
Fertilizing Acalypha Pendula requires attention to its growth phase and specific nutrient needs. Here are some guidelines to follow:
- Frequency: Fertilize the plant every 4-6 weeks during the growing season (spring and summer). Reduce frequency or cease fertilization during the dormant period (fall and winter).
- Fertilizer Type: Use a balanced, water-soluble fertilizer with an N-P-K ratio such as 20-20-20 or a formula specifically designed for flowering plants. This will support both foliar growth and flowering.
- Dilution: Dilute the fertilizer to half the recommended strength to avoid over-fertilization, which can harm the plant.
- Application: Apply the diluted fertilizer directly to the soil. Ensure that the soil is moist before application to enhance nutrient uptake and prevent root burn.
- Watering: After fertilizing, water the plant thoroughly to help distribute the nutrients and prevent any potential build-up in the soil.
- Signs of Nutrient Deficiency: Monitor for signs of nutrient deficiency, such as yellowing leaves or stunted growth. If these occur, consider adjusting your fertilization approach.
- Additional Considerations: Ensure that the plant is in a well-draining soil mix, as good drainage will allow for effective nutrient absorption and prevent root issues.
By following these guidelines, you can promote healthy growth and vibrant foliage for your Acalypha Pendula.
Acalypha pendula thrives best in a well-draining soil mix that retains some moisture but does not become overly saturated.
Here are the recommended soil characteristics:
- Texture: A loose, light texture is ideal. A mix of peat moss, perlite, and pine bark can provide the necessary aeration and drainage.
- pH Level: Aim for a slightly acidic to neutral pH, ideally between 6.0 and 7.0. This range supports nutrient availability and overall plant health.
- Organic Matter: Incorporate organic matter to enhance soil fertility. This can include well-decomposed compost or worm castings, which will provide essential nutrients and improve moisture retention.
- Drainage: Ensure that the soil is well-draining to avoid waterlogged conditions, which can lead to root rot. Consider adding perlite or sand to improve drainage if using a more compacted potting mix.
- Moisture Retention: While good drainage is crucial, the soil should still be capable of retaining adequate moisture to support the plant’s needs. A mix that balances moisture retention and drainage is ideal.
In summary, a well-aerated, nutrient-rich, and well-draining soil with slight acidity is optimal for cultivating Acalypha pendula.
Propagating Acalypha Pendula can be accomplished effectively through cuttings or seed. Here are detailed steps for both methods:
Method 1: Propagation by Cuttings
- Choose the Cutting:
- Select healthy stems from a mature plant. Look for non-flowering stems that are about 4 to 6 inches long. Ensure that the stems have at least two to three leaves.
- Select healthy stems from a mature plant. Look for non-flowering stems that are about 4 to 6 inches long. Ensure that the stems have at least two to three leaves.
- Prepare the Cutting:
- Use a sharp, sterile knife or scissors to take the cut. Make the cut just below a leaf node, as this is where root development will occur. Remove the lower leaves to expose the nodes and prevent them from rotting when placed in soil.
- Use a sharp, sterile knife or scissors to take the cut. Make the cut just below a leaf node, as this is where root development will occur. Remove the lower leaves to expose the nodes and prevent them from rotting when placed in soil.
- Rooting Hormone (Optional):
- Dip the cut end in rooting hormone powder to encourage root growth, although this is not strictly necessary.
- Dip the cut end in rooting hormone powder to encourage root growth, although this is not strictly necessary.
- Plant the Cutting:
- Fill a small pot with a well-draining potting mix or a suitable propagation medium, such as perlite or vermiculite. Make a small hole in the soil with your finger or a stick and place the cutting into the hole, ensuring the node is buried.
- Fill a small pot with a well-draining potting mix or a suitable propagation medium, such as perlite or vermiculite. Make a small hole in the soil with your finger or a stick and place the cutting into the hole, ensuring the node is buried.
- Watering:
- Water the cutting lightly to moisten the soil without waterlogging it. Ensure the water drains well, as excess moisture can lead to rot.
- Water the cutting lightly to moisten the soil without waterlogging it. Ensure the water drains well, as excess moisture can lead to rot.
- Humidity and Environment:
- Cover the pot with a plastic bag or place it in a humidity dome to maintain high humidity. Open the cover occasionally to allow for air circulation.
- Cover the pot with a plastic bag or place it in a humidity dome to maintain high humidity. Open the cover occasionally to allow for air circulation.
- Lighting:
- Place the pot in a location with bright, indirect sunlight. Avoid direct sunlight, which can scorch the cutting.
- Place the pot in a location with bright, indirect sunlight. Avoid direct sunlight, which can scorch the cutting.
- Monitoring Root Development:
- After 4 to 6 weeks, check for root growth by gently tugging on the cutting. If you feel resistance, roots have likely formed.
- After 4 to 6 weeks, check for root growth by gently tugging on the cutting. If you feel resistance, roots have likely formed.
- Transplanting:
- Once a good root system has developed, transplant the new plant into a larger pot filled with suitable potting soil. Continue to care for it as a mature plant.
Method 2: Propagation by Seeds
- Once a good root system has developed, transplant the new plant into a larger pot filled with suitable potting soil. Continue to care for it as a mature plant.
- Seed Collection:
- Collect seeds from a mature plant once they have fully ripened. Ensure you handle them gently to avoid damaging them.
- Collect seeds from a mature plant once they have fully ripened. Ensure you handle them gently to avoid damaging them.
- Prepare the Seed Bed:
- Prepare a seed tray or small pots filled with a light, well-draining potting mix. Moisten the soil before planting the seeds.
- Prepare a seed tray or small pots filled with a light, well-draining potting mix. Moisten the soil before planting the seeds.
- Sowing Seeds:
- Scatter the seeds on the surface of the soil. Lightly press down but do not cover the seeds with soil, as they need light to germinate.
- Scatter the seeds on the surface of the soil. Lightly press down but do not cover the seeds with soil, as they need light to germinate.
- Humidity and Temperature:
- Cover the seed trays or pots with a plastic dome or plastic wrap to retain moisture. Place them in a warm location with indirect light.
- Cover the seed trays or pots with a plastic dome or plastic wrap to retain moisture. Place them in a warm location with indirect light.
- Watering:
- Use a spray bottle to mist the soil surface as needed to keep it moist but not soggy.
- Use a spray bottle to mist the soil surface as needed to keep it moist but not soggy.
- Germination:
- Seeds typically germinate within 2 to 4 weeks under optimal conditions. Once seedlings are established and have developed a few true leaves, they can be transplanted into larger pots.
- Seeds typically germinate within 2 to 4 weeks under optimal conditions. Once seedlings are established and have developed a few true leaves, they can be transplanted into larger pots.
- Care for Seedlings:
- Ensure that the young plants receive enough light and are not overcrowded. Gradually acclimatize them to outdoor conditions if planning to transfer them outside.
Both methods can yield successful results and allow you to grow new plants from your existing ones. Be patient during the propagation process, as root establishment and seed germination can take time.
- Ensure that the young plants receive enough light and are not overcrowded. Gradually acclimatize them to outdoor conditions if planning to transfer them outside.


