Plant Overview
Acis rosea, often called the Rose-colored Snowflake, is a delicate treasure originating from the sun-drenched Mediterranean islands of Corsica and Sardinia. Unlike its white spring-blooming cousins, this tiny bulb waits for the late summer rains to wake up, offering a fragile splash of pink to parched landscapes. It is widely considered one of the most elegant miniature bulbs for rock gardens and alpine enthusiasts.
🔍 How to Identify
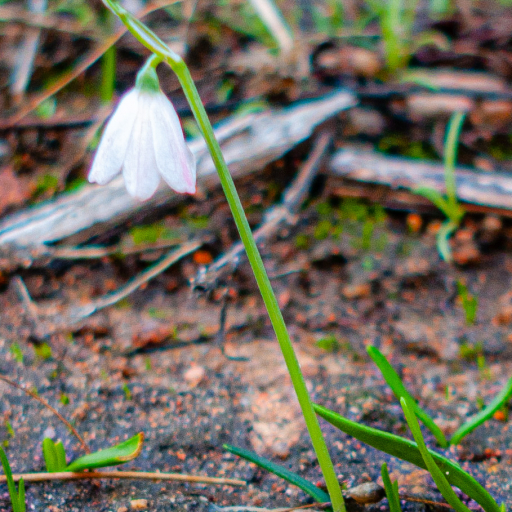
- 🌸 The Blooms: Features solitary, nodding, bell-shaped flowers that are a soft, pale rose-pink, often showing delicate darker veining on the translucent petals.
- 🌿 The Foliage: Produces very narrow, dark green, grass-like leaves that typically emerge alongside or just after the flowers have begun to fade.
- 📏 Stature: A true miniature, it usually stands only 10–15 cm (4–6 inches) tall, meaning it is best appreciated when planted in clusters or elevated containers.
🏡 In Your Garden
- ☀️ The Summer Bake: To thrive, this plant needs to replicate its island home. It requires a "summer bake"—meaning the bulbs should stay relatively dry and warm during their dormant period to trigger autumn flowering.
- 🪨 Gritty Substrate: This species is highly sensitive to waterlogging. It is best grown in a raised rock garden, a scree bed, or a terracotta pot filled with a very gritty, free-draining compost mix to prevent bulb rot.
⚠️ Safety & Toxicity
- 🚫 Toxic Status: Toxic if ingested.
- 🐾 Risk Details: Like many members of the Amaryllis family, Acis rosea contains lycorine and other alkaloids. These can cause stomach upset, vomiting, or lethargy in cats, dogs, and humans. Always wash your hands after handling the bulbs, as the sap can occasionally irritate sensitive skin.
✨ Fun Fact
🏛️ The genus name Acis comes from Greek mythology; Acis was a handsome Sicilian shepherd who was transformed into a river spirit after being crushed by a jealous Cyclops—a surprisingly dramatic origin for such a dainty, peaceful-looking flower!

Detailed Care Instructions
To grow Acis Rosea plants successfully, follow these guidelines:
- Select a suitable location: Acis Rosea plants prefer a sunny or partially shaded spot in the garden with well-draining soil. The soil pH should be slightly acidic to neutral.
- Planting: The ideal planting time for Acis Rosea bulbs is in autumn. Dig a hole around 4-6 inches deep and place the bulb in the hole with the pointed end facing upwards. Space the bulbs about 3-4 inches apart to allow for growth.
- Soil preparation: Enhance the soil with organic matter, such as compost or well-rotted manure, to improve drainage and fertility. This will create a suitable growing environment for the plants.
- Watering: Keep the soil consistently moist but not waterlogged. During the growing season, water regularly, especially during dry spells. However, avoid overwatering, as soggy conditions can lead to bulb rot.
- Fertilization: Apply a balanced slow-release fertilizer in early spring before the new growth emerges. Follow the manufacturer's instructions for the correct dosage.
- Mulching: Apply a layer of organic mulch around the plants to suppress weeds, retain moisture, and regulate soil temperature. Avoid mulching directly around the bulb to prevent rotting.
- Pests and diseases: Acis Rosea plants are generally pest and disease resistant. However, keep an eye out for common garden pests like slugs and snails, and treat accordingly if needed.
- Dormancy: After the flowering period, the foliage of Acis Rosea will start to die back. Allow the foliage to wither naturally, as this helps the bulb store nutrients for next year's growth. Avoid removing the foliage until it has completely yellowed and can be easily pulled away.
- Propagation: Acis Rosea plants can be propagated by bulb division. Lift and divide the bulbs during the dormant period in late summer or early autumn. Replant the divisions immediately, or store them in a cool, dry place until planting time.
- Winter care: Acis Rosea plants are hardy perennials but can benefit from a layer of mulch to protect them during cold winters. The mulch will insulate the bulbs and prevent freezing.
With proper care and attention, your Acis Rosea plants should thrive and produce beautiful blooms year after year.
To properly water this type of plant, you should first ensure that the soil is completely dry before watering again. Once dry, fill a watering can with room temperature water and gently pour onto the soil around the base of the plant, avoiding the leaves and flowers as much as possible. Be sure to water thoroughly, but not excessively, as overwatering can lead to root rot. When the water has drained through the soil and out the bottom of the pot, empty any excess water from the saucer or tray underneath the pot to prevent standing water. Repeat this process only when the soil has completely dried out again, which typically takes several days to a week depending on the environment and conditions.
To properly fertilize this plant, it is recommended to use a balanced fertilizer, typically with an N-P-K ratio of 10-10-10 or similar. It is important to follow the instructions on the label for the specific fertilizer being used, as rates of application may vary depending on the product. Generally, it is best to fertilize in the spring and summer months, and to avoid fertilizing during the winter dormant period. It is also important to water the plant thoroughly after fertilizing, to ensure that the nutrients are properly absorbed by the roots.
The ideal soil for growing Acis rosea plants is well-draining soil that contains a mixture of organic matter such as compost or peat moss, sand, and perlite. The soil should be slightly acidic with a pH range of 5.5 to 6.5. It is recommended to avoid using heavy clay or sandy soils that do not retain moisture well or compacted soils that hinder root growth. Additionally, the soil should be able to hold moisture without becoming waterlogged, as too much moisture can cause root rot and other diseases. Overall, the soil should provide good drainage while retaining enough moisture and nutrients to support the plant's growth.
First, identify a healthy and mature parent plant from which to take cuttings. Use clean and sharp pruning shears to take 3-4 inch stem cuttings from the parent plant, making sure to include at least two nodes or leaf joints on each cutting.
Remove any leaves or side shoots from the lower half of the cutting and dip the cut end into rooting hormone powder or gel.
Prepare a container with well-draining soil and make a small hole in the center with a pencil or finger. Insert the cuttings into the hole and gently pack soil around the stem to secure the cutting in place.
Water the cutting thoroughly and cover the container with a clear plastic bag to create a humid environment. Place the container in indirect sunlight and maintain consistent moisture levels, making sure not to overwater.
After 3-4 weeks, roots should begin to form on the cuttings. Once the roots are established and the plant has begun to grow, gradually acclimate it to brighter light and less humid conditions.
Transplant the new plant into a larger container or your desired outdoor location once it has outgrown its container.


