Plant Overview
Known as the "Mountain Rose," this stunning succulent is nature's way of creating a flower that never wilts. Originally found clinging to the volcanic cliffs of the Canary Islands, Aeonium aureum has gained a cult following among plant lovers for its uncanny resemblance to a tightly furled rosebud. It is a master of disguise, changing its shape dramatically between the growing season and its summer slumber.
🔍 How to Identify
- 🍃 The Rosette: Fleshy, paddle-shaped leaves arranged in a tight, spiral formation. During its dormant phase, the outer leaves wrap around the center to form a perfect, waxy cylinder.
- 🎨 Color Palette: Typically a soft, sea-foam green or jade. In high-light conditions, the leaf margins may develop a delicate rosy or golden tint.
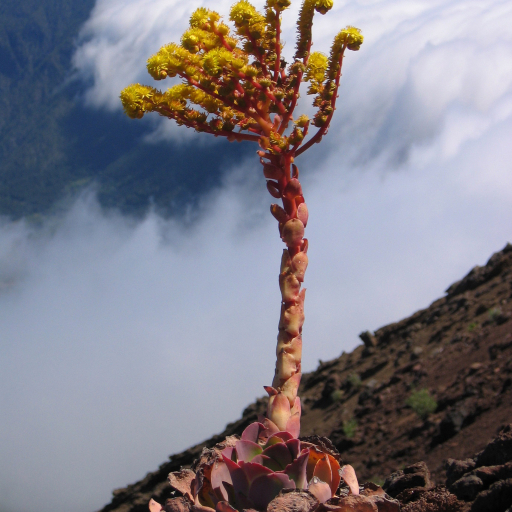
- 🌼 The Bloom: When the plant reaches maturity, it sends up a thick, leafy stalk topped with a cluster of vibrant, star-shaped yellow flowers.
🏡 In Your Garden
- 💤 Summer Slumber: This plant follows a "winter grower" schedule. If you notice the "rose" closing up tight in the summer, do not increase watering! It is simply protecting its core from the heat. It prefers to be left alone in a cool, shaded spot during the hottest months.
- ⛰️ Volcanic Roots: In the wild, they grow in rock crevices. In your home, they require incredibly gritty, well-draining soil. Avoid heavy peat-based mixes, as their roots are prone to rot if they sit in a "wet blanket" of soil.
⚠️ Safety & Toxicity
- ✅ Non-Toxic: Aeonium aureum is generally considered safe and non-toxic for both humans and curious pets like cats and dogs.
- 🧤 Delicate Skin: While not poisonous, the leaves have a thin, waxy coating (farina) that protects them from the sun. Touching the leaves can leave permanent smudge marks or "fingerprints," so it is best to admire this beauty from a distance.
✨ Fun Fact
This plant is "monocarpic," meaning that once a specific rosette produces a flower, that individual rosette will die. However, don't mourn too soon—the plant usually produces several "pups" or offsets at its base before it blooms, ensuring the "Mountain Rose" lives on in your collection.

Detailed Care Instructions
To grow Aeonium aureum (also known as Greenovia aurea or the "Succulent Rose"), you can follow these steps:
- Choose a suitable location: Aeonium aureum prefers bright, indirect sunlight. It grows well indoors near a window or outdoors in partial shade.
- Select the right soil: Use well-draining soil specifically made for succulents or cacti. It should contain a mixture of sand, perlite, and regular potting soil.
- Planting: Select a pot that has drainage holes at the bottom to prevent waterlogging. Fill the pot with the prepared soil mixture and plant the Aeonium aureum gently, ensuring its roots are properly covered. Press the soil firmly around the plant to secure it.
- Watering: Succulents like Aeonium aureum have low water requirements. Water them thoroughly and let the soil dry out completely between watering sessions. Overwatering can lead to root rot and other problems, so it's essential to avoid excessive moisture.
- Temperature and Humidity: Aeonium aureum prefers moderate temperatures between 65°F to 75°F (18°C to 24°C). It can tolerate a variety of humidity levels but prefers average or slightly higher humidity. Avoid exposing the plant to extreme temperature fluctuations.
- Fertilization: Apply a balanced, water-soluble fertilizer once a month during the growing season (spring through summer). Follow the manufacturer's instructions for proper dilution and application.
- Pruning: Aeonium aureum tends to grow leggy over time. Prune the plant to maintain its shape and encourage bushier growth. Trim back any excessively long or damaged stems using clean, sharp pruning shears.
- Propagation: Aeonium aureum can be propagated through stem cuttings. Take a cutting about 4-6 inches long from a healthy stem, remove the lower leaves, and allow it to dry for a few days. Then, plant the cutting in well-draining soil and mist it occasionally until new roots and leaves emerge.
Remember to monitor your plant regularly for signs of pests or diseases, such as aphids or fungal infections. Treat any issues promptly to maintain the plant's health.

Place in a window with dappled sun or a spot in the middle of a room. Or directly in a window facing west or east.

To water this succulent plant, you should first ensure that the soil is completely dry before watering. This plant prefers a well-draining soil mix and should not be over-watered. When watering, pour the water directly onto the soil and avoid getting water on the leaves or in the center of the rosette. Water should be allowed to fully drain away before replacing the plant in its container or location. It is recommended to water this plant once a week during the growing season and increase the frequency of watering in hot, dry conditions. During the winter dormant period, the plant may require less frequent watering.
To fertilize this plant, mix a balanced, water-soluble fertilizer with water according to the package instructions. Apply the fertilizer to the soil around the base of the plant, avoiding direct contact with the leaves. Apply the fertilizer once every two to three months during the plant's active growing season. Over-fertilization can lead to burnt leaves and damage to the plant, so avoid applying too much fertilizer.
The best soil for the Aeonium Aureum plant is a well-draining soil mix. It is important that the soil is able to provide adequate drainage to prevent root rot and other moisture-related issues. You can use a commercial cactus/succulent soil mix or create your own by mixing equal parts of perlite, coarse sand, and a potting soil mix. The soil should be slightly acidic with a pH level between 5.5 and 6.5. It is also important to ensure that the soil is enriched with nutrients by adding organic matter such as compost or aged manure. This will help to provide the plant with the nutrients it requires for healthy growth and development. Overall, the soil should be well-aerated, loose, and able to hold moisture without becoming waterlogged.
To propagate this particular plant, you will need to use its stem cuttings. First, select a healthy and mature stem from the parent plant. Using a sharp and sterilized cutting tool, cut a section of the stem so that it is about 4 inches long. Make sure to make a clean and straight cut.
Next, let the cuttings dry for a few days. Place the cut end of the stem in a well-ventilated area away from direct sunlight and let it dry out completely. This will help prevent the stem from rotting when you plant it.
After the cutting has dried, fill a small pot or container with well-draining soil mix. Make a small hole in the center of the soil using your finger or a pencil. Place the stem cutting in the hole, making sure that at least half of the cutting is buried in the soil.
Water the soil lightly and place the pot in a warm and bright location, but away from direct sunlight. Ambient or filtered light works best. Keep the soil moist but not overly wet, and avoid overwatering. After a few weeks, the cutting should start to root and grow new leaves.
Once the new plants have established roots and have grown a few leaves, you can transplant them into their permanent pot or garden bed.
Common pests of the rose crassula include Scale insect, mealybugs, spider mites, aphids, thrips. Make a habit of checking your rose crassula frequently for pests so that any infestations can be caught and managed early.


