Plant Overview
Known globally as "The Stinking Rose," Allium sativum is far more than just a kitchen staple. This pungent perennial has traveled from the steppes of Central Asia to every corner of the globe, woven into folklore as a protector against vampires and a booster of ancient athletes' strength. Whether you are growing it for its flavorful bulbs or its whimsical, curly "scapes," it is a rewarding, slow-burn addition to any sunny garden plot.
🔍 How to Identify
- 🌿 The Foliage: Unlike its onion cousins which have hollow tubes, garlic produces solid, flat, grass-like leaves that are blue-green and fan out from a central stem.
- 🌀 The Scape: In "hardneck" varieties, a central flower stalk emerges in late spring, curling into a beautiful, pig-tail loop before eventually straightening out to bloom.
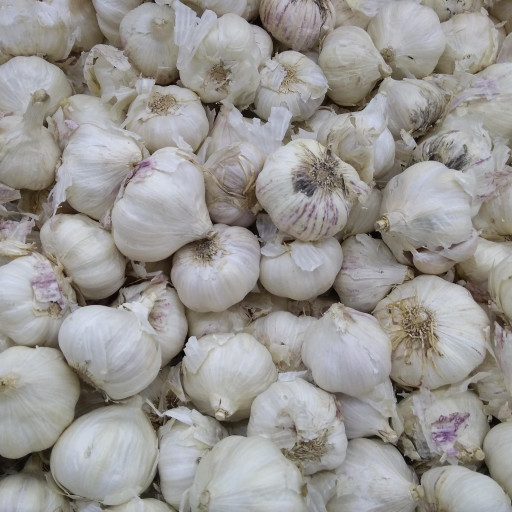
- 🧄 The Bulb: Beneath the soil, a single "mother" clove transforms into a head containing multiple cloves, all wrapped in several layers of papery, parchment-like skin.
🏡 In Your Garden
- ❄️ The Winter Sleep: Garlic is a lesson in patience; it requires a period of cold (vernalization) to trigger the bulb to split into individual cloves. Planting usually happens in autumn so the roots can establish before the ground freezes.
- 🥣 The Hungry Feeder: Because it stays in the ground for nearly nine months, it appreciates rich, loose soil. It "hates wet feet," so ensure your drainage is top-notch to prevent the bulbs from rotting underground during heavy spring rains.
⚠️ Safety & Toxicity
- 🐾 Pet Danger: While a delight for human chefs, garlic is toxic to dogs and cats. It contains thiosulfates that can damage red blood cells, leading to anemia if ingested in significant amounts.
- 👶 Skin Sensitivity: For some gardeners, the potent oils in crushed leaves or fresh bulbs can cause mild skin irritation or "garlic burns" if handled excessively without gloves.
✨ Fun Fact
🏛️ During the first Olympic Games in Ancient Greece, athletes reportedly consumed garlic before competing. It was considered one of the world's earliest "performance-enhancing drugs," believed to provide stamina and ward off the "evil eye" of competitors.

Detailed Care Instructions
Garlic is a fairly easy crop to grow as long as you are patient throughout its long growing season. It's also essential to make sure it's never in waterlogged soil.
How long does it take to grow hardneck garlic?
Garlic will be ready to harvest approximately eight to nine months after planting. This can differ by variety, so be sure to check your plant label.
Does hardneck garlic come back every year?
Garlic is technically a perennial with bulbs continuing to form new plants when left in the ground. However, most gardeners grow it as an annual to harvest the bulbs.
| Humidity | Normal |
| Lighting | Part Sun |
| Difficulty | Medium |
| Hibernation | Cold Period |
To grow Allium Sativum, also known as garlic, you can follow these steps:
- Choose the right garlic bulbs: Select healthy, firm, and disease-free garlic bulbs from a reliable source. There are different varieties of garlic available, so choose the one that suits your taste preference.
- Prepare the soil: Garlic prefers well-drained soil with organic matter. Loosen the soil to a depth of 8-10 inches and remove any rocks or debris. Add compost or well-rotted manure to enrich the soil. You can also mix in some bone meal or organic fertilizer.
- Planting: Break apart the garlic bulb into individual cloves, making sure to keep the papery skins intact. Plant each clove with the pointed end facing up, about 2-3 inches deep and 4-6 inches apart. Space rows about 10-12 inches apart. Cover the cloves with soil and firm it gently.
- Watering: Water the garlic right after planting to settle the soil around the cloves. After that, water regularly, keeping the soil consistently moist but not waterlogged. Garlic requires regular watering, especially during dry spells.
- Mulching: Apply a layer of organic mulch, such as straw or dried leaves, around the plants. Mulching helps control weeds, retain moisture, and regulate soil temperature.
- Fertilizing: Garlic plants benefit from a balanced fertilizer during the growing season. Apply a slow-release granular fertilizer or liquid fertilizer according to the instructions on the package.
- Controlling pests and diseases: Garlic is generally resistant to pests and diseases. However, if aphids or other harmful insects are a problem, you can spray with a mild insecticidal soap or use biological controls. Remove any diseased leaves or plants immediately to prevent the spread of diseases.
- Harvesting: Garlic bulbs are ready for harvest when the leaves turn yellow and start to dry up. Typically, this occurs in late summer or early fall. Carefully dig up the bulbs using a garden fork or shovel, being careful not to damage them. Allow the harvested bulbs to dry in a well-ventilated, shaded area for two to three weeks.
- Storing: Once the bulbs have thoroughly dried, remove the outer layers of skin and trim the roots. Store garlic in a cool, dry, and well-ventilated place, such as a pantry or cellar. Properly stored garlic can last several months.
Remember, garlic requires patience as it takes about 8-9 months to mature. However, the fresh, aromatic bulbs will be worth the wait.

Place in a bright room that is sun drenched almost all day. Or directly in a south-facing window.

To water this plant, ensure the soil is moist but not waterlogged. Water thoroughly once a week, allowing water to soak into the soil. Avoid wetting the foliage to prevent diseases. The plant prefers well-drained soil with organic matter. Watering may need to be adjusted depending on weather conditions, as the plant may require more water during hot and dry spells. Test the soil moisture level by inserting a finger into the soil up to the first knuckle - if the soil feels dry it is time to water.
To fertilize this plant, apply a balanced fertilizer with an NPK ratio of 10-10-10 in early spring, when growth begins. Side dress with additional fertilizer every 4-6 weeks throughout the growing season. Water well after fertilizing to ensure the nutrients are absorbed by the roots. Avoid fertilizing after mid-summer to encourage bulbs to mature and fully develop.
The ideal soil for growing this plant should be well-draining, loose, and fertile. It should not be too heavy and clayey as it can lead to waterlogging and poor root growth. Instead, a sandy loam soil that is rich in organic matter would be ideal. The soil pH should be slightly acidic to neutral, ranging from 6.0 to 7.0. It should also have good moisture retention ability without being soggy or waterlogged. Adding compost or aged manure to the soil can improve its fertility and texture. Overall, the soil should provide good aeration, drainage, and sufficient nutrients for the healthy growth and development of this plant.
To propagate this plant, one should first select a healthy bulb from a mature plant. The bulb should be firm and free from any damage or disease.
The bulb should then be carefully separated into individual cloves. Each clove should have a small amount of the basal plate attached to it.
The individual cloves should be planted in a well-draining soil mixture, with the pointed end facing upwards. The soil should be kept moist but not waterlogged, and the planting area should receive plenty of sunlight.
Within a few weeks, shoots should begin to emerge from the soil. These shoots will grow into tall, leafy stems, which will eventually produce bulbils at their tips.
To encourage the production of larger bulbs, the mature plant should be allowed to dry out before harvest. Once the plant has turned brown and the leaves have fallen over, it is ready to be dug up and cured.
The bulbs should be cleaned and allowed to dry in a well-ventilated area for several weeks. Once they are fully cured, they can be stored in a cool, dry place until they are ready to be planted again.


