Plant Overview
Known as the Egyptian Walking Onion or the Tree Onion, this plant is a horticultural wanderer that refuses to stay in one place. Unlike standard onions that keep their bulbs underground, this hybrid "walks" across your garden over several seasons by tipping over and rooting its offspring. It is a hardy, conversation-starting perennial that provides a continuous harvest of greens and bulbs.
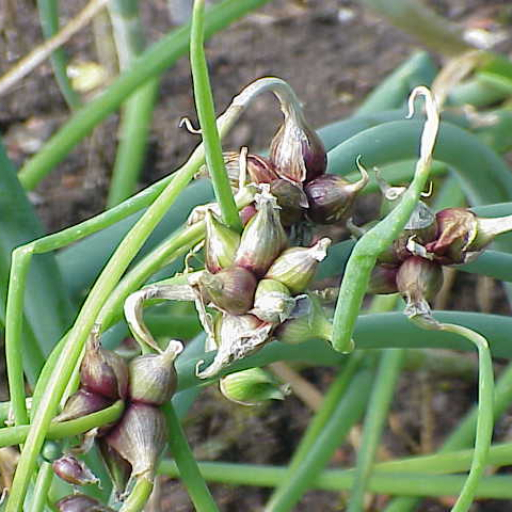
🔍 How to Identify
- 🌿 The Topsets: Instead of producing a typical flower head, this plant grows clusters of small, reddish-purple mini-bulbs (bulbils) at the very tip of its stalks.
- 🌱 Hollow Stalks: The leaves are thick, tubular, and hollow, reaching up to 3 feet in height. They look like oversized scallions but are much sturdier.
- 🧬 Multi-Tiered Growth: In a display of botanical "Inception," a second or even third "story" of tiny bulbs can sprout out of the first set, creating a whimsical, tiered appearance.
🏡 In Your Garden
- 🚶 The "Walk" Mechanic: As the top bulbs grow heavy, the stalk eventually bends under the weight. When the bulbils touch the soil, they quickly sprout roots, effectively moving the plant about 2 feet away from the original parent every year.
- 🥣 Continuous Harvest: You can harvest the underground bulbs like shallots, the hollow greens like chives, or the tiny top bulbs for pickling. Because it is a perennial, it will return faithfully every spring without needing to be replanted.
- ❄️ Winter Resilience: It is incredibly cold-hardy. While most onions retreat in the winter, the "Walking Onion" often stays green under a light dusting of snow, making it a reliable source of fresh flavor in the off-season.
⚠️ Safety & Toxicity
- 🥗 Safe for Humans: Every part of this plant is edible and carries a pungent, sharp onion flavor.
- 🐾 Toxic to Pets: Like all members of the Allium family (garlic, leeks, and onions), it contains N-propyl disulfide. This compound is toxic to dogs and cats, as it can damage red blood cells and lead to anemia if ingested.
✨ Fun Fact
Despite the name, the Egyptian Walking Onion didn't originate in Egypt! It is a natural hybrid between the common onion and the Welsh onion, likely originating in India or Central Asia before being carried across the globe by travelers who loved its "self-planting" nature.

Detailed Care Instructions
To grow Allium X Proliferum, also known as Egyptian onion or tree onion, follow these steps:
- Obtaining the plant: Egyptian onions can be propagated through bulbs or seeds. The easiest way is to purchase bulbs from a local nursery or online plant store. You can also find someone who already grows tree onions and ask for a division or bulbils.
- Planting: Choose a sunny location in your garden with well-draining soil. Plant the bulbs or bulbils about 1-2 inches deep, ensuring the pointed end faces upward. Space the bulbs or bulbils around 8-12 inches apart.
- Watering: Keep the soil moist but not overly saturated. Deep, regular watering is usually sufficient, especially during periods of dry weather. Avoid overwatering, as it can lead to bulb rot.
- Fertilizing: Allium X Proliferum generally doesn't require heavy fertilization. However, you can incorporate organic matter such as compost or well-rotted manure into the soil before planting. If needed, supplement with a balanced organic fertilizer during the growing season.
- Mulching: Applying a layer of organic mulch around the plants helps suppress weeds, retain moisture, and protect the bulbs from extreme temperature fluctuations.
- Maintenance: Egyptian onions are relatively low-maintenance. Remove any weeds around the plants to reduce competition for nutrients. Remove any flowering stalks to divert energy toward bulb development. You can also harvest the green shoots, leaves, or bulbils throughout the growing season.
- Harvesting: Egyptian onions are known for producing bulbils on top of their stalks. Wait until the stalks dry and turn brown. Then, harvest the bulbils by cutting the stalks and allowing them to dry further before removing the bulbils.
- Storing: Store the harvested bulbils in a cool, dry place until you are ready to plant them or use them for cooking.
By following these steps, you can successfully grow Allium X Proliferum and enjoy its unique growth habit and delicious bulbs.

Place in a bright room that is sun drenched almost all day. Or directly in a south-facing window.

To properly hydrate this plant, begin by ensuring that the soil in which it is planted is well-draining and porous. If the soil is compact or retains too much water, the roots can become waterlogged and may rot.
As a general rule, this plant prefers consistent moisture, but it is important to not overwater it. Check the soil regularly to ensure it remains damp to the touch, but not saturated.
When watering, try to avoid watering the foliage as much as possible. Instead, focus on pouring water directly onto the soil around the base of the plant, taking care not to splash water onto the leaves.
During periods of drought or in very dry climatic regions, it may be necessary to water the plant more frequently. Keep in mind that this plant is somewhat drought-tolerant and can often withstand short periods of dryness, however prolonged periods of dryness can hinder its growth and overall health.
Lastly, it is worth noting that this plant prefers to receive water in the morning or evening, as watering during the heat of the day can cause the water to evaporate too quickly.
- Choose a high-quality fertilizer with a balanced NPK ratio.
- Apply fertilizer in the early spring before the plant starts to grow.
- Spread the fertilizer evenly around the base of the plant.
- Water the plant immediately after fertilizing to help the nutrients soak into the soil.
- Avoid over-fertilizing, as this can lead to excessive growth and weakened stems.
- Repeat the fertilization process every 4-6 weeks throughout the growing season.
Allium X Proliferum plant requires well-draining soil that is loose, fertile, and rich in organic matter. The ideal pH level of the soil should be between 6.0 to 7.5. The plant thrives in partial to full sunlight and requires moderate moisture to grow. The soil should be moist, but not waterlogged, as excessive moisture can lead to root rot. The plant does well in sandy loam, clay loam, and sandy soil types. The soil should be prepared by mixing compost, manure, or other organic matter to improve soil structure and fertility. It is recommended to avoid heavy clay soils as they can cause drainage issues and result in poor plant growth. It is best to plant Allium X Proliferum in a location where it will receive good air circulation and avoid areas prone to flooding or waterlogging.
- Choose a healthy mother plant: To propagate Allium X Proliferum, select a healthy mother plant that is at least two years old and is growing vigorously.
- Prepare the soil: Prepare a well-draining soil mix by mixing equal parts of peat moss, perlite, and sand.
- Cuttings: Gently remove a few stems from the mother plant, making sure they have enough foliage and are not too woody. Cut the stem with a sharp, clean pair of pruners.
- Rooting hormone: Dip the bottom 2 inches of the cutting in rooting hormone powder to enhance rooting.
- Planting the cutting: Make a hole in the soil mix using a pencil or skewer and insert the cutting into the hole. Firm up the soil around the stem to keep it upright.
- Watering: Water the soil thoroughly and place the container in a bright, warm location with indirect sunlight.
- Maintain humidity: Cover the container with a clear plastic bag or a propagation dome to maintain the humidity level and allow the cutting to root.
- Transplant: After 4-6 weeks, check for signs of new growth, which indicates rooting. Once the cutting has rooted, transplant it into a larger container or directly into the garden bed.
Common pests of the garden onion include Thrips, larvae, snails. Make a habit of checking your garden onion frequently for pests so that any infestations can be caught and managed early.


